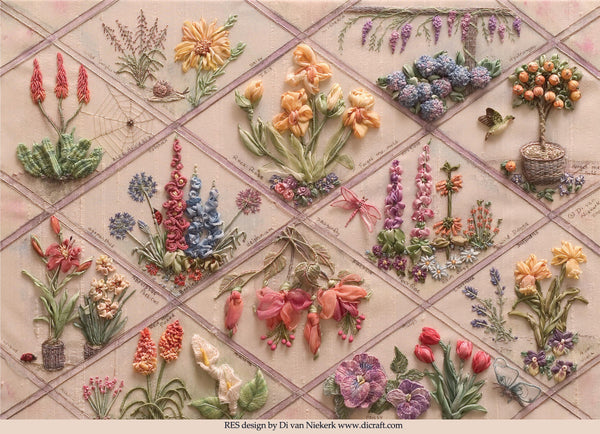
Hi, hello! I promised to show you how to make an orange tree and at the same time, I will show you how to make Forget-Me-Nots or simple daisies. See the RES design below, the second panel on the far right?
.
.
For my
RES book, I show how to make an orange tree in a woven basket and in my New Beginnings design, I show you how to make berries and Erica by covering a bead. See the
New beginnings sampler below and the panel with the pink bird? The berries are made in the same way as the oranges. The pink Erica flowers in the panel on the bottom left are made in the same way. I will show you how.
.
.
Method
You are welcome to download the step-by-step instructions
here for your collection.
.
You will Need
THREADS (Chameleon Threads)
Perlé #8 - Rustic Brick
Stranded Cotton - Autumn Leaves, Moss Green (Bulrush) and Rustic Brick
Silk or Rayon - Tree Bark
RIBBON (Di van Niekerk's ribbons)
2mm Silk Ribbon - 86 Coppershine
2mm Silk Ribbon - 51 Citrus
4mm Silk Ribbon - 23 Moss
.
OTHER
Size 13 to 15 necklace beads with hole
large enough for no 22 Chenille
needle to passthrough
+ Small piece toy stuffing or batting
+ #24 White wire
+ #28 White wire
+ 20 x 20cm white fabric
+ Sharp HB or 2B pencil
+ 6" embroidery hoop
+ Small bird & clear glue (optional)
+ Needles: Chenille size 18, 20, 22 and Crewel/Embroidery size 8
.
STITCHES
Click on the name of each stitch to be taken to the technique/diagram
Make the Basket
NOTE: See the stitches list above and tap on the name to be taken to the techniques.
.
1. Trace all the detail of the basket on the right onto the centre of the white fabric with a sharp pencil. Insert the end of a length of #28 wire to the back at A. Couch in place with 1 strand of Tree Bark silk or rayon, every ½ cm, along top edge of basket, to form a perfect oval for the rim of the basket. Overcast the wire, taking the thread to the back each time. Keep the stitches neat and slanted for a basket-like effect.

2. Work Woven Filling Stitch with the perlé Rustic Brick. First make long Straight Stitches to form the vertical lines, pulling the stitches taut. Then using the same thread, work small Stem Stitches on the outer edge of the basket to form the 'U' shape. Weave thread over and under the vertical stitches so a woven basket is formed. Pack the stitches closely together and alternate the weave with each row so you are working over where you were under the stitch in the previous row. Stitch over the Stem Stitch taking the thread to the back and starting on the same side each time.
.

Work the Ground in the Basket
Use 2 strands of Autumn Leaves thread and Seeding Stitch in a circular form to fill the basket. Leave the middle line unstitched as you will be cutting a hole in this area later for the stem.
.
Stitch along the outside of the basket.
Thread up with 2 strands of Autumn Leaves in Crewel needle no 8. Start with a knot at the long end and make tiny Running Stitches 3mm away from the edge of the basket. Do not stitch along the wired outer edge. Leave the thread hanging to use later.

Cut out the basket
Use a sharp pair of embroidery scissors to cut 2mm on the outside of the running stitches. When you reach the wired section, cut along the wired edge as close as you can to the wire (do not leave a seam). Be careful not to cut the stitches or the hanging thread.
Attach the Basket
Pull the hanging thread to fold the seam to the back of the basket. Use the same gathering thread and tiny hem stitches to attach the basket to the background. Couch the wired edge to the background with the same rayon thread.
HINT: the basket will have changed shape as you worked and you will need to use the needle and the thread to position it in place, pulling the basket into shape as you stitch.
.
Fill the Basket
With a tiny piece of toy stuffing or shredded batting, fill until a nice rounded shape is formed. Be careful not to over or under stuff. Close the bottom edge with tiny hem stitches.
.
 Make the Tree Trunk
Use the #24 wire to make the trunk. Cut 4 lengths 8cm long. Twist them over each other, leaving the top parts free to form separate branches later. Cut a slit into the centre of the seeded part of the basket. Be careful not to cut the stitches. Insert the twisted end of the trunk into the basket and secure this end with Overcast Stitch in 2 strands of Autumn Leaves thread.
.
Thread needle with a 70cm length of thread (2 strands) and wind the thread tightly around the twisted section. When you need to change the thread, insert the needle between the previous stitches and end off. Anchor the new thread at the back of the wired trunk.
As you reach the section where the trunk starts branching into 4 stems, continue winding onto one branch at a time, starting and ending so that the stitches are at the back part of the branch. Wind up to outer oranges on the design, secure thread into last few wraps and leave the thread hanging at the end of each branch to secure later. Trim excess wire and attach end of each branch with overcast stitches at each tip. The trunk is now free from the fabric and only attached at the basket and the tips of the branches.
Make the ORANGES
 Use either of the orange ribbon and a no 22 Chenille needle. Pass the ribbon through the bead leaving a 4cm tail. Hold the tail as the needle is inserted into the bead each time. Allow the stitches to lie close together, just overlapping. (If you cover the bead too thickly, the hole becomes too small to pass a needle through.) As you make the last stitch, prick the tail to anchor the stitch and cut off, leaving a second 4cm tail. Make 13 or 14 oranges in this way - alternating with both shades of orange ribbon.
Attach the oranges
Insert one tail into a no 18 Chenille needle and place on top of the background fabric. Insert the needle from the front to the back of work. Repeat with other tail, inserting needle 2mm from first tail. Tie off each orange by tying the tails in a tight knot, pulling the orange snugly against the fabric. Cut off excess ribbon.
.
Make the Green Core
Use Moss (Bulrush) thread and a size 8 Crewel needle. Make a neat knot at the long end of the thread. Insert the needle from the top of the orange to the back of the work. Allow the knot to fit snugly into the eye of the bead. Secure at the back. Start with a knot again for next orange.
Make the Leaves and (optional) add a Bird
LEAVES
Use the Moss (Bulrush) silk ribbon and Detached Chain to form the leaves.
Add a few French Knots in between (1 and/or 2 wraps for each knot) the oranges for a fuller texture. Make tiny Detached Chains in the same green ribbon for the orange that has fallen off the tree and the leaves that are lying on the ground. BIRD (Optional) Use a tiny resin or ceramic bird, bee, butterfly or any other flying creature and glue in place with a clear fabric glue.
Make the Stone Floor
Use 1 strand of Rustic Brick and long Straight/Stab Stitches from beginning to end. This ensures a nice straight line.Take the thread to the back pulling it taut and insert it back out the long stitch again about ½ cm down the line. Couch in place by inserting the needle over the thread and back into the same hole again. This ensures the Couching Stitch is invisible. Make a tiny Cross Stitch at each intersection to stabilise the stitches.
Have a look at the
the step-by-step instructions here
to learn how to make the Forget-me-nots.
I hope you enjoyed this tutoroal and that I will see some orange trees in your masterpieces!
Until next time, mooi bly!
Love
Di


Leave a comment