
# Type at least 1 character to search # Hit enter to search or ESC to close
Cart


Hint: Use this technique to add that special touch of a little moth in 3D to make a brooch, to add a delightful touch to clothing, scrapbook pages, curtains, handbags, quilts, cushions...
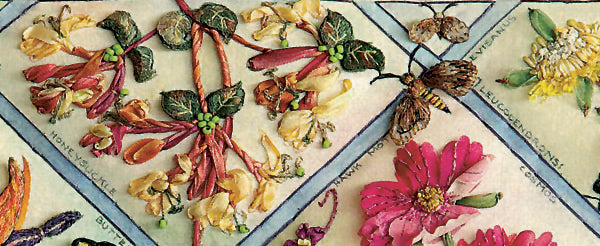
Hawk Moths and Honeysuckle from my Perfect World book
Hello everyone, hope you are having a good day ♫♬♪
Today I will show you a quick and easy way of making life-like stumpwork wings without wire.
For this method you will use iron-on/fusible interfacing (Vilene or similar) and organza ribbon. The organza has a lovely shine that results in a life-like finish.
You will need:
Requirements
· Sharp 2B or 3B pencil or waterproof/pigment ink pen.
· A piece of medium weight iron-on interfacing (Vilene or similar)
· Water-soluble, multi -purpose glue stick such as Pritt ™(or any similar glue stick, white or clear) which the kids use at school for paper projects
· 20 x 20 cm or (8 inch)
· 15 cm or
6 inch embroidery hoop
Threads
Note: Use 1 strand of thread — separate one strand from the six.
Pure silk: egg yolk no. 28, velvet brown no. 111
Stranded cotton: baked earth no. 7
Lagerfeld ink no. 25 or charcoal no. 29
15mm organza: Protea grey no. 124
Note: Use or 25 or 38mm organza in the same shade if you are making larger wings
Use a size 9 or 10 crewel/embroidery needle
Stitches
click on the name to be taken to each stitch diagram.
Back stitch, Running stitch, Stem stitch, Satin stitch, Split stitch, Straight/stab stitch, Blanket stitch
METHOD

Below is an example of four moth wings. These will give you an idea of what your wing shapes could look like. The large wings are 15mm (5/8 inch) long and the small wings are 7mm (¼ inch) long, but do feel free to change the size to suit your own creation. The Vilene shapes are ironed onto the organza ribbon to prevent fraying and to stabilize the wings. Use a soft, sharp 2B or 3B pencil or waterproof/pigment ink pen and trace the shapes as neatly as possible.

1. Trace wing shapes with all the detail on the smooth non- fusible side (not on the shiny or rough side) side of the Vilene.
2. Cut out the Vilene shapes, leaving a small seam. Don’t cut on the pencil line. To prevent fraying, you will only cut along the pencil line once the Vilene has been ironed onto the ribbon.
.

.
3. Place a length of the organza ribbon or fabric on an ironing board and set the iron on a medium setting with the steam off (a dry iron is essential) and position a Vilene wing, pencil side up (shiny or rough side down) on top of the ribbon. Press each wing onto the ribbon so the heat bonds it well. Be careful not to scorch the ribbon. Check that the shapes are attached to the ribbon and that the shapes do not lift at the edges.
4. Cut out each shape along the pencil line as neatly as possible with small, sharp embroidery scissors.

5. Insert the water-soluble fabric in a 15cm (6 inch) hoop. Place the wing shapes, pencil side down (right side up) on the water-soluble layer. Leave a 1 cm (3/8 inch) space between each shape. Use a water-soluble multipurpose glue stick (similar to the ones used at school) and lightly glue the shapes to the water-soluble fabric.
Hint: if too much glue is used, it dissolves the water-soluble fabric. Simply lift the shape and place elsewhere on the fabric.

1. Thread up with the brown Baked-Earth thread. Start at the narrowed base with a knot.
Hint: start with a knot at the long end, but ensure the knot is never along the edge of the shape. Always start a short distance inside the wing and make a running stitch to reach the outer edge again. This way the knot is not visible when the shape is attached to the design.
2. Use a blanket stitch along the edge.
End off with a few back stitches on the base at the sharp point of the wing. Do the same for all the wings.

3. Fill in the wings with the same thread and straight stitch. Hint: Leave small patches of the organza uncovered for an authentic finish.
4. Change to the black thread and form a row of blanket stitches about 2mm inside the rounded edge of the large wings to complete the shape as shown above.

.
1. Cut out the shapes leaving a small seam. Place shapes in a bowl of water for one minute. Remove and allow the shapes to dry on a towel or dishcloth.
Hint: by leaving the shapes in the water only for a minute, the shapes are sticky and have more body. Once the shapes are dry the wings are bent and retain their shape. Every now and then, while they are drying, move the wings so they don’t stick to the towel or dishcloth.
.
1. Use the black thread and outline the head in tiny
2. Embroider the antennae in stem stitch and the black stripes on the abdomen in straight stitch and satin stitch.
3. Change to the velvet brown thread and fill in the head and thorax in satin stitch. The brown stripes on the abdomen are straight stitch.
.

Use the same brown thread and tiny stab stitches along the base of the wings to attach alongside the body. Add a few tiny stitches along the sides to stabilize, allowing the rounded outer edges to be free.
Do the same for the small moth.
.

You are welcome to download the PDF instructions from my Perfect World book for your collection
 Part 1 here
,

Part 2 here
Did you know?
Hawk Moth: Family Sphingidae Order Lepidoptera
Moths are closely related to butterflies. Hawk moths, active at night, are among the fastest and most attractive moths, with some species flying over 45km (28 miles) per hour. There are around 900 hawk moth species worldwide, mostly feeding on nectar. Their large forewings, prominent heads, and eyes distinguish them. The bee hawk moth mimics bumblebees with its yellow-black body and transparent wings, deterring predators.
Enjoy your weekend ♥
Love
Di
Get regular newsletters packed with tips, specials and new products!
Copyright © DI VAN NIEKERK. ALL RIGHTS RESERVED.
Added to cart successfully!

Elizabeth Libbey
Thank you for sharing this.