Welcome to my Blog. This a place to share and learn all things embroidery. Here I post inspirational stories and free lessons in the form of tutorials and guides. I also share tips, tricks and teach stitches and techniques.
You will also find free patterns and designs for you to unlock your creativity. It is a great place for any creative looking to learn or find inspiration in this art form.
To stay in the loop with Dicraft you can subscribe to my newsletter and stay in touch on Instagram and Facebook.
Good Morning! I have something really cute to show you just in time for Christmas. Embroidered by Kwok Wing Sum (Happy) who lives in Tsuen Wan, Hong Kong. Kwok Wing Sum wrote to me, and to everyone who will be celebrating Christmas tomorrow: “Hello everybody, I embroidered this hedgehog ^^ Merry Christmas ^^ I wish you merry Christmas ^^ and happy New Year^^” ….. and this is what...
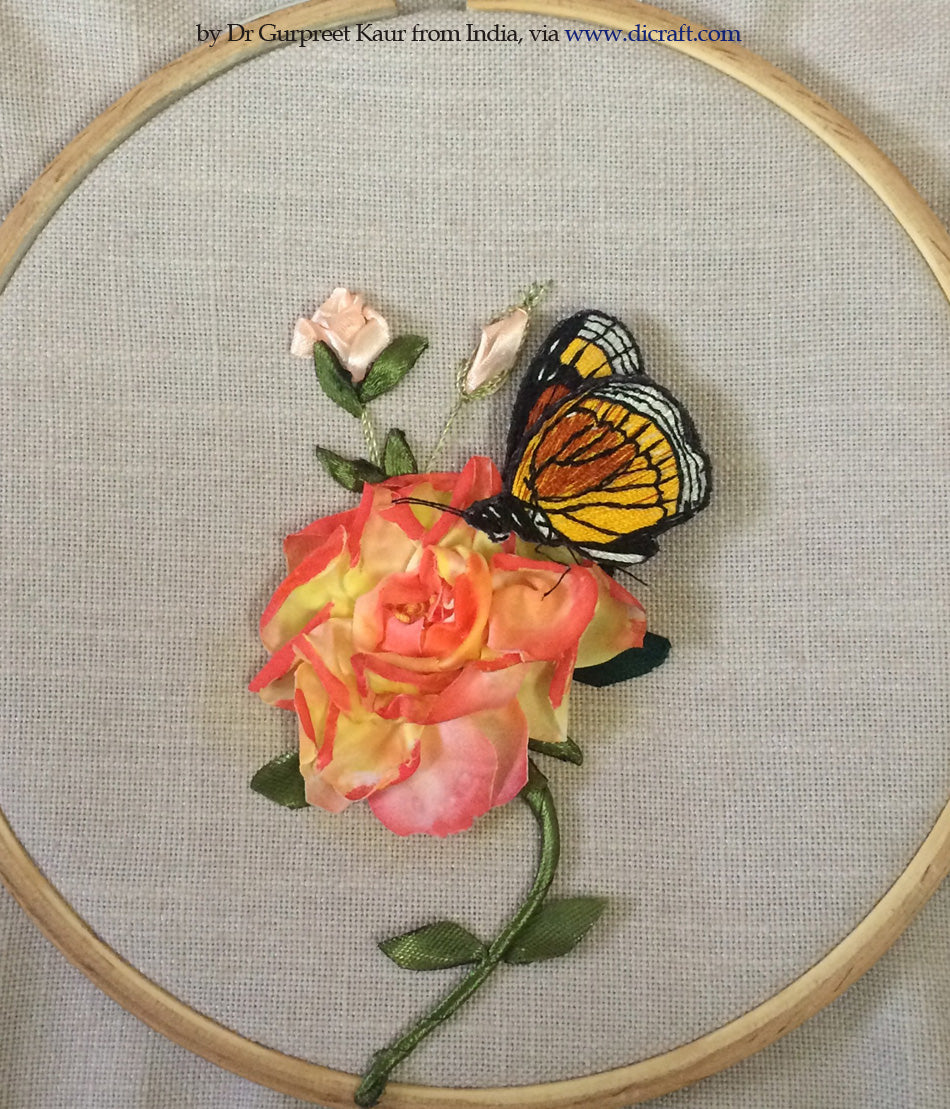
Hello everybody, I have two beautiful roses to help brighten up your weekend! I recently received this mail from India: “Hello Di Inspired by your Roses book, this is what I made. Just wanted to share with you. Love Dr Gurpreet Kaur. India.” Click on the images to enlarge So I asked Dr Gurpreet to tell me more about herself and this was...
Hello stitching world ♬❤♬❤♬ I thought you would enjoy seeing this gorgeous piece Claudia ordered the kit from us, titled JK4 Wild Orchids, Violets, Roses, Blue Salvia…. and this is what she made! Don’t you think it’s fabulous? I just love the frame! Click on the image to enlarge So I asked her to tell me more about herself and this is what...
Good morning everybody :-) Today I have something really special to brighten up your day and hopefully your week too..... exquisite masterpieces by Ludmila from Chisinau in Moldova. Click on the image to enlarge Don’t you just love her roses?? This is what her daughter, Adriana, wrote to me about her mum … “Her name is Ludmila. She lives in Chisinau,...
Roses, Fuchsias, Hydrangeas and Jasmine in silk ribbon Hello stitching world! I hope that you are creating beautiful things with your embroidery! I am sorry I have not blogged as often as I could have in the last two months. Things have been rather rough this side of the world. Renn has had an operation on her neck and it is going to take some time for...
Hello everybody ^•^ Hope you had a lovely week…. I have something lovely to help brighten up your weekend. Embroidered by Kwok Wing Sum (Happy) who lives in Tsuen Wan, Hong Kong.... Click on the image to enlarge Close up detail…click on the images to enlarge More detail... Kwok Wing Sum works...
Hello! I hope you are well and happy, wherever you are in this world. Do you live in Johannesburg or will you be travelling to Johannesburg in October? Then I have good news for you.... My friend Trish Burr will be teaching there! Don’t miss out on this wonderful opportunity…. Click on the images to enlarge Nuthatch in Spring Needle-Painting project ...
Hello Stitching World! I hope you are well and happy. I have something gorgeous to show you today - a lovely felt and silk ribbon Hussif or handy-hold-all. Jenny sent me some photos of her lovely piece and this is what she wrote: "Finished this last night or should I say early this morning..... Did ever so enjoyed the doing of it!Thank youJenny" So I asked...
Hello Stitching World ◕‿◕ Today I have a lovely piece to show you .... Jacqui O'Connell JK3 Roses, Fuchsias, hydrangeas & Jasmine that will surely inspire you today. Click on the image to enlarge Jacqui is a very talented teacher and stockist from her studio: Ribbon Room in Randburg, Johannesburg and she kindly wrote a list of what she used to create this lovely...
Hello Stitching World. It’s nearly Friday, thank goodness, and I am not sure what happens to the week — it seems to be a blur these days. I have some news to share with you from Bryna Black, the Marketing Manager for the Royal School of Needlework (RSN) at Hampton Court Palace in Surrey, UK. Hampton Court Palace is a very special place (with exceptionally beautiful gardens) ... ...