
# Type at least 1 character to search # Hit enter to search or ESC to close
Cart


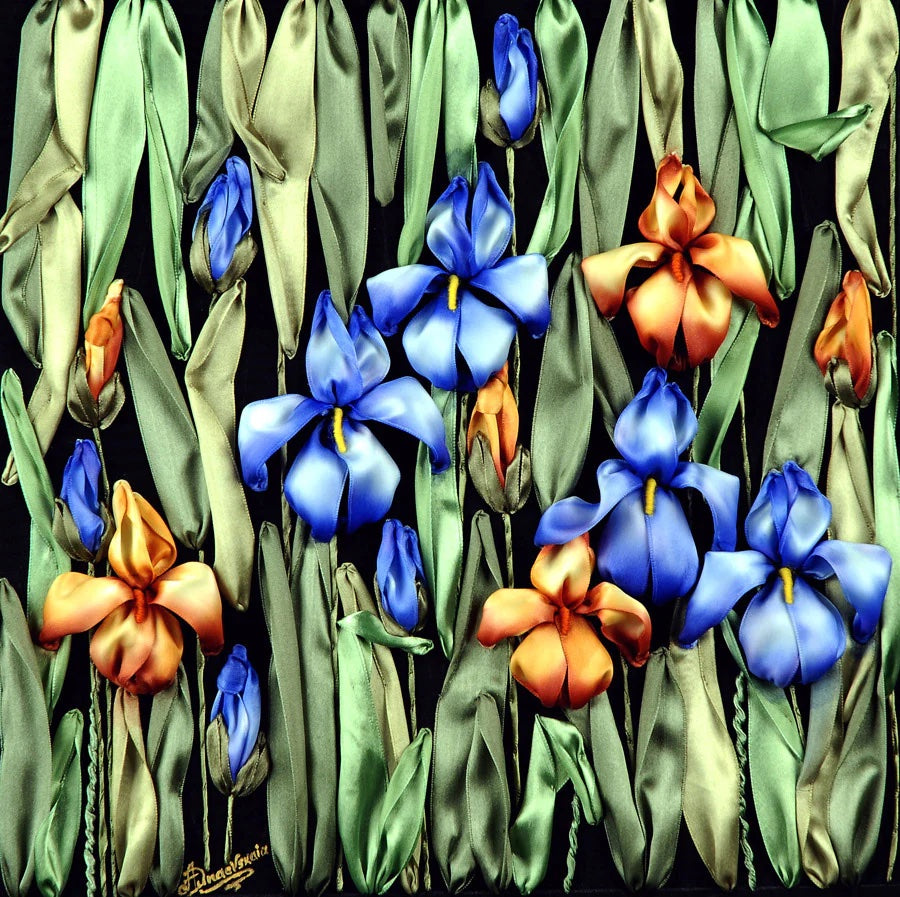
Hello everyone … today I thought I would show you how to make Irises. These are beautiful Irises by Anna Dunaevskaya.
.
 .
.
... and this is a short tutorial on how to make one of the most popular flowers for ribbon embroidery!
I also wrote some notes for you on a black and white diagram of Anna’s beautiful design. This should help you to see how she made her Irises …
.
 .
.
There are many ways to make Irises. Anna used mainly ribbon stitch for her magnificent irises and she used a very gentle tension when she pulled the ribbon through to the back. For the bottom part of the Iris she used detached chain stitch
I will show you how.
.
 .
.
Make the thin stems of the Irises first.Use a twisted straight stitch or couch the ribbon after twirling it to form a cylindrical shape. With a matching thread and tiny straight/stab stitches, secure the twirled ribbon onto the design, spacing the stitches quite far apart and only where necessary. Make the upright leaves in straight stitch and twisted straight stitch.
.
Use a matching thread and tiny stitches on the edge of the ribbon to shape the leaves where necessary. Use folded straight stitch for the bent leaves.
Make the buds in ribbon stitch or use a detached chain stitch as before.
Anna used ribbon stitch to make some petals of her Irises in loose/puffed ribbon stitch is the technique to use for beautiful raised effect: Work with a gentle tension and stitch over a spare tapestry needle or similar object. Carefully pull the ribbon to the back and stop pulling before the petal flattens out. This way the petals are raised off the surface of the design.
.
Anna also used a detached chain stitch for the bottom part of her Irises, but you could use the same ribbon stitch as above if you like.
.
Here are other examples where I have used the same stitches for Irises...
.
My Floral Vista design.
 .
.
You could also use a detached chain and ribbon stitch combination like I did for the yellow Irises in my Floral Vista design
First make a detached chain stitch (Lazy daisy), taking the needle to the back as usual. Come up to the right of this stitch as shown in the diagram below. Insert the needle under the chain and take the needle to the back as shown in the diagram below.
Note: Use a blunt tapestry needle or a sharp chenille needle. If using a sharp needle, insert the blunt end under the chain as shown in the diagram.
.
 .
.
Add ribbon stitches to form more petals or to make them wider. Here is a video of me making different Irises...
.

Finally, Anna added the yellow and orange Iris beards in the centre. Use a bullion knot or a whipped straight stitch. I hope you enjoyed this little tutorial :) I will add more tutorials for you in the coming weeks.
Have a lovely day everyone and thank you again Anna, for your magnificent Irises!
Love
Di ♥
Get regular newsletters packed with tips, specials and new products!
Copyright © DI VAN NIEKERK. ALL RIGHTS RESERVED.
Added to cart successfully!

Leave a comment