
# Type at least 1 character to search # Hit enter to search or ESC to close
Cart


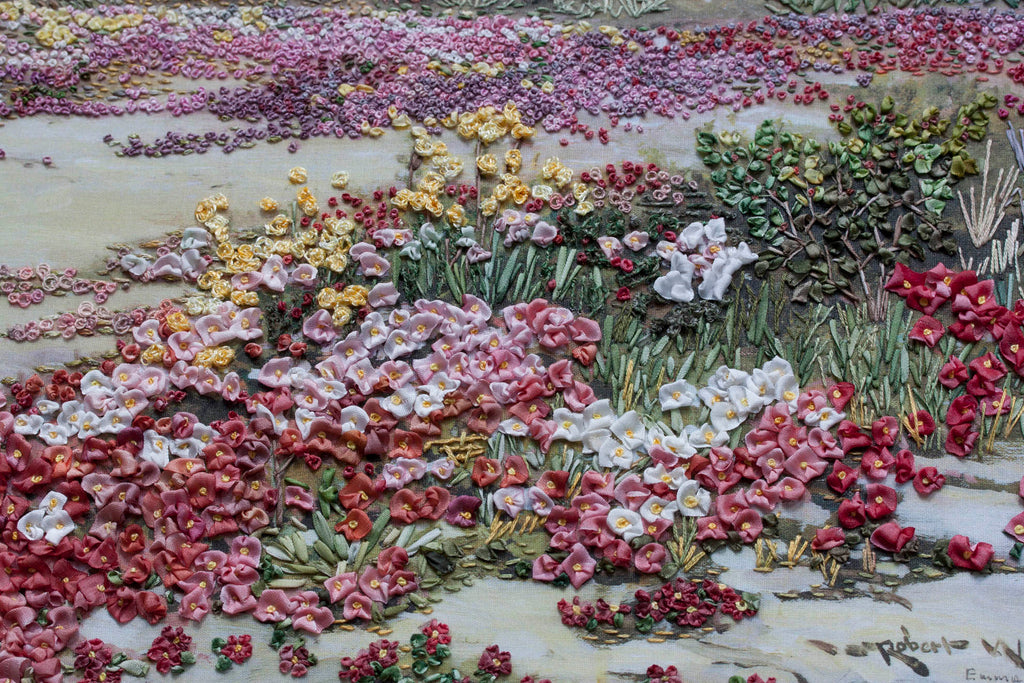
Here in the scene, you will see that simple stitches were used to build the texture, simple stitches in varying thickness of thread and ribbon. The detail in the far background is embroidered first and note how these stitches are much smaller than the ones in the foreground.
Note: use one strand of thread unless suggested otherwise.
.
.
Outline the edge of the hill in stem stitch. Use a plum colour for the darker pink shadows and a grey for the grey shadows, pale yellow for the light shadows.
Use one or two strands of thread and seeding stitch (see diagram below) to fill in the plum, grey, cream, and soft brown grass-like texture on the hill. Make tiny stitches about 2 to 3mm ((1/8 inch) in length and scatter them in all directions as shown in the colour picture.


The carpet of flowers in the middle distance (beneath the green and brown bushes) is formed with various shades of pink, orange, plum and old-gold thread and two, three or four-wrap French knots. Use one or two strands of thread. The larger flowers are made in silk ribbon:
Use 2mm silk in varying shades of yellow, pink, plum white and make French knots to form the larger flowers. Alternatively, use a loose/puffed ribbon stitch, working over a spare tapestry needle to form shapes that are raised off the surface of the design.

Form the large white, red, coral and watermelon-coloured flowers in the foreground with 7mm silk ribbon in white, red, honeysuckle and watermelon. Refer to the colour picture above as a guide. Form some flowers in loop stitch with a French knot centre. Work over a spare tapestry needle and use golden yellow thread for the French knot (one strand and two or three wraps). Make other flowers in loose/puffed ribbon stitch. Push the ribbon up to form a loop before piercing the ribbon to form the ribbon stitch. Add a golden yellow French knot in the centre, as you did before.
 .
.
Use the red silk ribbon and ribbon stitch to form the red daisies in the front. Work over a spare needle to form raised petals. Add a two-wrap yellow French knot in the centre. Form the leaves in green ribbon and ribbon stitch.
I do hope that you enjoyed making your masterpiece. May it bring you many years of joy!
Love
Di
♥
Get regular newsletters packed with tips, specials and new products!
Copyright © DI VAN NIEKERK. ALL RIGHTS RESERVED.
Added to cart successfully!

Cheryl
So beautiful!