
# Type at least 1 character to search # Hit enter to search or ESC to close
Cart


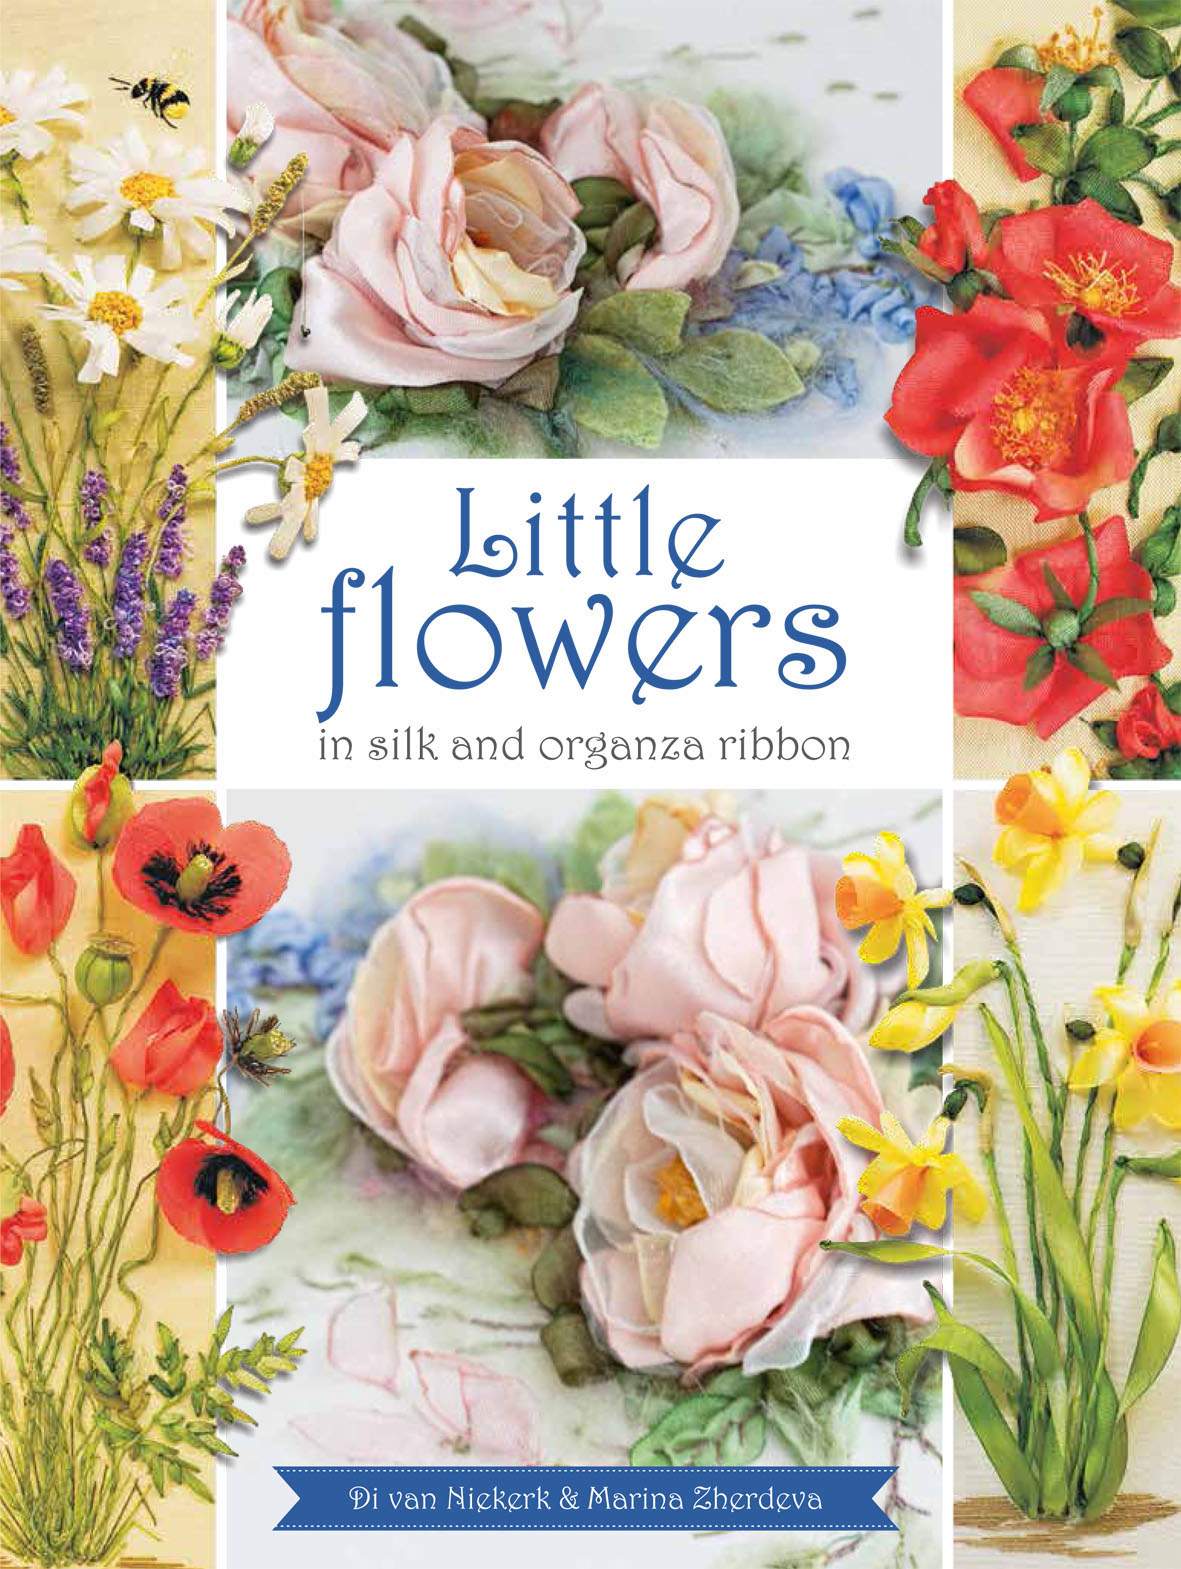
 From our book: Little Flowers in Silk and Organza by Di van Niekerk and Marina Zherdeva.
We hope that this tutorial will inspire you to make beautiful Chamomiles and Daisies for all sorts of projects in the future.
Enjoy!
___________________________________________________________________________
Three-dimensional flowers are almost life-like and such fun to make!
Chamomiles, Daisies, Poppies and Poppy Seeds have been used successfully in the Little Flowers book and for this tutorial, Marina and I will show you how to make 3D Chamomiles shown on page 31 in the book.
From our book: Little Flowers in Silk and Organza by Di van Niekerk and Marina Zherdeva.
We hope that this tutorial will inspire you to make beautiful Chamomiles and Daisies for all sorts of projects in the future.
Enjoy!
___________________________________________________________________________
Three-dimensional flowers are almost life-like and such fun to make!
Chamomiles, Daisies, Poppies and Poppy Seeds have been used successfully in the Little Flowers book and for this tutorial, Marina and I will show you how to make 3D Chamomiles shown on page 31 in the book.

 Place the 32 mm ribbon no. 132 in a 10 or 15 cm (4 or 6 inch) hoop.
Use a water-soluble pen to draw a circle as shown opposite. The inner circle has a diameter of 10 mm (just over 3/8 inch) and the outer, larger circle is 24 mm (almost an inch)
With 2 mm ribbon no. 95: fill the small circle with French knots, wrapping the ribbon once around the needle.
Make two layers of French knots, working on top and between the spaces of the previous knots to add volume.
Place the 32 mm ribbon no. 132 in a 10 or 15 cm (4 or 6 inch) hoop.
Use a water-soluble pen to draw a circle as shown opposite. The inner circle has a diameter of 10 mm (just over 3/8 inch) and the outer, larger circle is 24 mm (almost an inch)
With 2 mm ribbon no. 95: fill the small circle with French knots, wrapping the ribbon once around the needle.
Make two layers of French knots, working on top and between the spaces of the previous knots to add volume.
 To gather the daisy a little later, use one strand of green thread to make short running stitches on the outer circle as shown.
Hint: Stitch two semicircles instead of one circle and leave long tails of thread to easily gather them when completing the flower.
To gather the daisy a little later, use one strand of green thread to make short running stitches on the outer circle as shown.
Hint: Stitch two semicircles instead of one circle and leave long tails of thread to easily gather them when completing the flower.
 Make the white petals: embroider loop stitches with 4 mm ribbon no. 103

 Repeat for the next Chamomile or Daisy, making the petals as you did before with no. 103 (4mm) silk ribbon.
Hint: It is easier to work over a spare needle (or similar object) when you form the loops.
One, two or three loops can be held on the spare needle until you have to move the needle to make the next few loops.
Repeat for the next Chamomile or Daisy, making the petals as you did before with no. 103 (4mm) silk ribbon.
Hint: It is easier to work over a spare needle (or similar object) when you form the loops.
One, two or three loops can be held on the spare needle until you have to move the needle to make the next few loops.
 Outline the edge of the circle with running stitch and the green thread, like you did for the first flower.
Optional: Flatten the loops: use a small amount of fabric glue on the tip of the needle and spread the glue evenly on the inside of the ribbon loop.
Lightly press between your fingertips, aligning the edges up neatly. Let the glue dry.
Hint: While the glue dries, make a stem as described here and on page 26 of the little flowers book.
Outline the edge of the circle with running stitch and the green thread, like you did for the first flower.
Optional: Flatten the loops: use a small amount of fabric glue on the tip of the needle and spread the glue evenly on the inside of the ribbon loop.
Lightly press between your fingertips, aligning the edges up neatly. Let the glue dry.
Hint: While the glue dries, make a stem as described here and on page 26 of the little flowers book.
 Cut the embroidered flower out of the ribbon, adding a 5-6 mm (almost ¼ inch) seam on the outside of the large circle.
Pull the thread tails, gathering the edges to make a kind of pouch; fill it with a small piece of toy filling or woolly fibre.
Cut the embroidered flower out of the ribbon, adding a 5-6 mm (almost ¼ inch) seam on the outside of the large circle.
Pull the thread tails, gathering the edges to make a kind of pouch; fill it with a small piece of toy filling or woolly fibre.
 Fold the seam inside the pouch and insert the looped end of the wire stem inside.
Tie the thread tails together tightly. Do not cut the ends, just conceal them.
Fold the seam inside the pouch and insert the looped end of the wire stem inside.
Tie the thread tails together tightly. Do not cut the ends, just conceal them.
 Use one of the thread tails to make several stitches through to tighten the pouch and secure the filling and the wire stem.
Now trim the tails of the thread to complete the daisy.
Use one of the thread tails to make several stitches through to tighten the pouch and secure the filling and the wire stem.
Now trim the tails of the thread to complete the daisy.
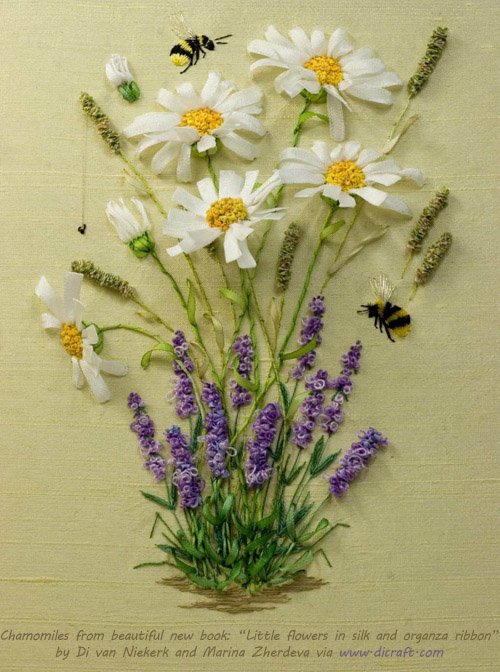
 The dimensional chamomile is ready!
This is the Chamomiles design from the Little Flowers book that Marina Zherdeva teaches you step-by-step.
Shape the stem according to the design and secure the flower with tiny stitches.
Hint: Insert the wire stem under the embroidered elements for a natural effect.
The dimensional chamomile is ready!
This is the Chamomiles design from the Little Flowers book that Marina Zherdeva teaches you step-by-step.
Shape the stem according to the design and secure the flower with tiny stitches.
Hint: Insert the wire stem under the embroidered elements for a natural effect.
 Click on the images to enlarge
 For more information about the book, you are welcome to look here.
Have a good week stitching world and happy stitching!
Love
Di
For more information about the book, you are welcome to look here.
Have a good week stitching world and happy stitching!
Love
Di

Get regular newsletters packed with tips, specials and new products!
Copyright © DI VAN NIEKERK. ALL RIGHTS RESERVED.
Added to cart successfully!

Leave a comment