Good morning everybody, I know that some of you have been waiting anxiously for the final chapter, Chapter 6 and... here it is!  It's a perfect way to learn online. From the beginner to the advanced, everyone will enjoy this lovely project. I am sure! For those seeing this for the first time, you are welcome to follow from Chapter 1 here. I hope you will enjoy making it as much as I did. Apologies for the waiting periods between the Chapters, I wish there were more than one of me to do all that needs to be done! Besides the new book, I have been working on the proposals for the fabulous BATB convention which will be held by Inspirations magazine in Adelaide, Australia in 2020. I think you will like what I made! I'll show you as soon as I can. I am also so excited to be working on new designs for a very special festival to be held in England in 2021 and I will tell you more about this as soon as I can. But back to the online lesson, here we go:
This is Chapter 6, the final chapter of the Pink Delight project, a project that I have been teaching online.
♥ If you like, you can purchase the complete kit for all six chapters here or you can purchase individual packs for the chapters below. It is however easier to purchase the complete kit as you will save on the courier fee.
If you are seeing this for the first time, please see:
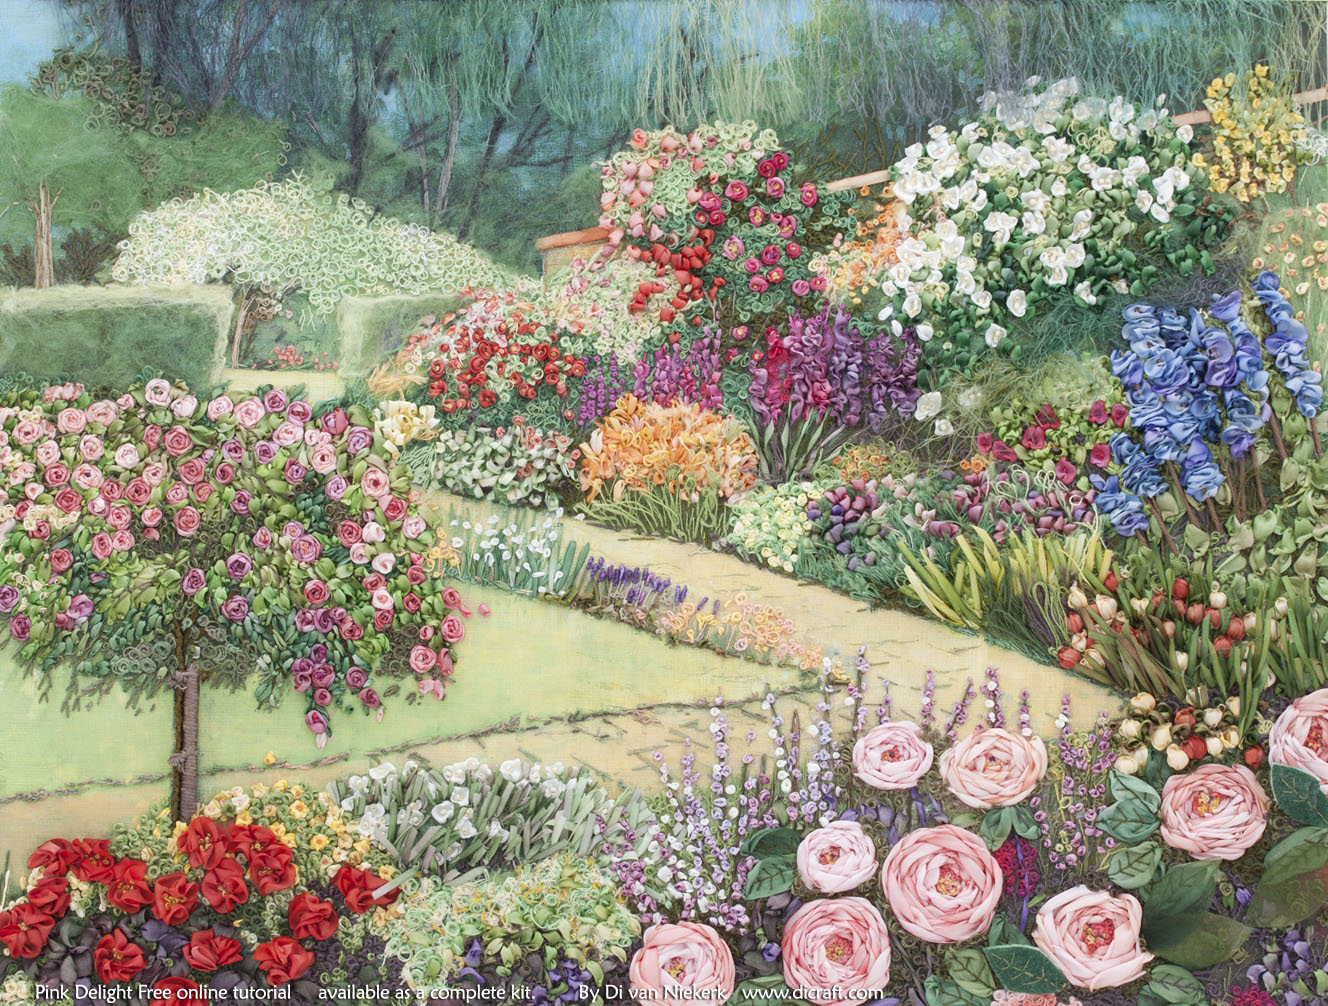
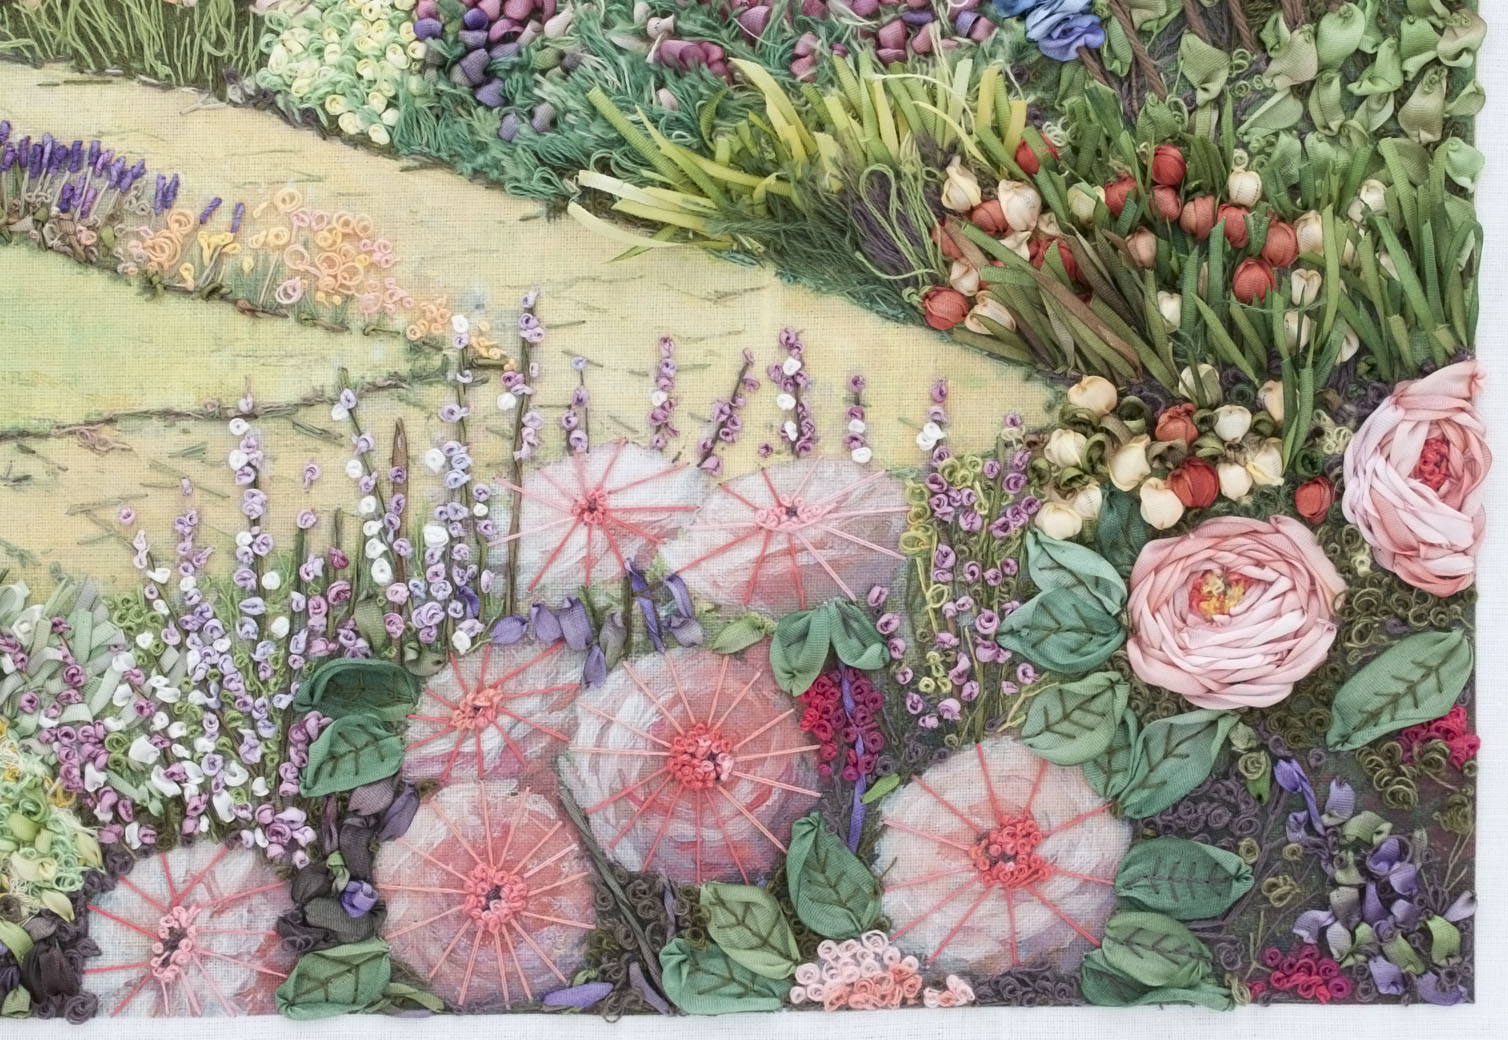
Pink Delight from the Magical Gardens series has turned out to be a beauty – a most enjoyable project.
I hope that those of you who already have the kit for chapters 1, 2, 3, 4 and 5 are enjoying yourselves! I have already added the final step-by-step details of the pink rose bush for the last chapter if you will scroll down to the end of chapter 5.
.

.
Pink delight is a fun, colourful project and if you would like to follow the step-by-step tutorials for this lovely panel, you are welcome to purchase the following:

♥ If you are not sure what you need for this project, please contact us to ask for assistance. Please mention that you would like to make the Pink Delight project that I have taught online.
.
For this final chapter (Chapter 6) I will show you how to make the flowers and roses in the foreground (steps T, U, V, Q, R, S, W) and how to add the finer touches to finish off your masterpiece. Enjoy!
.

1. Complete Section T.
A. The Yellow Roses.
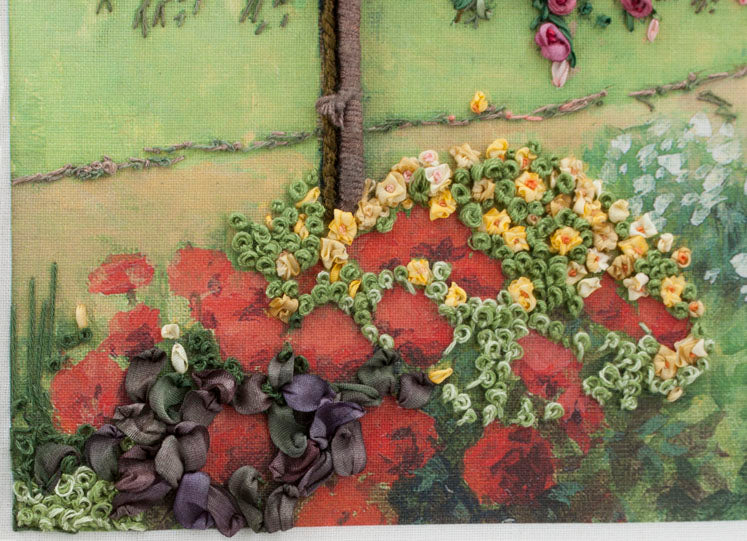
Make the yellow roses using the French Knot Rose method. This is the method that I teach in my RES book, a fabulous teaching tool for all ribbon embroiderers who wish to add some dimension in their work. Thread up with 4mm ribbon number 99 on a size 22 Chenille needle, and as if you were making a French Knot, wrap ribbon once around your needle. See the diagram below. Wrap the ribbon as if you were making a French knot, BUT, instead of taking the needle to the back of your work, point your needle downwards and make small running stitches in the ribbon (5 or 6 running stitches will be good) before inserting your needle to the back of your work and gently pulling it through. This will gather the ribbon to form a cute little rose. Come up to make the next rose and repeat. For larger roses, make more running stitches and for smaller roses, make fewer running stitches in the ribbon. French Knot Rose. Click on the image to enlarge.

 Change to 4mm no. 95 to make brighter yellow roses in between the others. When your ribbon becomes a bit short, a loose/ puffed ribbon stitch for smaller roses is a good choice. You can also make a loop stitch and add a French knot on top (as you did in section J2 in Chapter 5) With 1 or 2 strands of 4100 (Peach) thread, make a French knot (1 or 2 wraps) in the centre of each rose to stabilize the stitch and to form the centre of the rose at the same time. See picture above. For smaller roses, use 2mm no. 146 and make three-wrap French knots and for longer shapes make a straight stitch.
 B. The Green Leaves
Thread up with 2 Strands of 711 and make the green leaves with loosely wrapped French knots, wrapping thread 2 or 3 times around your needle. Pistil Stitch or extended French knots are also a good filler. Remember to fill in the bottom left-hand corner as well. See picture below. Change to 2 strands of 723 green and make the darker green leaves in between, using the same stitch as above. 2. Complete Section U. The Red Roses.
A. Make the Dark Plum Leaves
Thread up with 7mm no. 148 and make loose/puffed ribbon stitches for the leaves. Push the ribbon up slightly before piercing it to take your needle to the back. Use 1 strand of thread 747 green and tiny stab stitches to secure each stitch along the tip and the base. End off at the back and pierce the tails of the ribbon at the back of your work to end off.B. Make the Red Roses.
Use 7mm no. 58 and (optional) iron the ribbon to remove the creases. Cut 10 cm to 12.5 cm (4 or 5") lengths. I made 16 roses for this section.  Form cup-like shapes for the roses. Thread up with 1 strand of 4210 (Fuchsia/Purple) thread and make a knot at the long end. Fold the ribbon in half. Come up along the section where the two raw edges meet and stitch up and then down again to reach where the knot is. Then make small running stitches along the one edge as shown below. Gather ribbon by pulling the thread to form a cup-like shape. Pull thread taut, catch the sewn edge a few times to retain the shape. Secure the rose onto your design. Where a few roses are blending into one shape on the design, use one gathered shape, pulling it and shaping it to form one elongated shape.
 With 1 strand of golden yellow (4075) thread, make several French knots (3 wraps) in the centre of the rose to form the stamens and to shape the flower at the same time. See the picture below.
 C. Make the Green Leaves.
Use 2 strands of 747 thread and first add the lighter green leaves (see below) with French knots (3 wraps), stitching under and in between the roses. The stitches under the roses will help support and hold the shape of the roses. Change to 2 strands of 723 thread and add more knots in between the others. Change to 2 strands of 905 dark plum thread and add the plum coloured leaves as shown in the pictures below.  Hint: For a variegated effect, you can use 1, 2 or 3 strands each of 747 mixed with 723, threaded on the same needle. Use a size 22 chenille needle for this.
D. Add More Plum Coloured Leaves and Stems.
With loose/puffed ribbon stitch, add more plum coloured leaves with 7mm no. 148. Work towards the pink roses on the right-hand side. With the same ribbon, make twisted straight stitches to form the rose stems. You can also use fly stitch in between. Add dark brown/plum shadows between the roses with 2 or 3 strands of 814 and 3-wrap French knots. Make some knots looser than others for an interesting effect. 
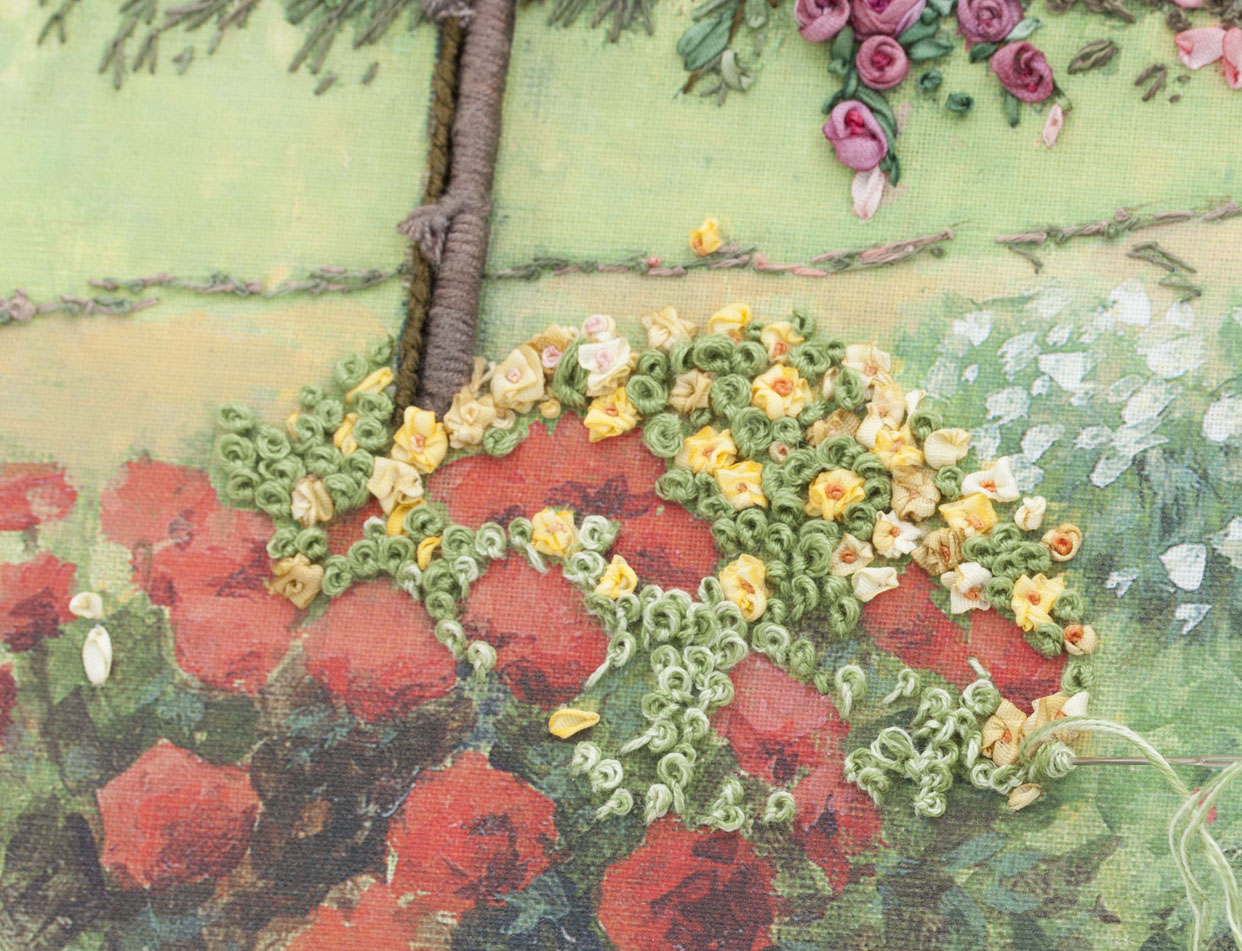
3. Complete Section S. The Pale Yellow Bush.
A. Add the Yellow Texture First.
With the 1 metre of knobbly yellow yarn supplied in your kit and with one strand of 830, twirl and couch/stitch the yarn into position as shown below. There's no need to bring the yarn up from the back of your work, Simply place onto your design and couch. Don't make the texture too heavy, you need the space between the twirls for the green leaves in the next step. 
B. Add the Green Leaves
See the picture below and make the green French knots between the twirls. Use 2 strands of 729 and French knots, wrapping the thread (quite loosely) three times around your needle. 
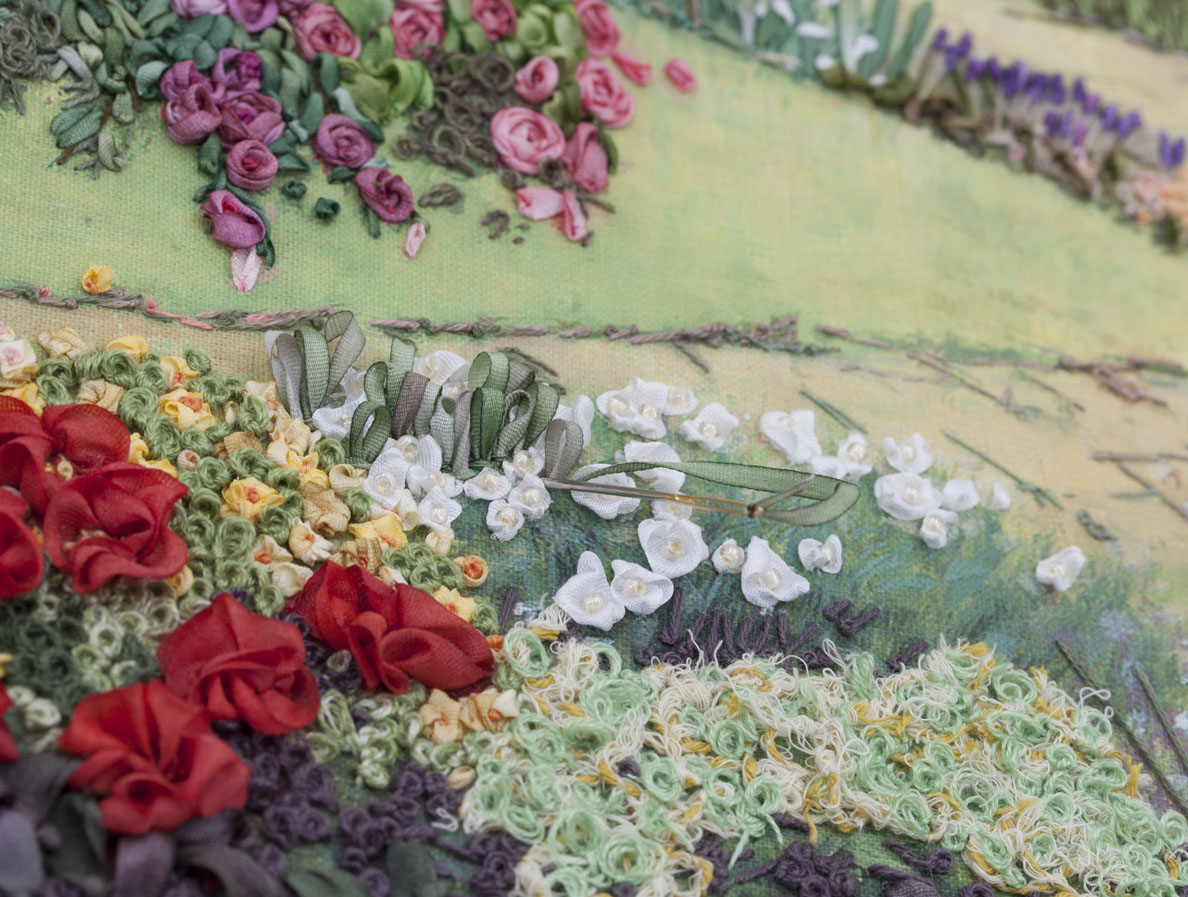
4. Complete Section R. The White Bush.
A. Make the White Flowers.
Refer to the picture above and use the remainder of the 7mm no. 103 white ribbon or the 2mm no. 103. With the 7mm ribbon, make the flowers with loops stitch as you did for the red roses in section J2, Chapter 5. With the 2mm ribbon make loosely wrapped French knots, wrapping ribbon 3 times around your needle. Or you could use the 4mm no. 103 (which you will find in this chapter's kit) and make French knot roses as you did for the yellow roses in section T above. B. Add the Yellow Stamens.
Use the yellow beads from the previous chapter 5 and secure with 1 strand of 112 (yellow) thread. OR with 2 strands of 118 (yellow/gold), make a 2-wrap French knot in the centre. 
C. Make the Leaves.
Make the long, upright leaves with 2mm ribbon no. 142 and use loop stitch as you did in section K in Chapter 5. Start at the top and work between the flowers the loops will be trimmed to size in the next step and the flowers will be visible. Work over a kebab stick or similar object and secure each loop with a stay stitch before making the adjoining one. Hint: Pull the loop in the direction you would like the leaf to be before securing it with the stay stitch. When no. 142 is finished, use the 2mm no. 17 ribbon or use three strands of thread in a similar shade. 
5. Complete Section V. The Purple Leaves
With 4mm no. 100, make loose/puffed ribbon stitches below the yellow bush (T). See the picture above. Add dark shadows between with 2 strands of 905 and then add 814 for the dark green leaves. Use 2 strands of thread and 3-wrap French knots and make some knots looser than others for an interesting effect. Fill in the gaps between the leaves. With 4mm no. 35 or no. 36 ribbon, make loose/puffed ribbon stitches, working above the purple leaves, stitching on top of the yellow and green bush to add more texture. 6. Complete Section W. Pink Roses and the Background
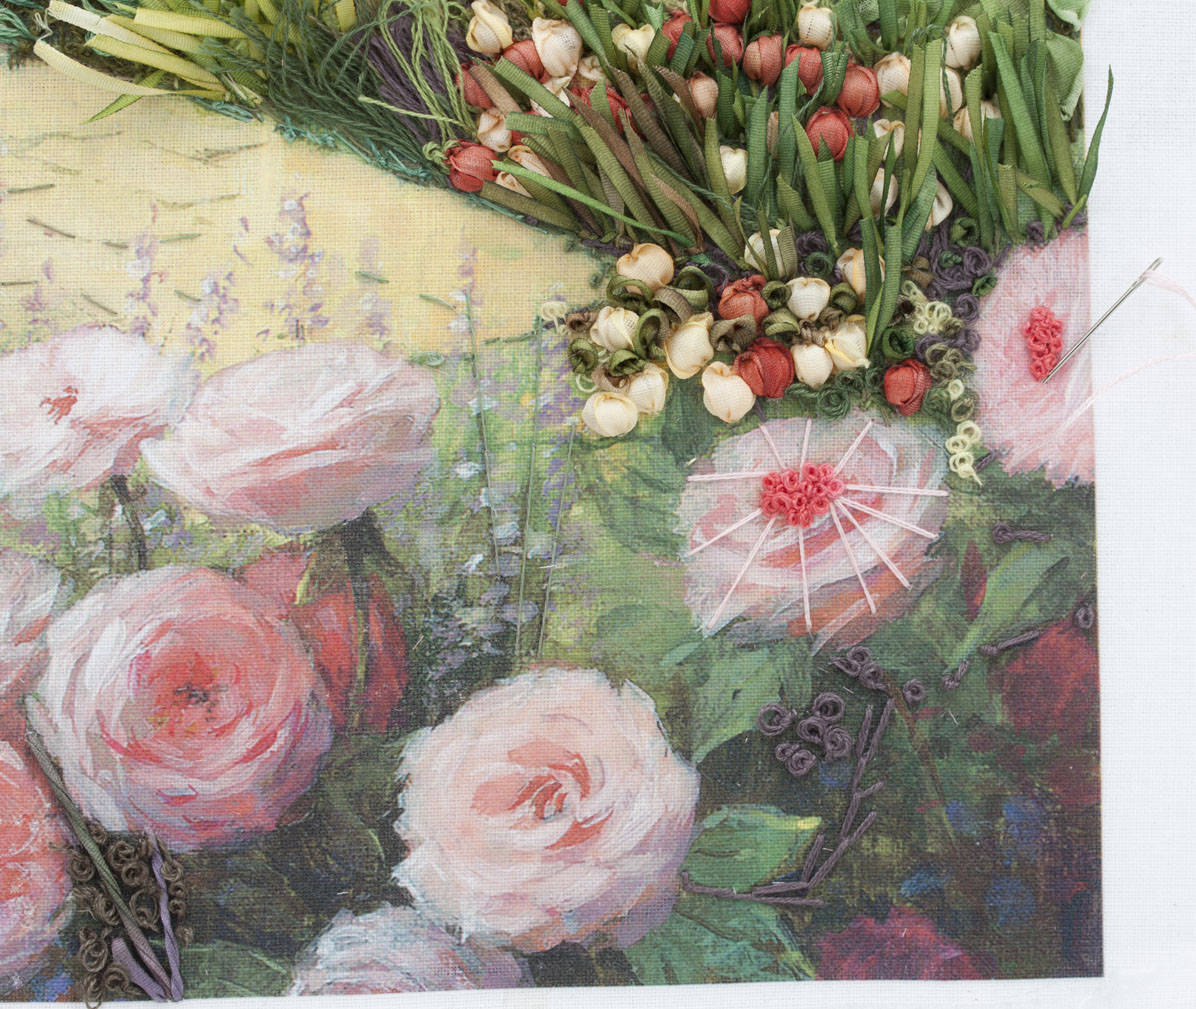
1. Make the Pink Rose Centres and Spokes.
Note: For your convenience, I have numbered the roses for easier reference in the instructions that follow. 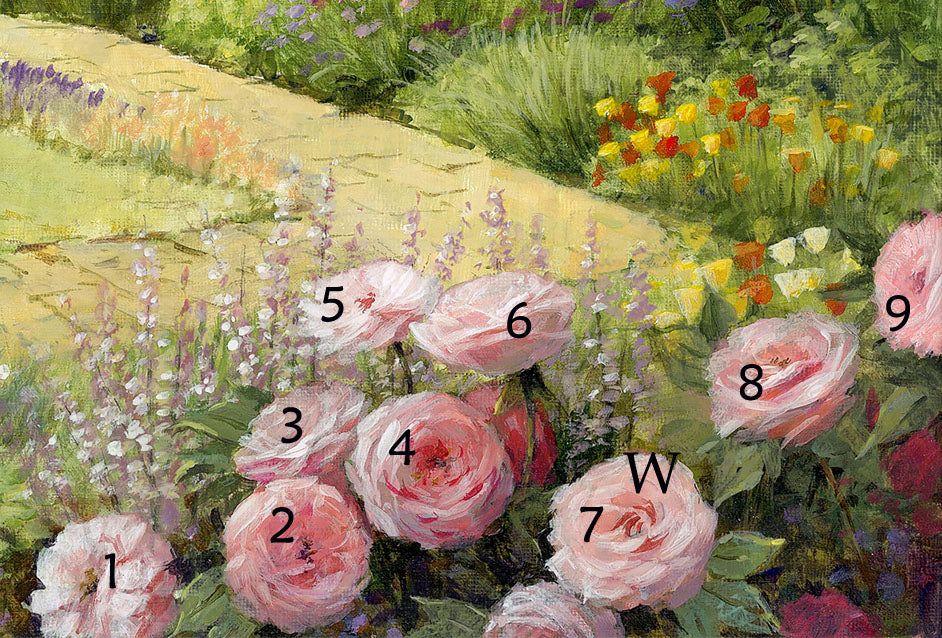 Start with Rose 8 and then 9.
  A. Make the Centre of the Rose. With 2 strands of no. 964 or no. 968 thread, make 3-wrap French knots in the centre as shown above. B. Make the Spokes for the Spider Web Rose. With no. 340 pink thread (2 strands) make spokes for the woven spider web roses. But this time work from the edge of the circle of pink knots and work outwards. Note: There is no need to start in the very centre as you would with the normal spider web rose. Make between 9 and 15 straight stitches to form the spokes, keeping the thread quite taut for a neat finish. See the picture further down this page. C. Add the Dark Dots in the Centre. Change to 823 (1 strand) and add one or three French Knots (2 or 3wraps) working between the pink knots in the centre of the rose.
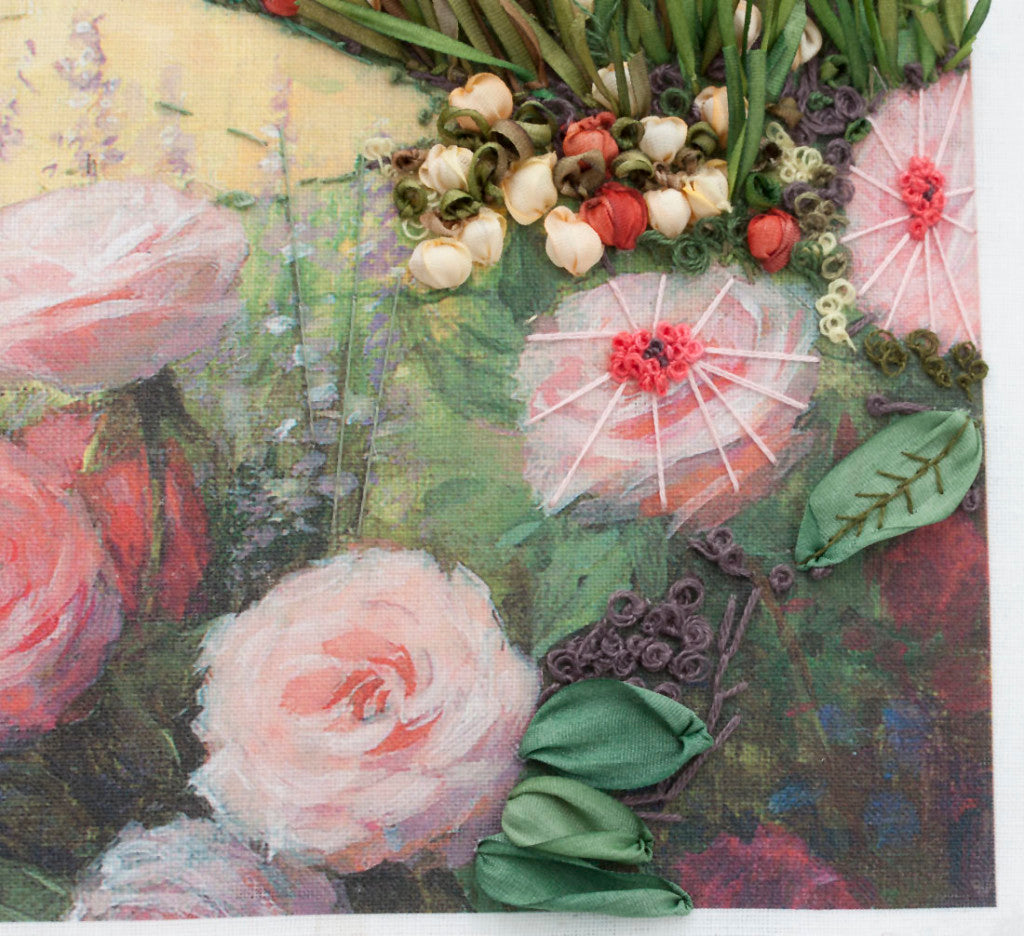
2. Make the Large Green Leaves and Calyxes
Thread up with 13mm no. 126 or no. 24 on a size 16 (large) chenille needle. Make a ribbon stitch for each leaf as shown in the photos above and below. The picture below is to show you where all the large green leaves are on the design. The other flowers and leaves in the picture I will show you a little later in the lesson. With 1 strand of 812 make the veins on the leaves in back and/or straight stitch, shaping and securing the leaf at the same time. For an interesting effect, allow the edges of the leaf to be lifted off from the surface of the design. 
3. Make the Spider Web Roses
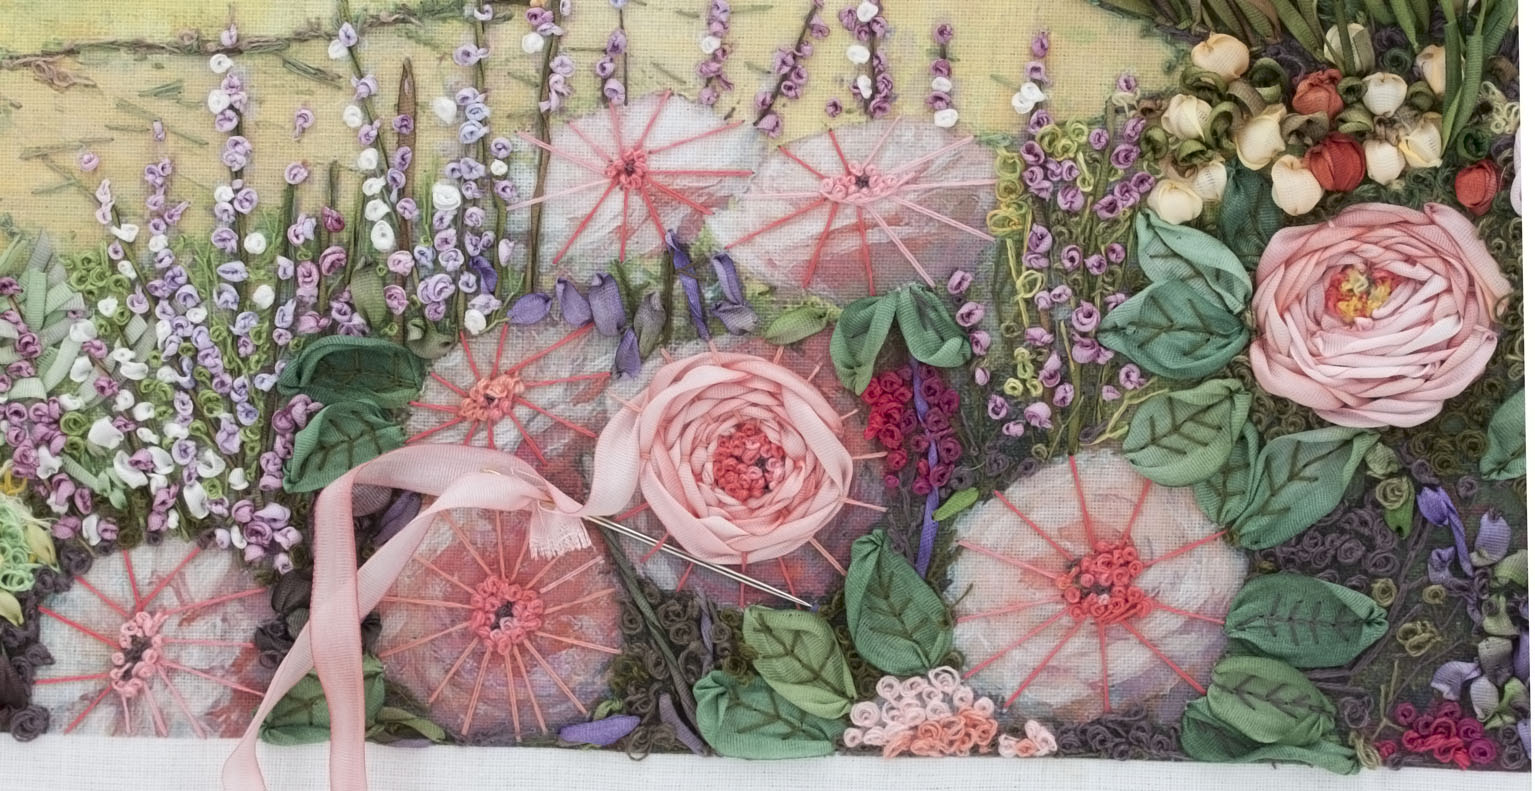
 There are 3 shades of softest salmon pink to choose from 7mm no. 38, 114 and 115. Cut each packet of ribbon into 4 lengths which will be approximately 49 or 50 cm (19 inches) long. Shape with your fingertips or the blunt end of a large needle. When you feel that the rose is large enough, For Roses 9 and 8, I used the no. 38. For the others, you can choose any of the shades above. Come up alongside the circle of pink knots, pin the tail of ribbon out of the way at the back of your work and weave your needle under and over the spokes. Before you start, twist the needle a few times to form twirls in the length of the ribbon and then weave in and out. Work clockwise or anti-clockwise. You can miss every second or third spoke while you stitch for a looser effect. There is no need to work every second spoke as you normally would. Use a gentle, even tension for soft petals. End off and start with a fresh length when the ribbon length becomes too short. Gently push the petals inwards to overlap the others for a softer effect. Add the yellow dots in the centre. Change to 2 strands of 118 or 4075 and make a few yellow stamens in the centre, wrapping thread 2 or 3 times around your needle, working between the pink and dark brown knots.
  When you are happy with the size of the rose, even if it is before the spokes are covered by ribbon, end off and cover any of the pink detail on the fabric (or the spokes that are still showing around the rose) with French knots. Use 2 strands of 812 and make 3 wrap French knots, wrapping thread loosely around your needle for a frilly effect. Work on top of the ribbon in places to hide any spokes that are showing on the outer edge of the design. Do not worry about spokes showing inside the rose itself, these can be covered as shown in the next step. If a rose looks too flat or to cover the spokes, use 4mm no. 114 and make ribbon stitches or stem stitches where you'd like to cover some of the flatter petals. Twist the needle to twirl the ribbon a bit and work between the petals as shown below.
  Repeat the process for all the large pink rose and alternate between the 7mm ribbon no. 114 and 115 once no. 38 is finished.
  Stop when you are happy with the size...
  Add more petals between and on top with 4mm silk no. 114 and use ribbon, straight or stem stitch. Work with a gentle tension for a soft finish.
  Make all the pink roses and add yellow dots in the centres as you did above. Use 2 strands of 118 or 4075 and make a few yellow stamens in the centre, wrapping thread 2 or 3 times around your needle, working between the pink and dark brown knots.
 Similarly, make all the roses
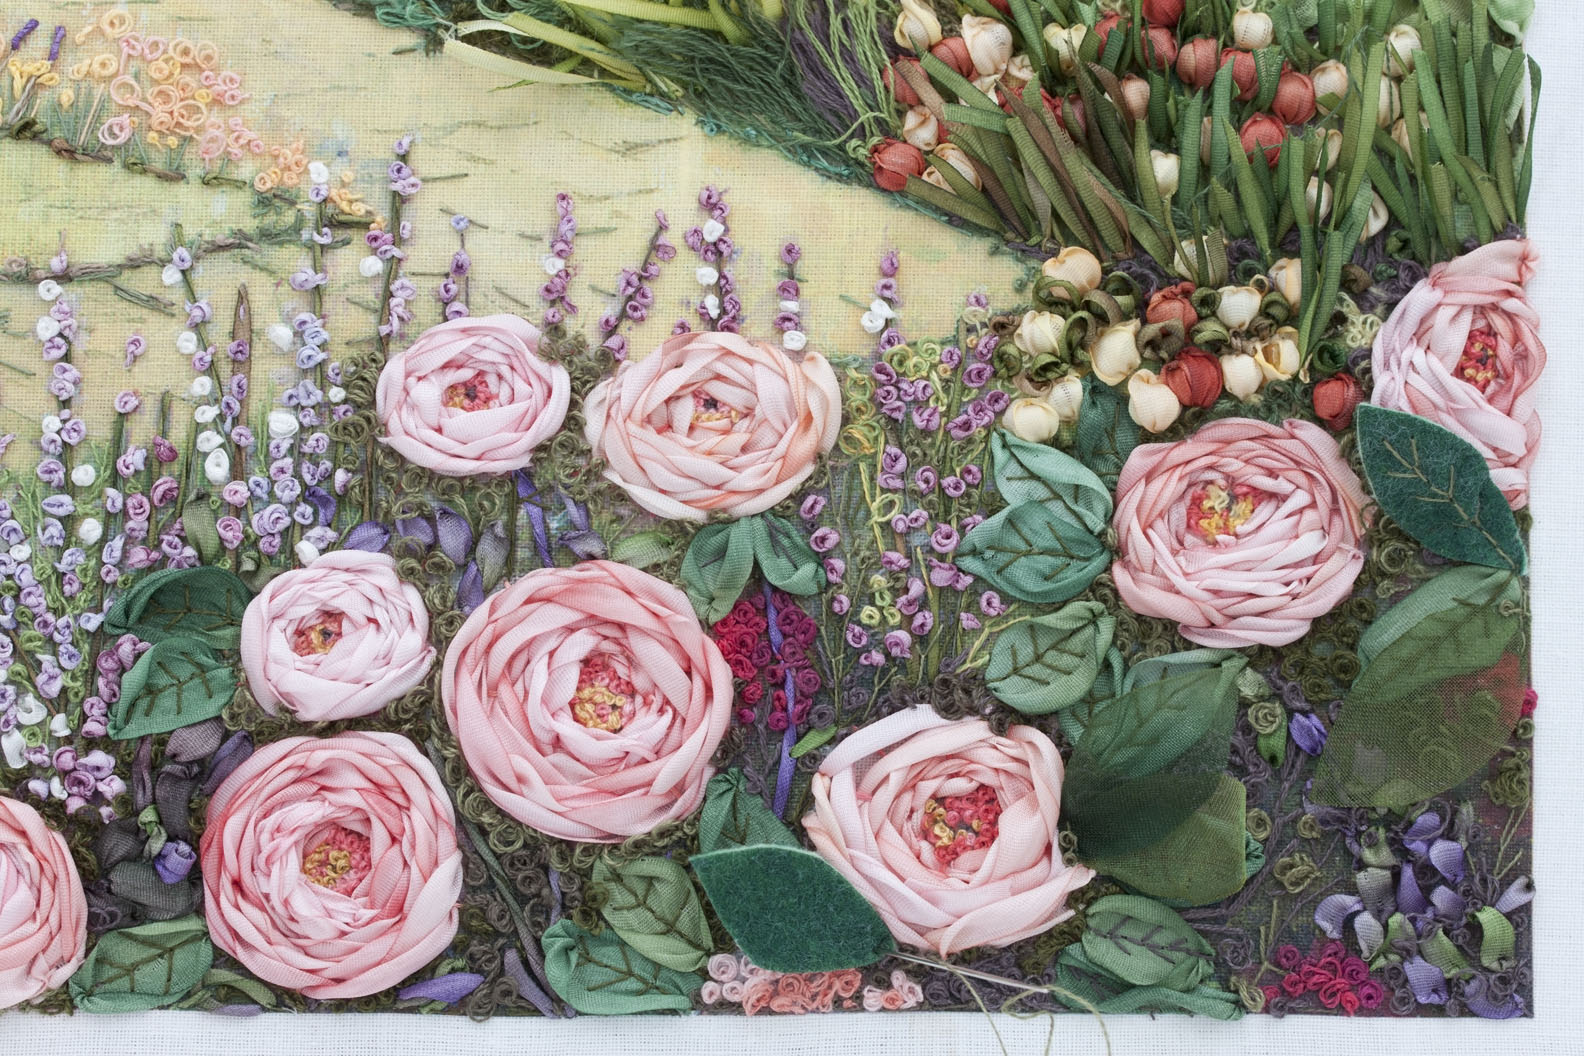
...  Here is a picture of all the pink roses...
4. Fill in the Background Detail
Make the purple and green leaves in the right-hand corner with 4mm no. 100 and loose/puffed ribbon stitches. Work between the purple/green leaves with dark plum 905 thread (1 strand) and make loosely wrapped French knots, wrapping thread 3 times around your needle. Make a few fly stitches, straight stitches for the straight twigs or use feather stitch. Use 1 strand of 812 thread and 1 strand of 806 thread on the same needle, fill in more background shadows with 3-wrap French knots. Make the fuchsia/plum pink roses in the background with 2 strands of 4210 and 3-wrap French knots. See picture above and below. Make the salmon pink rose in the background (beneath rose 7) in the same way with French knots, using 340 pink thread. See picture above. Change to 814 and make French knots to complete this section with 2 strands, 2 or 3 wraps around your needle. 
7. Complete Section Q. The Long, Upright Flowers
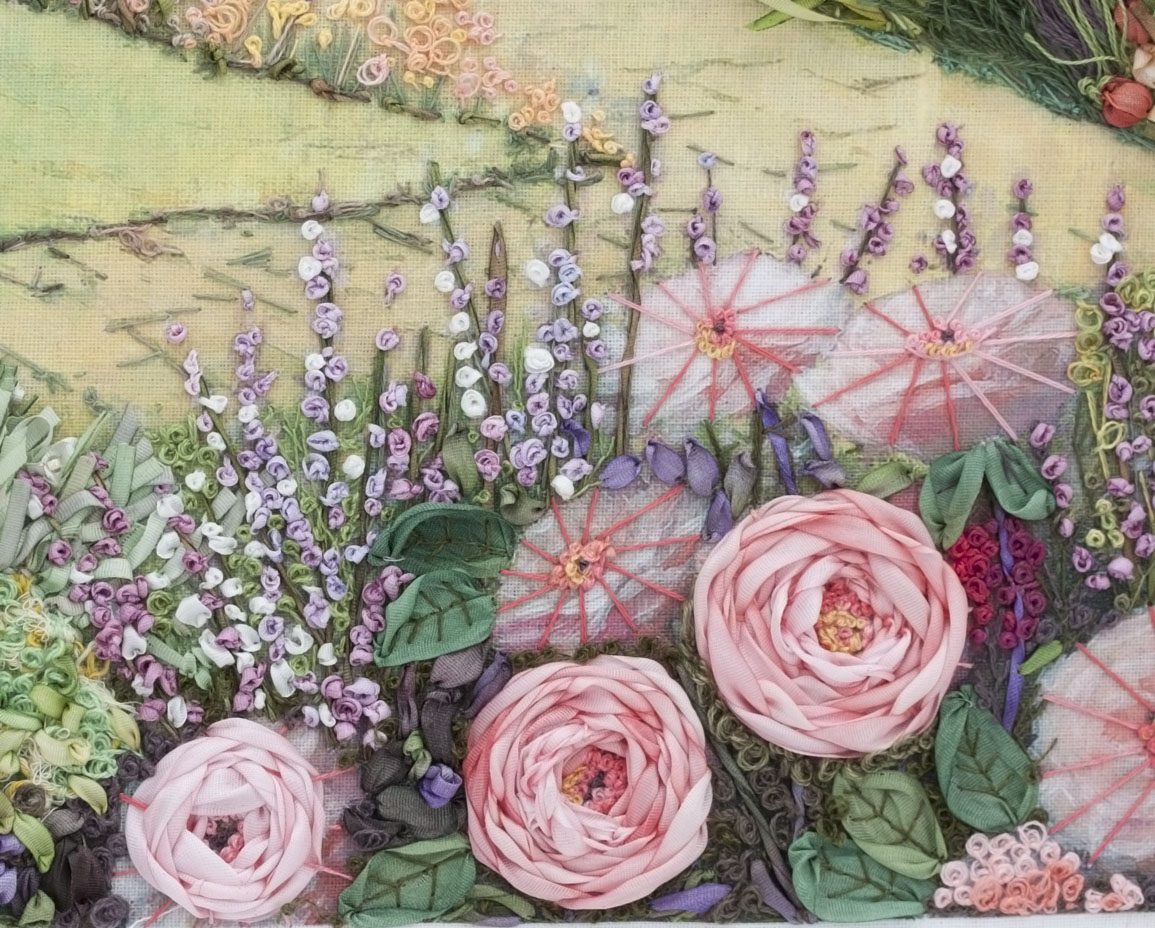
With 2mm no. 26 ribbon, make long upright stems with a twisted straight stitch, working alongside or on top of the thin stems that you made in the beginning. You can also use 3 or 4 strands of 812 or 814 and straight stitch if you do not have enough ribbon.  With 4mm no. 103 (white) ribbon, work over the leaves on section R and make ribbon stitches to form white flowers. Work down the stem leaving space for pink flowers. Do this for the larger white flowers on all the stems. For smaller white shapes use 2mm no. 103 and ribbon stitch or 2-wrap French knots. Thread up with 2mm no. 44 and make the pink flowers with 2 or 3-wrap French knots. Work up and down the stems to add the flowers on the stems. Change to 2mm no. 40 and add plum pink flowers in between.
 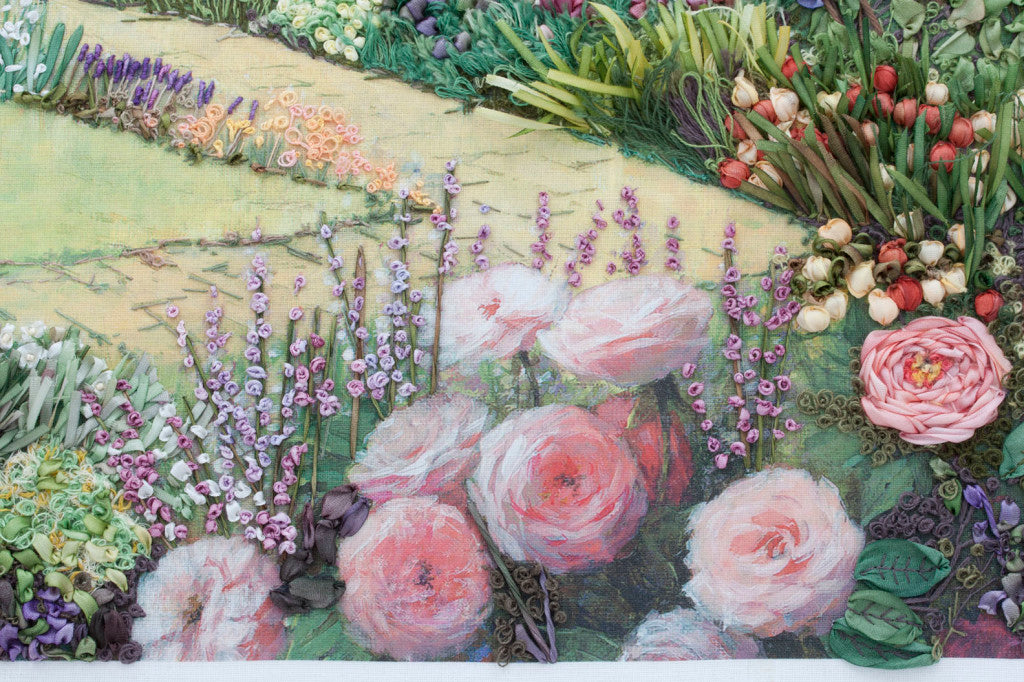 Use 1 or 2 strands of 812 (or use 816) and make straight stitches for the fine stems between the flowers and make 2-wrap French knots for the round leaves between the ribbon flowers.
  Make the rose stems with 4mm no. 100 and use twisted straight stitch. Add a few more purple leaves under rose 5 in ribbon stitch. Use 1 strand of 830 golden green and form fly or feather stitches to make the light green foliage on the right-hand side of rose 6.
  8. Complete the Background Detail. If you have not done so yet, add another fuchsia/plum pink rose underneath rose 6 with French knots - 2 strands, 3 wraps. Add more green detail with French knots, 2 or 3-wraps. (1 strand 806 or 830 and 1 strand 723 on the same needle) Plum detail with 1 or 2 strands of 905 Golden green/yellow detail with 1 or 2 strands of 830
9. Add More Dimension with 3-D Leaves.
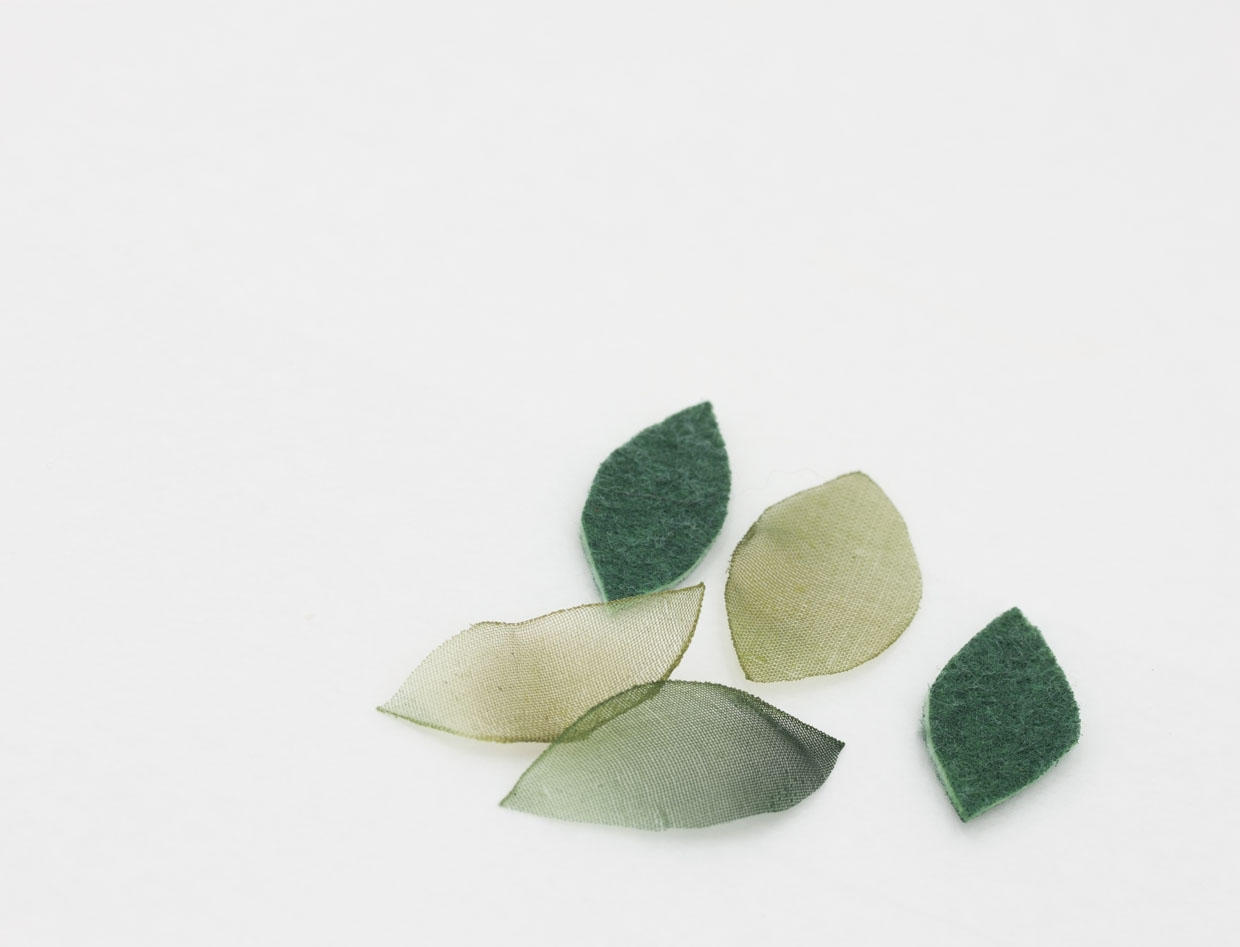
I added some 3-dimensional leaves to give the correct impression of the height, width, depth of the roses in relation to the other flowers in the painting. For this, I used organza ribbon and felted leaf shapes (supplied in your kit). 1. Make the Organza Leaves.
In your kit, you will find a piece of organza ribbon and 2 felted leaf shapes. From the organza ribbon, cut out 3 leaf shapes approximately 2 cm (3/4") wide and 4 cm (11/2") long.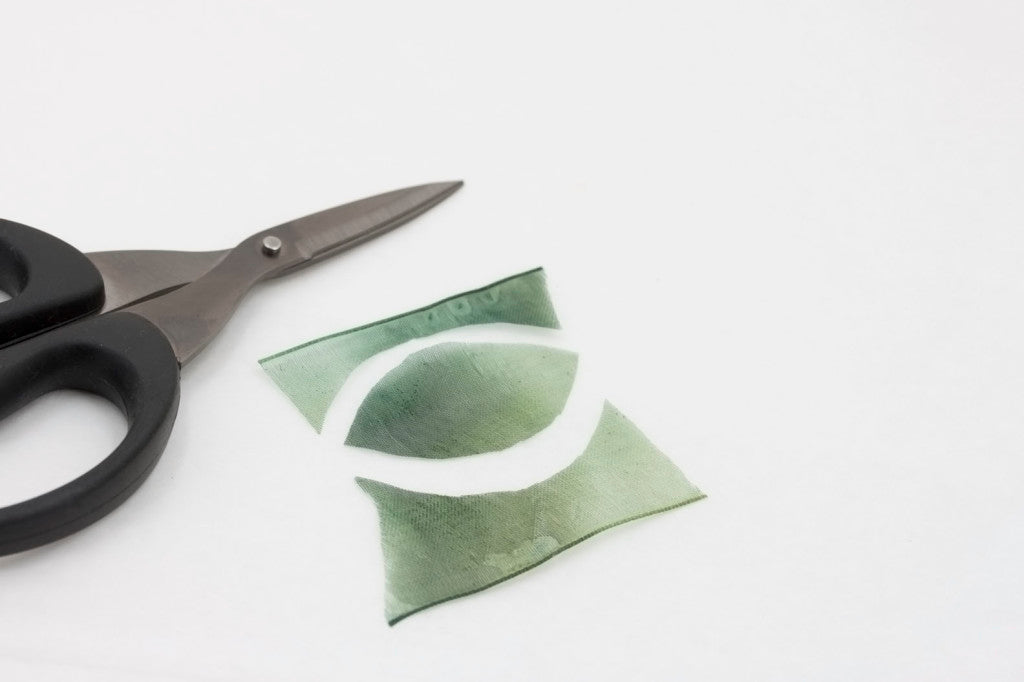 Cut out three leaf shapes from the organza ribbon. The felted shapes will be applied a little later.
  Singe the edges of the organza with a flame. Hold the shape with a tweezer and use a lighter or candle flame to seal the edges by quickly moving the ribbon across the flame. Keep the shape a short a distance away from the flame as it burns quickly! Be careful not to burn yourself. If you find the shape has become too small from the flame, make another from the leftover ribbon. Place the organza leaf shapes near rose 7 and below rose 9, overlapping the silk ribbon leaves where necessary. Secure each leaf with 1 strand of 806 and small straight/stab stitches along the base of the leaf. Allow the tip and edges to be lifted off the surface of the design. Make a few 3-wrap French knots at the base to secure the shape better and place more knots under the leaf, if necessary, to help lift it off the surface of your design.
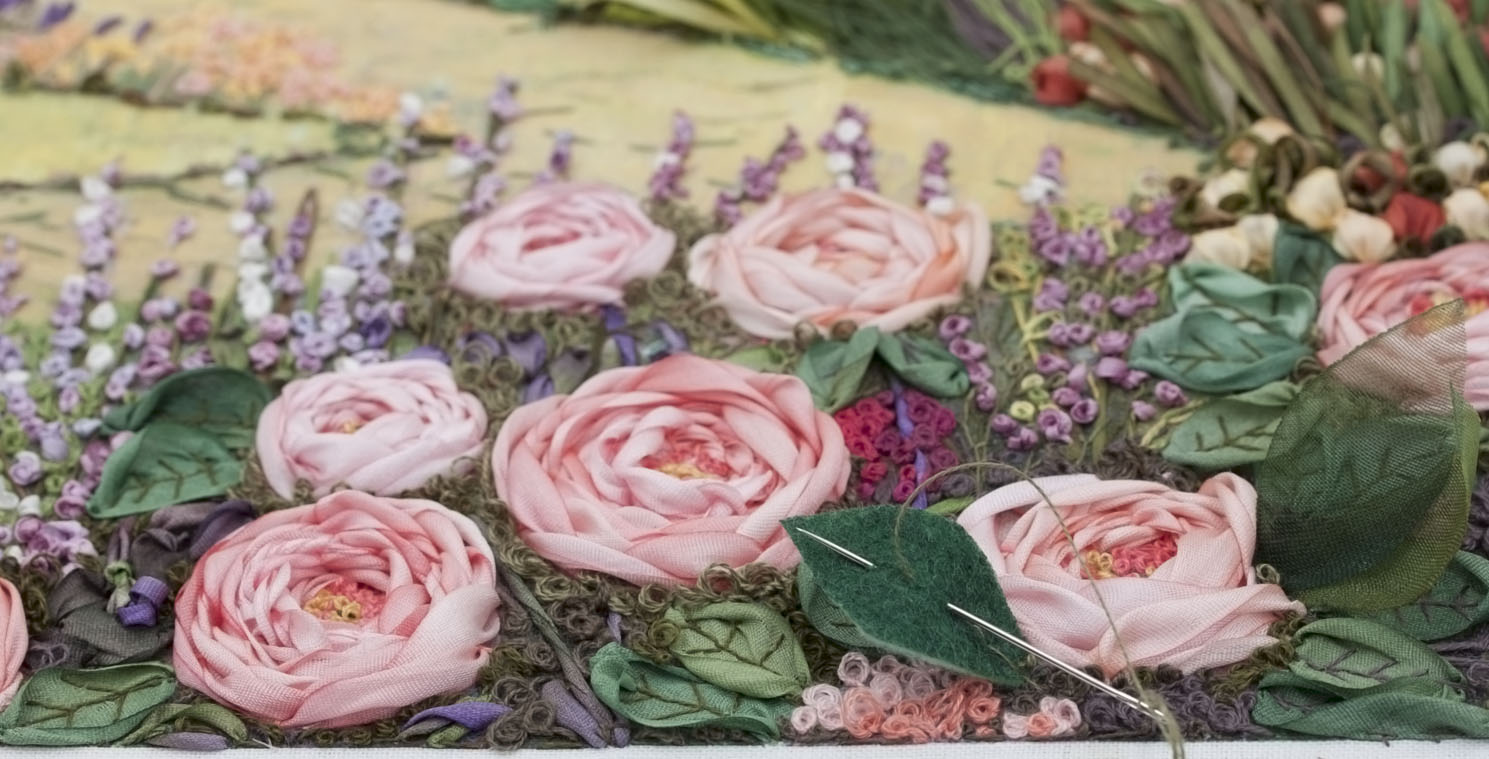
  Place the felted leaf shapes (supplied) alongside rose 9 and under rose 7 as shown above. Secure with 1 strand of 806 and then, lifting the shape off the surface, make small back stitches into the felt to form the veins on the leaf. Work back down again by making side veins until you reach the surface again and make a 2 or 3 wrap French knot or two to secure the leaf properly. Repeat for the other leaf.
  and
and  and
and  and
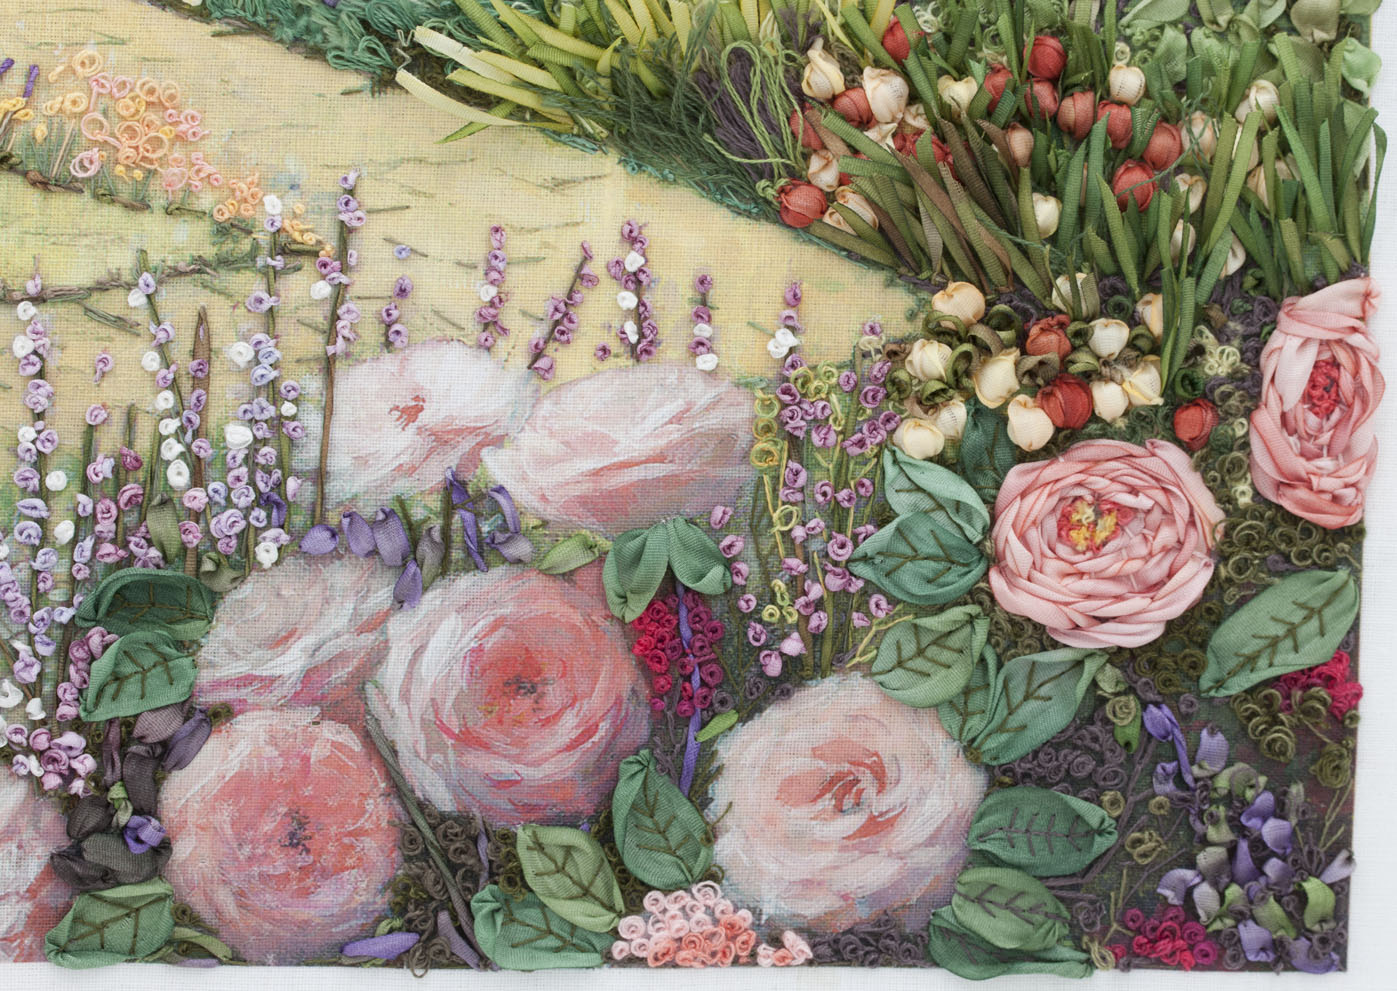
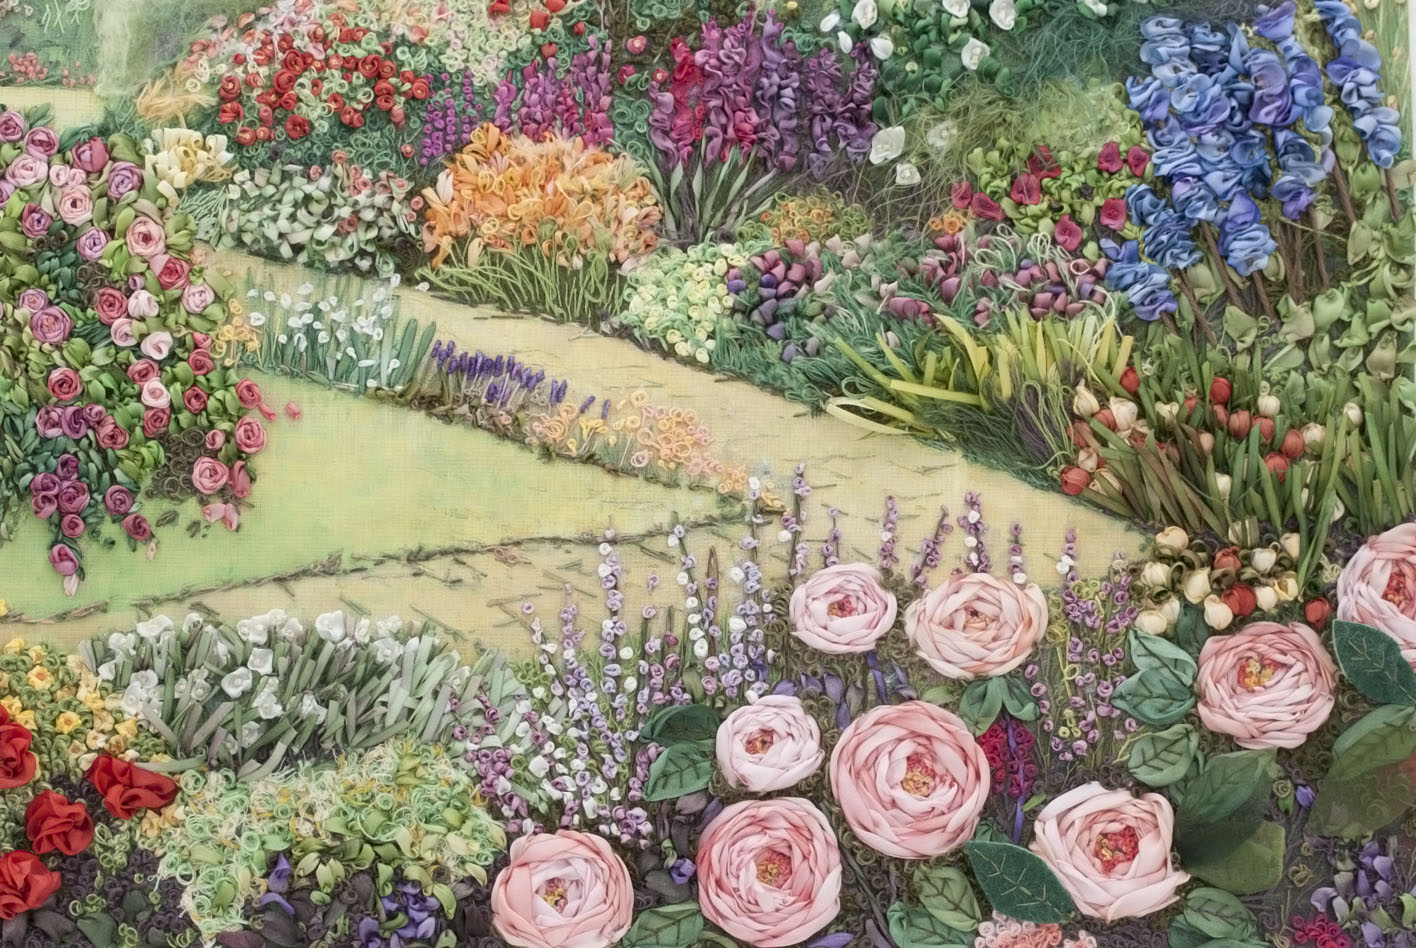
and  Completed design...
  Have a look at the design and where you see too much fabric detail showing through the background leaves and roses, use 1 strand of 806 and 1 strand of 812 on the same needle, add more French knots (3-wraps) to complete your masterpiece.
  And voilà! I hope you enjoy making this design as much as I did. I would love to have your feedback on this kind of teaching and whether you found it beneficial to your learning process.Until next time, have fun and happy stitching! LoveDi van Niekerk ♥


Leave a comment