Hi everyone! Today, I thought I would show you how to weave a basket and how to make Folded Ribbon Roses to fill it. If you would like to make a beautiful project the complete kit is available from us here.
.
.
.
Method
Make the BASKET
.
Use two strands of brown perlé thread on a medium chenille needle and work
Woven Filling stitch to form the basket.
.
Hint: as the basket is quite deep, use back stitch instead of straight stitch to form the foundation “spokes”. Make several back stitches (about 4mm or 1/8th inch long) instead of one long straight stitch.
.
Then weave the perlé thread in and out of the foundation stitches to form a basket-like weave.
.
Basket HANDLE
Form the handle with wire, gently couching it in place every 10mm or 3/8 inch with brown perlé thread. Use the same thread and inserting the needle under and over the wire, cover the wire with thread.
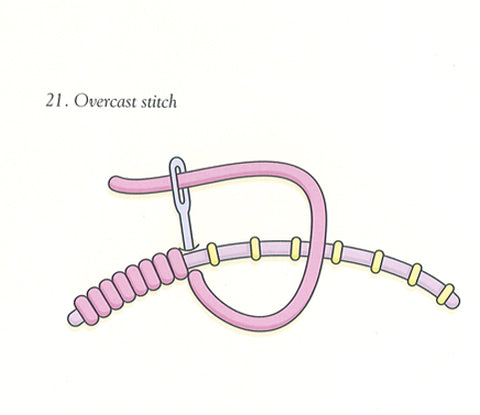
Alternatively, use Overcast stitch to cover the wire with the perlé thread. Refer to the diagram below.
.
.
Hint: If you do not have access to wire that is thick enough for the handle, use several thinner wires and twist them together to form a thicker handle. Or use 2mm silk ribbon no. 21(Antique Brown) and
chain or
back stitch to form the foundation stitches. Whip these stitches with the brown perlé thread to form the handle of the basket.
ROSES
Secure in place (stitching in the centre of the rose, stitching through the silk and the fabric) with a matching thread or use a golden yellow thread and small stab stitches or
French knots.
.
Make the smaller buds in
ribbon stitch. Form the green stem in 4mm number 83 or 126 and use
twisted straight stitch, gently couching it in place with matching green thread. Make the small leaves in the same colour, using loose, puffed ribbon stitches. Work over the spare tapestry needle to form raised stitches. Use the same stitch (with number 27 or 28 in 7mm silk ribbon) for the larger leaves.
.
.
Folded ribbon roses were also used in this pretty Floral Vista design (above), and you can purchase the e-book
here.
.
.
Woven Filling stitch was used for the orange tree (above) in my RES book, and you can purchase the book
here
Hope you enjoyed this tutorial!
Love
Di


Leave a comment