I thought I would show you some lovely folded ribbon roses.
.
.
How to make Folded Ribbon Roses
.
.
Folded Ribbon Roses
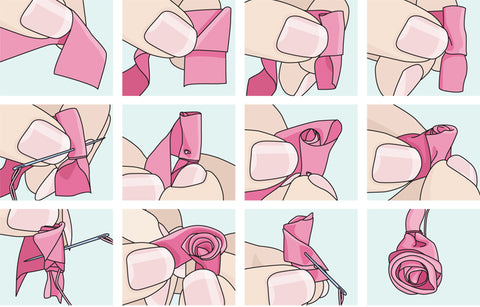
Folded ribbon roses are made separately as illustrated below, and then attached to the background. Use needle and thread (insert the needle between the folded petals) and tidy or re-shape the rose. Ribbon stitch leaves made underneath the folded rose will lift the outer petals and enhance the rose.
.
Silk ribbon of 7 and 13 mm are ideal widths although you can also use 25 and 32 mm silk ribbon for larger roses.
.
Method
Cut a length of ribbon and use a matching thread with a knot at the long end.
Fold the end to make a corner.
Roll the end five times and use tiny stab stitches to secure the bottom edge of the roll. Keep the tail on the left at all times.
.
.
Leave thread hanging; fold the ribbon towards you at an angle of 45 degrees. The tail should be hanging downwards.
Hold the tail, lifting it so that it is level with the centre; wrap it around the centre until the folded part is used up. The tail is back on the left.
Pinch the top of the rose and hold it as you secure the folds with tiny stab stitches, working halfway up the rose. Use a gentle tension so as not to flatten the centre. Make four or five stitches to secure.
Repeat the steps until you are happy with the size of the rose.
Remember to lift the tail so the folded part is level with the centre of the rose, and make sure that the tail is either hanging down or that it is (always) on your left.
.
.
.
.
When you reach the end of the ribbon, make a fold and secure it near the base
of the rose. If there is still enough thread on the needle, use it to secure the rose onto the design. Secure in place (stitching in the centre of the rose, stitching through the ribbon folds and the fabric) and use a gentle tension so as not to flatten the rose. End off at the back.
.
For larger roses, have a look at my video clip on Facebook
here.
.
To make a woven basket and the roses, have a look at my tutorial
here.
.
Enjoy!


Leave a comment