
# Type at least 1 character to search # Hit enter to search or ESC to close
Cart


By Di van Niekerk
Enjoy!

YOU WILL NEED


|
A cream band - crochet or felted, approximately 18 x 4 cm (7 x 1.57"). Make 3 loops for the buttons. Crochet the loops or use a detached buttonhole stitch. |
|
3 small green buttons |
|
A piece of blue felt a little larger than above. |
|
Woolly fibre-natural shade, if using a crochet band |
|
Lining fabric - cream, white (or look for an embroidered linen napkin from a charity shop) or use a multi-coloured cotton fabric a little bigger than the blue felt so that you can turn in seams before stitching onto the back of the bracelet |
|
A thick sponge if needle-felting the crochet band |
|
|
Note: Click on the name of each stitch below to be taken to the stitch and diagram.
.
BACK STITCH
BLANKET STITCH
CHAIN STITCH
DETACHED BUTTONHOLE STITCH
FEATHER STITCH
FRENCH KNOT
STAB STITCH
.

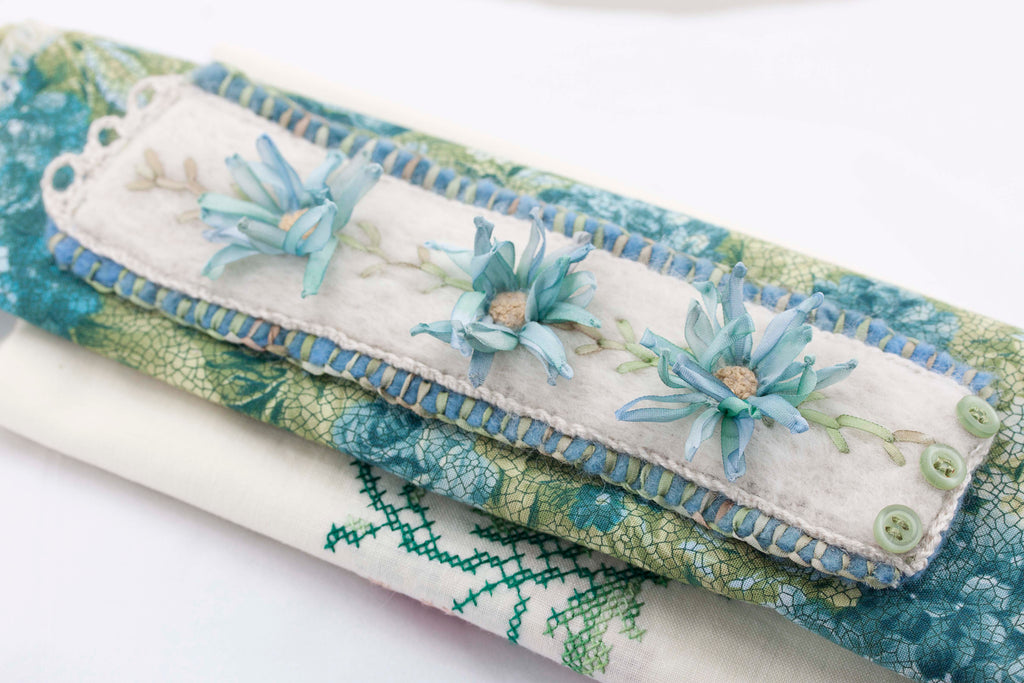
Use a cream piece of felt or crochet a band (with no. 8 mercerised cotton) approximately 18 x 4 cm (7 x 1.57"). Make 3 loops for the buttons.
Crochet the loops or use detached buttonhole stitch – see the links to all the stitches above.
For the crochet band, use the needle felting technique as follows: work on top of a thick sponge, use the #36 felting needle and pierce the fibre and the crochet band, needle-felting the fibre into the cotton. Be careful not to prick yourself.
Work up to the end of the band and pull or trim the excess fibre for neat edges.

.
Stitch three buttons onto the band with two strands of green thread.
.


Fold the band in half and with the blue water-soluble pen, make a mark for the daisy centre. Measure 4.5 cm ( 1.77”) to the left and the right and make a mark for two other daisy centres. Using the dots as a guide, draw three 8 mm (5/16”) circles which will be filled with French knots.
With two strands of the yellow thread, fill the circles with French knots, making them close together, and wrapping the thread twice around your needle. Repeat for the other two daisies.
Use the green silk ribbon and use a feather stitch (see all the stitches above) to make the leaves from centre to centre, edge to edge.

Make the petals with the no. 67 silk ribbon as follows:
Come up close to the yellow centre and measure a distance of about 16 mm (5/8”) but instead of making the normal ribbon stitch, pierce only the ribbon as shown. Gently pull the needle through to form a sharp point. Holding the tip so the ribbon lines up nicely, insert the needle to the back close to the centre of the daisy and take it to the back.

Come up to form the next petal. Use the blue thread to tie tails off at the back and to secure the base of the petal with a tiny stab stitch or two. This will prevent the petal from pulling out of shape and will flatten the petal slightly.

If you prefer that the petals lie flatter, use more stitches to hold the shape. Each petal is about 16 to 18 mm (5/8 to 11/16 “) long and make as many petals as necessary to surround the circle.
Place the band onto the blue felt, and secure with back stitches.

If you have used a cream piece of felt instead of the crochet band, make a row or two of chain stitches along the edge.

At this stage you could decide to use the bracelet as it is, or embellish it as shown in the next few steps.

With the green ribbon, make blanket stitches along the blue felt.

Choose a lining that will suit your creation and leave enough for a good size seam. Turn in the seams and press flat. With the blue thread make tiny back stitches along the edge of the cream band.
Remove the pen marks by wetting a cotton bud and moistening the blue lines. The water dissolves the pen marks.
I do hope you enjoyed this tutorial and that you'll make beautiful things! You can download the lesson here for your collection. Note: The photos in the PDF are not as good a quality as shown on this blog post as they are compressed when the PDF is made. So, you may need to refer back here for clarity.
You can use this idea to make beautiful belts, necklaces, for dressmaking and on handbags and purses. The ideas are endless...
Please send us your photos, I do love seeing your creations!
Have a lovely day, stitching world!
Stay safe
Love
Di
Get regular newsletters packed with tips, specials and new products!
Copyright © DI VAN NIEKERK. ALL RIGHTS RESERVED.
Added to cart successfully!

Leave a comment