
# Type at least 1 character to search # Hit enter to search or ESC to close
Cart


 For this project, you will need to use the following as a guideline as this is what I used and what is packed in the kit.
 However, you are most welcome to use your own embroidery supplies and follow the online tutorial below.
If you prefer to work on the colour panel then you can buy the lovely kit here which includes:
The linen panel with the image printed in full colour - another linen panel for you to make a separate little pot, or use the panel to make a second design for someone special. There are more than enough ribbons and threads to make two designs. -
6 packets of silk ribbon: 2mm no. 73/96, 33 or 16 or 132, 35 or 19 or 25, 41 or 42, 4mm no. 114 and 127 or 2 packs of 114 or 2 packs of 127.
9 different Threads: Metallic thread: White. DMC Variations 6-strand: 4145 (autumn) and 4045 (green), DMC 6-strand: 3852 (golden yellow), 3013 (green), Maxi Mouline 6-strand: 404 (pink), 938 (brown), 235 (red) a card of brown cotton (2 or 3 metres) for the supporting rod of the rose tree.
A ball of toy filling (white) for Trapunto and a piece of brown fibre to fill the pot, Needles (embroidery size 9 or 10 and chenille size 20 or 22) Backing fabrics same size as linen panel x 2 - one to back your embroidery and another for Trapunto after embroidery is done.
Enjoy!
However, you are most welcome to use your own embroidery supplies and follow the online tutorial below.
If you prefer to work on the colour panel then you can buy the lovely kit here which includes:
The linen panel with the image printed in full colour - another linen panel for you to make a separate little pot, or use the panel to make a second design for someone special. There are more than enough ribbons and threads to make two designs. -
6 packets of silk ribbon: 2mm no. 73/96, 33 or 16 or 132, 35 or 19 or 25, 41 or 42, 4mm no. 114 and 127 or 2 packs of 114 or 2 packs of 127.
9 different Threads: Metallic thread: White. DMC Variations 6-strand: 4145 (autumn) and 4045 (green), DMC 6-strand: 3852 (golden yellow), 3013 (green), Maxi Mouline 6-strand: 404 (pink), 938 (brown), 235 (red) a card of brown cotton (2 or 3 metres) for the supporting rod of the rose tree.
A ball of toy filling (white) for Trapunto and a piece of brown fibre to fill the pot, Needles (embroidery size 9 or 10 and chenille size 20 or 22) Backing fabrics same size as linen panel x 2 - one to back your embroidery and another for Trapunto after embroidery is done.
Enjoy!
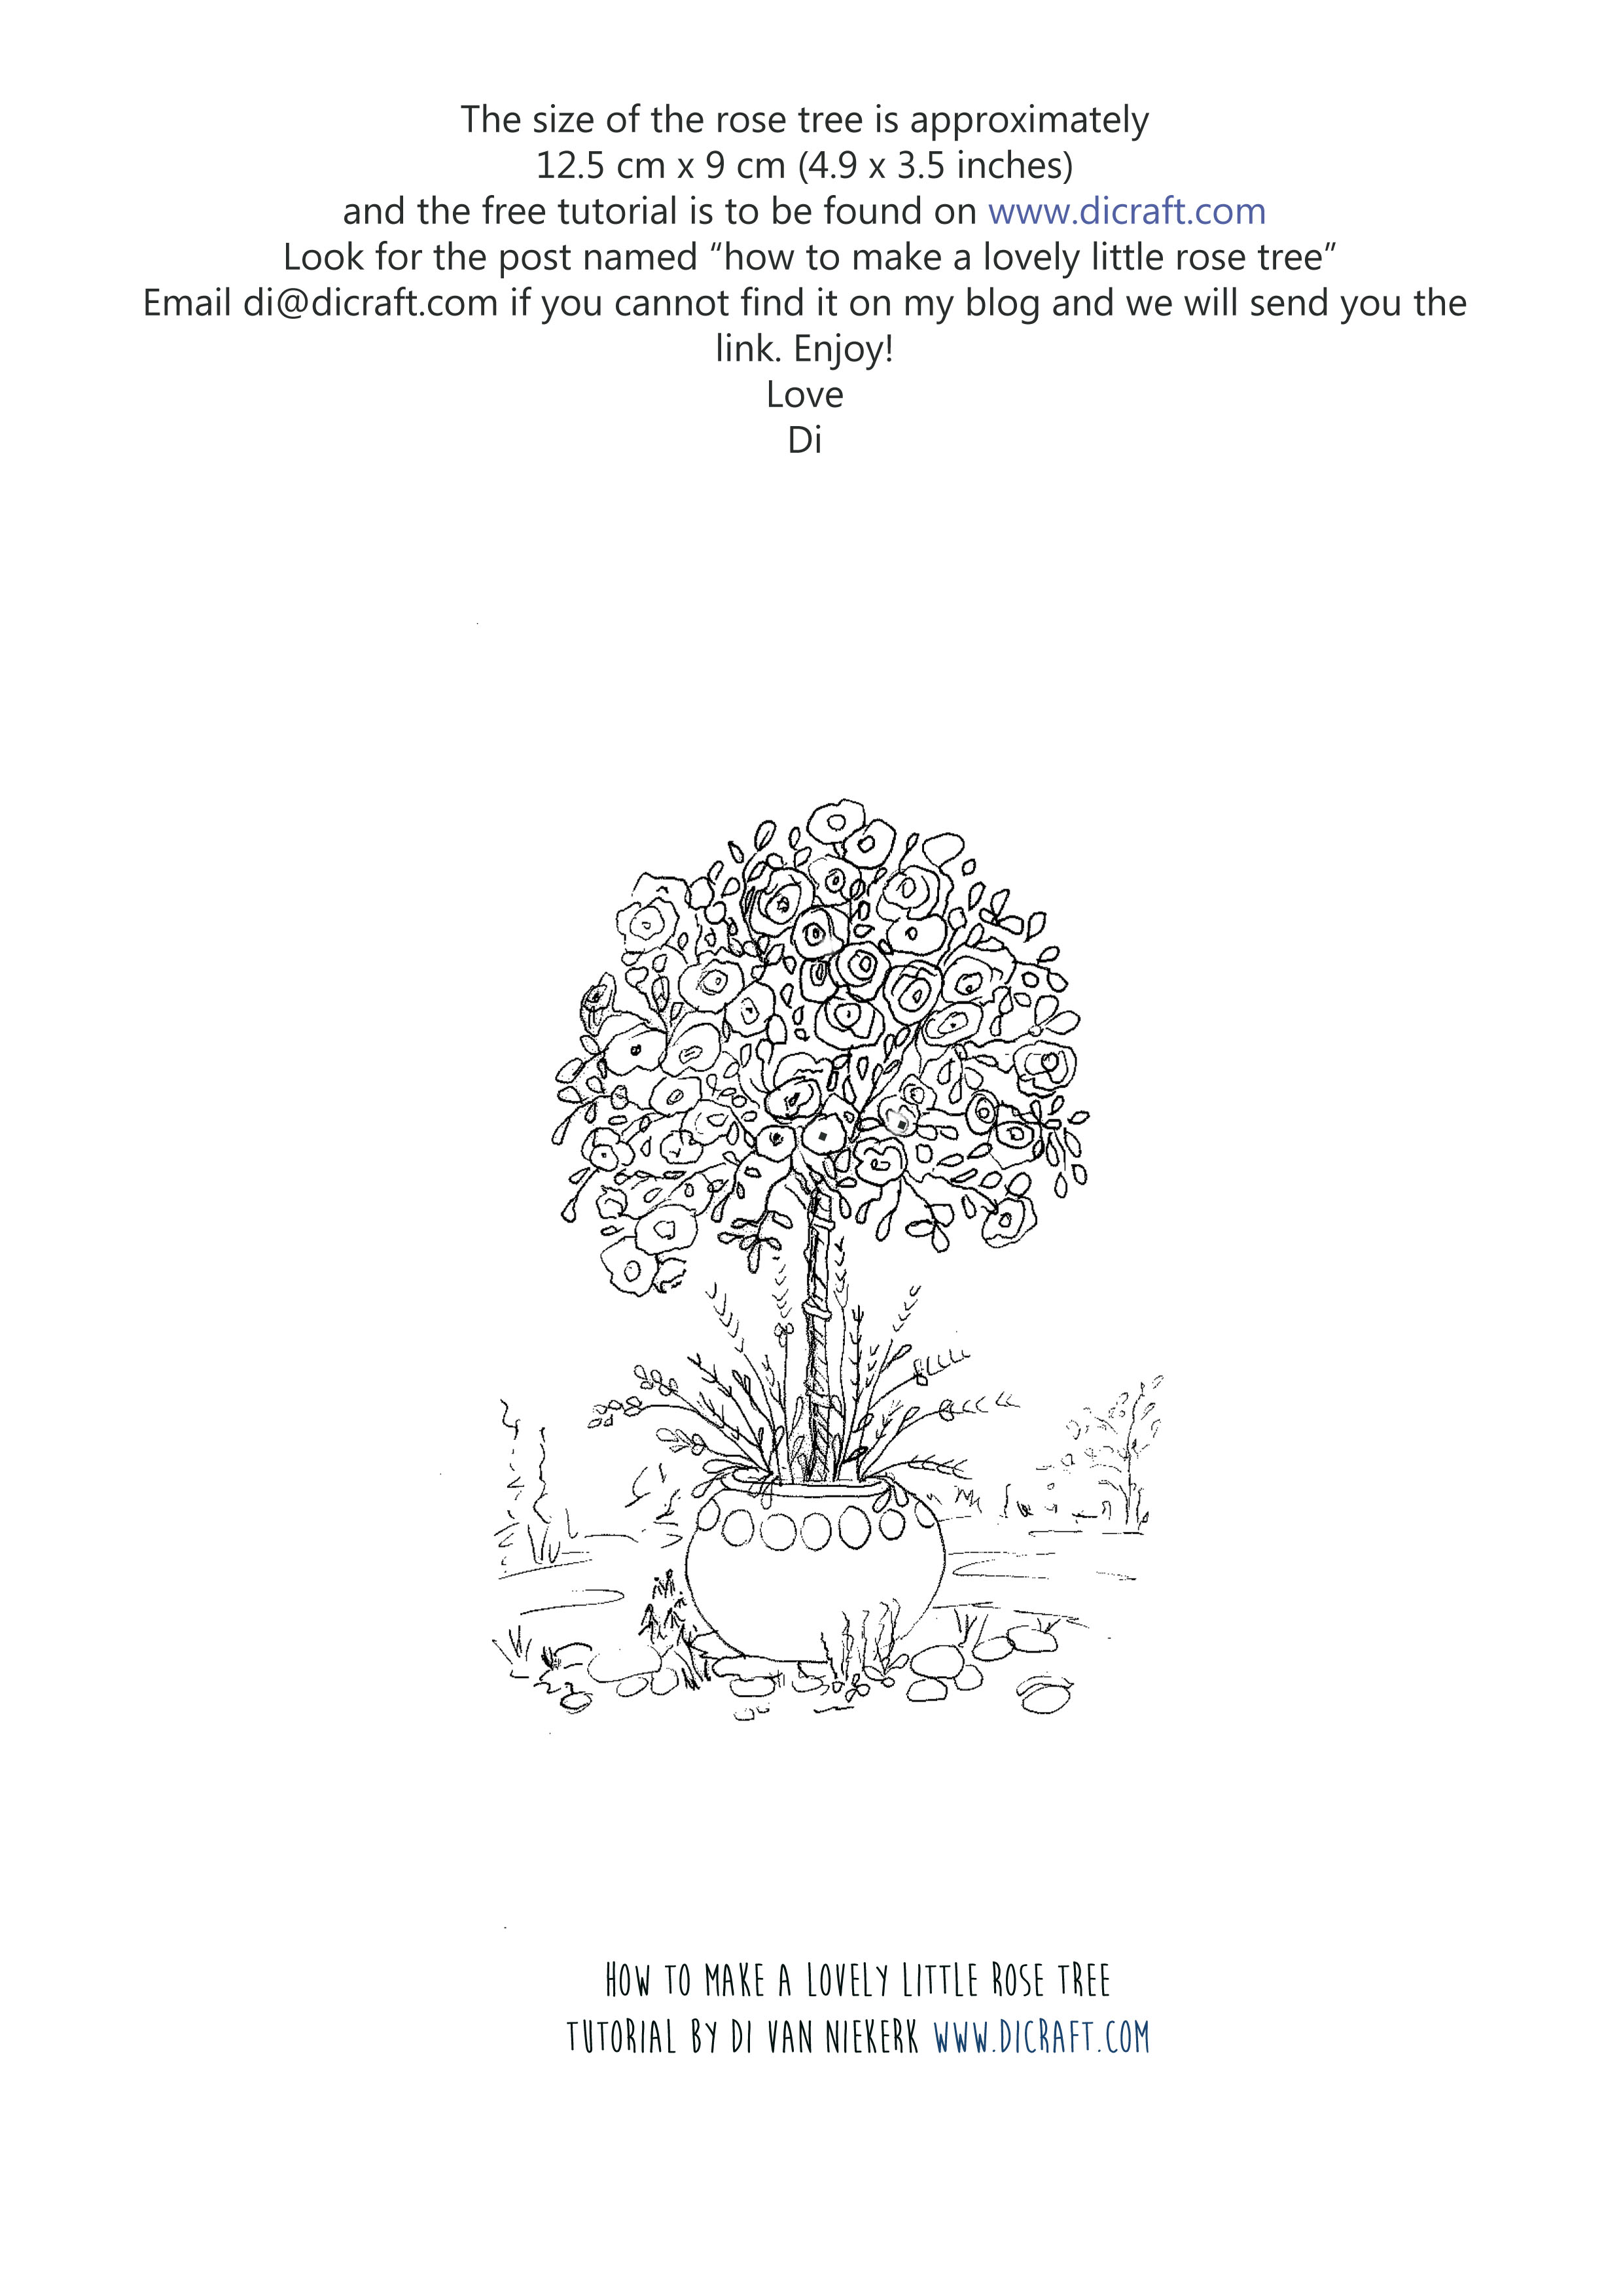 For those using their own supplies, here is the line drawing to download and to trace onto cotton or linen (or any fabric of your choice).
[download id="209"]
Here are the instructions I have written and saved as a PDF for you to download...
[download id="210"]
and the Trapunto notes are here...
[download id="211"]
I will also post some step-by-step photos below. These will serve as a useful guide. You can enlarge the pictures to see close-up detail. Remember to refer to the PDF (see link above) that you must download and save. Have fun!
For those using their own supplies, here is the line drawing to download and to trace onto cotton or linen (or any fabric of your choice).
[download id="209"]
Here are the instructions I have written and saved as a PDF for you to download...
[download id="210"]
and the Trapunto notes are here...
[download id="211"]
I will also post some step-by-step photos below. These will serve as a useful guide. You can enlarge the pictures to see close-up detail. Remember to refer to the PDF (see link above) that you must download and save. Have fun!
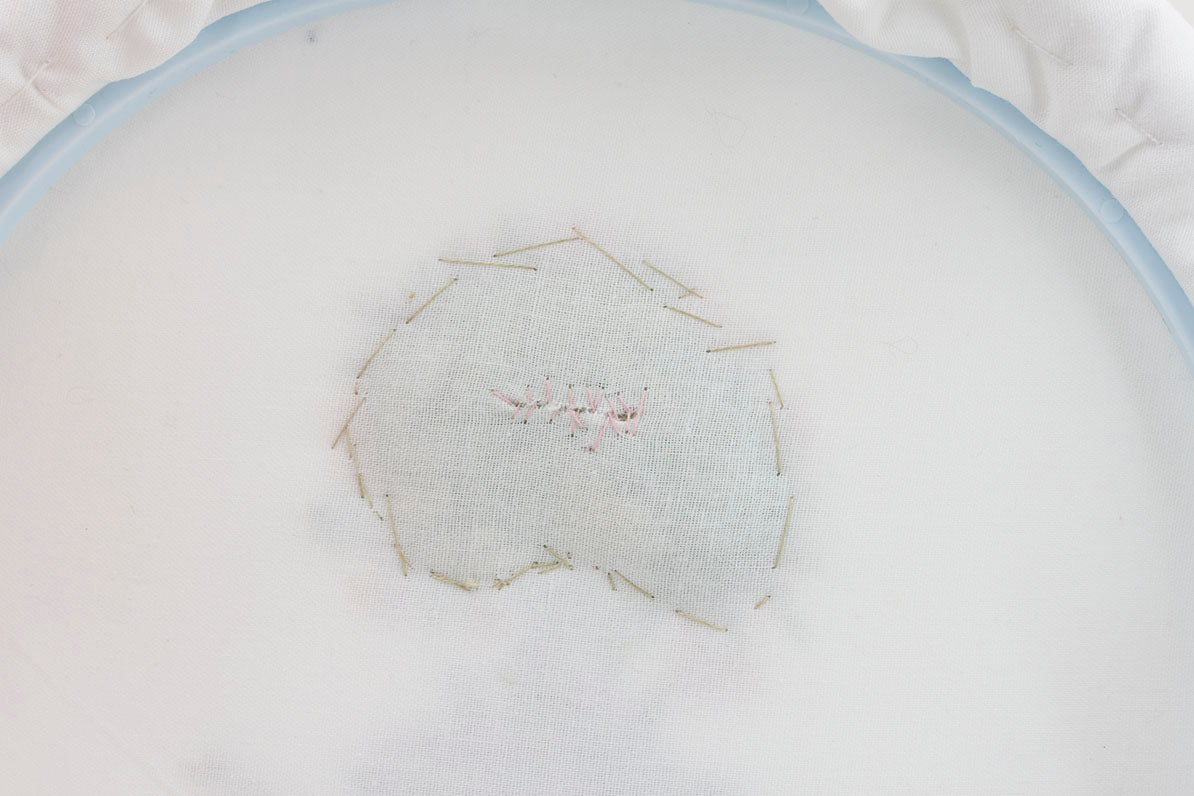
 Place design in a hoop...
 Make the supporting rod or pole for the rose tree...
 Make the rose stem and branches...
 Form the ties for the stem and rod and make more branches...
 Make the spokes for the spider-web roses. Refer to the instruction sheet.
 Make the lavender stems
 Complete the spokes for all the spider-web roses...
 Make the spider-web roses and the buds. Refer to the instruction sheet.
 Cut out the pot from the panel provided in the kit, or trace a pot onto a suitable fabric using the line drawing. Cut out leaving a seam as shown on the instruction sheet.
 The pot is the same size as the one on your design. Place the pot aside to use later.
 Complete the roses and buds...
 Make the yellow stamens...
 Make the grass and bushes in the background...
 Use 1 strand of thread for the dainty branches...
 As shown on the instruction sheet, fill in the grass and details in the background...
 More close-up detail. Refer to the instruction sheet.
 Make the ground in the pot...
 Start to make the lavender. Remember to refer to the instruction sheet.
 The lavender flowers and leaves...
 Add the yellow detail...
 Secure the pot that you prepared earlier. Fill it with brown woolly fibre or use a similar kind of filling, make the red flowers and make the leaves for the pink flowers. Refer to the instruction sheet.
 Make pink flowers...
 Looking good! Have you enjoyed yourself so far?
 Add the brown centres for the red flowers, make more lavender leaves that overlap the rim of the pot. Refer to the instruction sheet.
 See how the leaves are made by stitching into the pot before taking the needle to the back?
 To fill out the roses, you can add another layer of fabric and trapunto the back to lift the section up from the surface. This gives a lovely rounded effect and balances out the stumpwork pot. Refer to the instruction sheet.
 The back of the work. Refer to the instruction sheet.
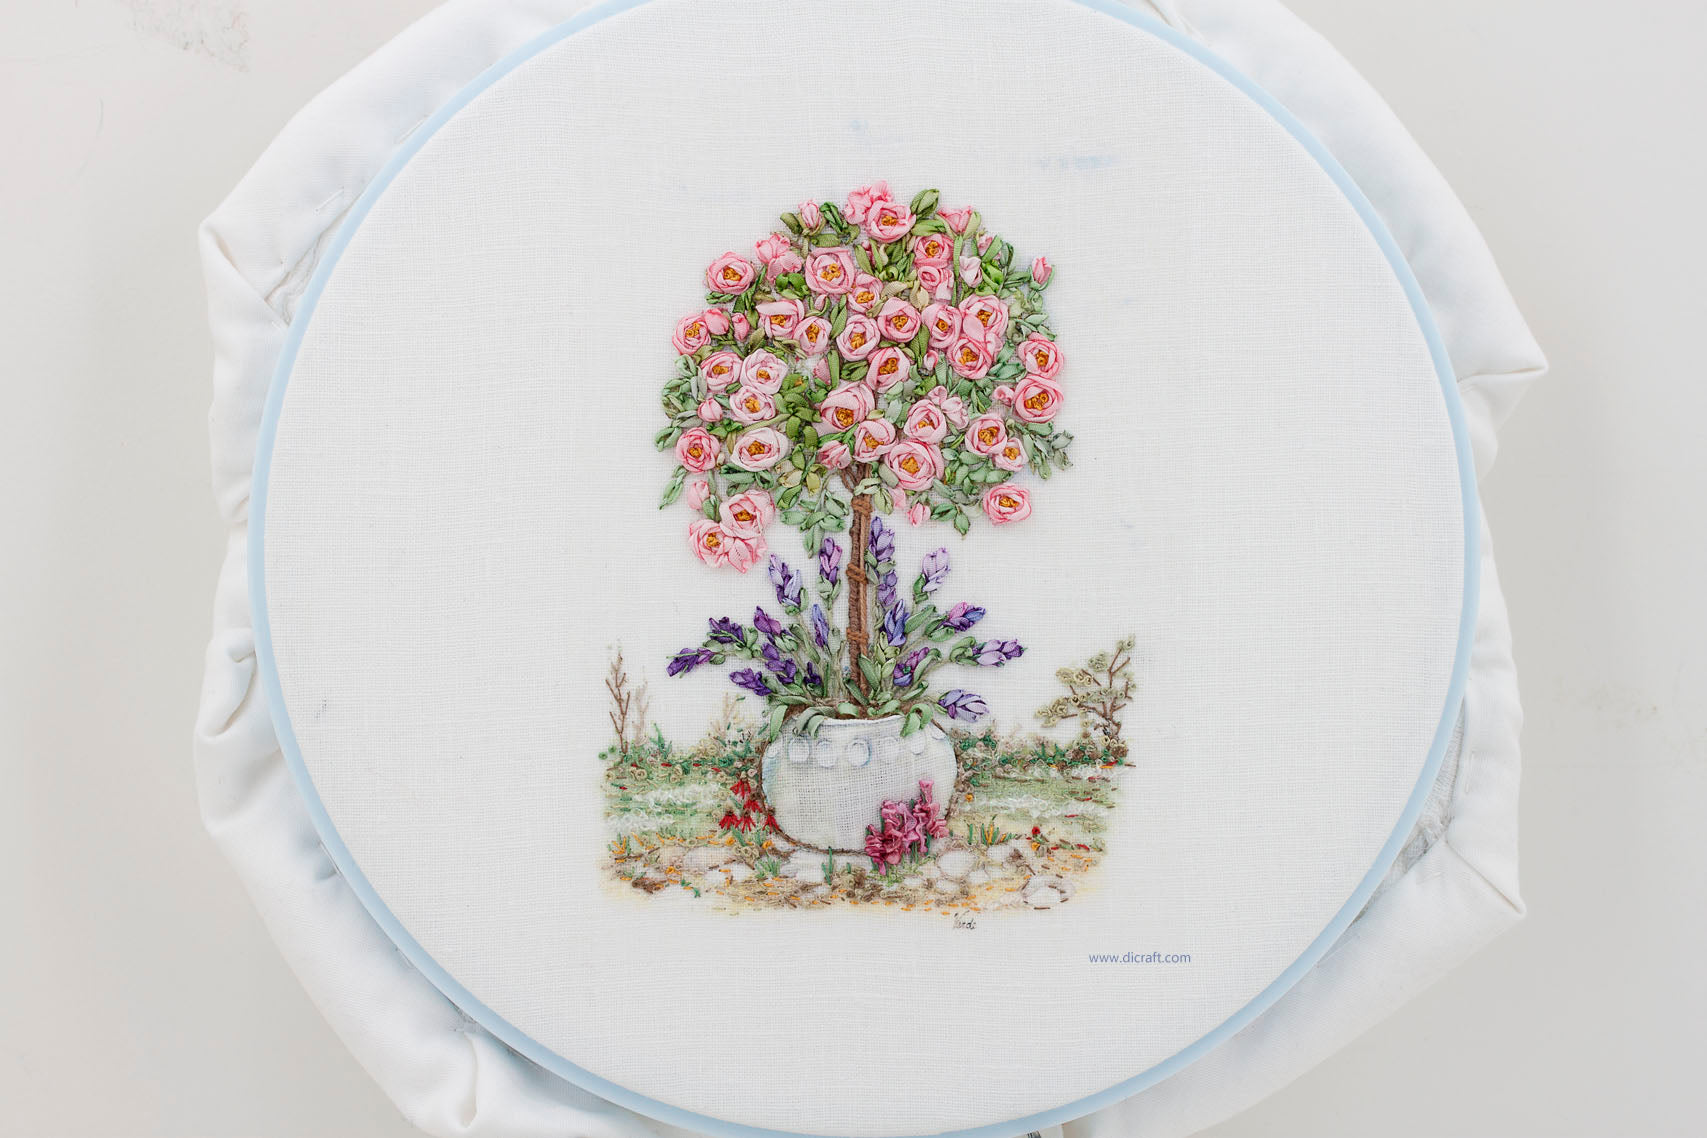 The completed piece. Cute!
I turned mine into a herb cushion. You can fill it with scented rose petals or lavender or whatever you feel like, or use the normal cushion filling to make a lovely little cushion for someone special. Or turn it into hoop art ♥
The completed piece. Cute!
I turned mine into a herb cushion. You can fill it with scented rose petals or lavender or whatever you feel like, or use the normal cushion filling to make a lovely little cushion for someone special. Or turn it into hoop art ♥
 I hope you enjoyed this tutorial.
Here are the stitches you will refer to as you work.
STITCHES-PAGE 1
STITCHES-PAGE 2
STITCHES-PAGE 3
STITCHES-PAGE 4
Until next time, have fun! Would love to hear from you.
Love
Di
I hope you enjoyed this tutorial.
Here are the stitches you will refer to as you work.
STITCHES-PAGE 1
STITCHES-PAGE 2
STITCHES-PAGE 3
STITCHES-PAGE 4
Until next time, have fun! Would love to hear from you.
Love
Di

Get regular newsletters packed with tips, specials and new products!
Copyright © DI VAN NIEKERK. ALL RIGHTS RESERVED.
Added to cart successfully!

Leave a comment