♥ If you like, you can purchase the complete kit for all six chapters here or you can purchase individual packs for the chapters below. It is however easier to purchase the complete kit as you will save on the courier fee.
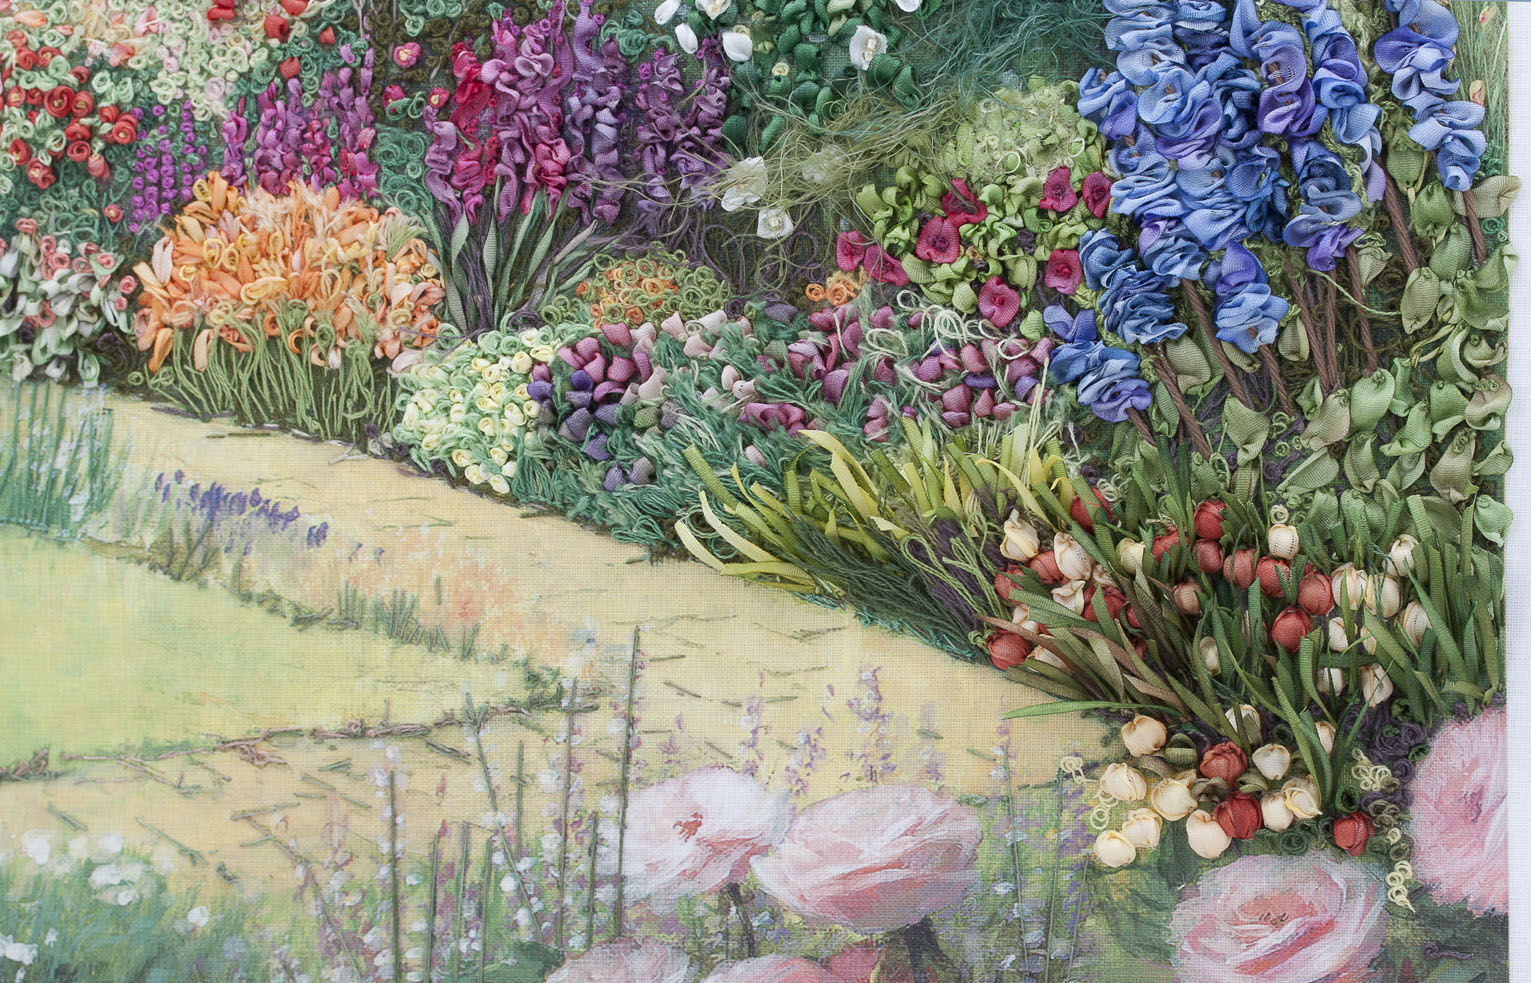
How to embroider a landscape in ribbon embroidery – Chapter 5 This is Chapter 5 of the Pink Delight project, a project that I have been teaching online. If you are seeing this for the first time, please see: Pink Delight from the Magical Gardens series is turning out to be a beauty – a most enjoyable project. I hope that those of you who already have the kit for chapters 1, 2, 3 and 4 are enjoying yourselves! It is a fun, colourful project and if you would like to follow the step-by-step tutorials for this lovely panel, you are welcome to purchase the following:
♥ If you are not sure what you need for this project, please contact us to ask for assistance. Please mention that you would like to make the Pink Delight project that I am teaching online. For this chapter (Chapter 5) I completed sections J2 (Red Roses above J), K, L, M, N, 0, P and completed steps 8, 9 and 10, and I embroidered the roses and some of the leaves of the rose bush that you started in Chapter 1 step 7. I also finished the trees in the far background. I hope you will enjoy this Chapter as much as I did! Have fun! ♥ To stay in touch with the latest blog posts and kits, you are welcome to join me on Instagram here and on Facebook here and I will keep you updated. Let’s start. Enjoy! 
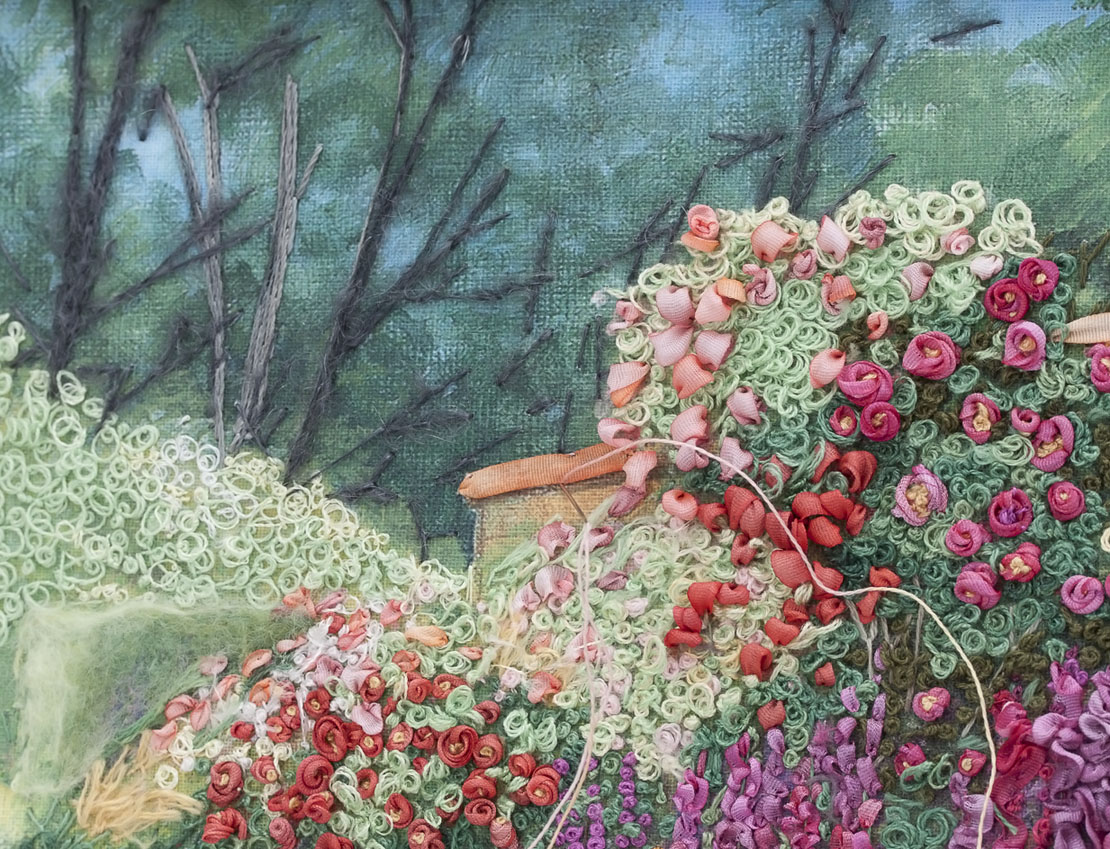
Complete section J2. The Red Roses.
Make the branches first. It is always a good idea to build a framework initially which will give the plant structure. With 2 strands of 905 make the brown branches with stem stitch as shown in the picture below. Fill in the dark shadows with two-wrap French knots. Change to fly or feather stitch to form dark shadows. This helps to create depth in your design.Add more French knots (2 strands, 2 wraps around your needle) or loop stitches to form more dark shadows in the area. ![IMG_6092[1]](https://cdn.shopify.com/s/files/1/0641/0892/1076/t/9/assets/IMG_60921-1024x876.jpg?v=1659617147) Make the green leavesThread up with 4mm ribbon, no. 132, and make loose, puffed ribbon stitches as shown below. Work from the bottom up towards the white flowers. Leave the red/cerise areas open for the roses in the next step.
Make the green leavesThread up with 4mm ribbon, no. 132, and make loose, puffed ribbon stitches as shown below. Work from the bottom up towards the white flowers. Leave the red/cerise areas open for the roses in the next step. ![IMG_6095[1]](https://cdn.shopify.com/s/files/1/0641/0892/1076/t/9/assets/IMG_60951-1024x904.jpg?v=1659617150) Make the Red/Cerise RosesWith 7mm ribbon no 108, make the cerise/red roses with loop stitches. Use 1 strand of 4210 to secure the tail of the ribbon and come up, leave the thread at the top of your work. Work over a spare tapestry needle or similar object when making the loops or if you prefer, make the loose loops by pulling the ribbon gently to the back of your work. Make all the cerise/red roses in the same way.
Make the Red/Cerise RosesWith 7mm ribbon no 108, make the cerise/red roses with loop stitches. Use 1 strand of 4210 to secure the tail of the ribbon and come up, leave the thread at the top of your work. Work over a spare tapestry needle or similar object when making the loops or if you prefer, make the loose loops by pulling the ribbon gently to the back of your work. Make all the cerise/red roses in the same way. ![IMG_6098[1]](https://cdn.shopify.com/s/files/1/0641/0892/1076/t/9/assets/IMG_60981-1024x761.jpg?v=1659617152) With the 4210 thread, make 2 or 3 French knots close together in the centre of the loop. This will secure the stitch and you can use the stitches to shape the roses at the same time. I think you may find this useful. Here is the Ribbon Chart for you to download so you can see all the colours and codes as whenever you like.
With the 4210 thread, make 2 or 3 French knots close together in the centre of the loop. This will secure the stitch and you can use the stitches to shape the roses at the same time. I think you may find this useful. Here is the Ribbon Chart for you to download so you can see all the colours and codes as whenever you like. ![IMG_6104[1]](https://cdn.shopify.com/s/files/1/0641/0892/1076/t/9/assets/IMG_61041-1024x798.jpg?v=1659617154)
Complete section J2
Add Yellow Highlights The sunny part of J2 is highlighted with yellow fibre (tease out a thin film, place on top of the leaves as shown) and with Rajmahal number 261 (1 strand) use a single-knotted stitch or make loose French knots to secure and shape.Trim the fibre if too heavy. The film of fibre should only serve as a highlight in this area and the leaves are still faintly visible. ![IMG_6186[1]](https://cdn.shopify.com/s/files/1/0641/0892/1076/t/9/assets/IMG_61861-1024x811.jpg?v=1659617156)
Complete section L.
Make the dark shadows below section L. Use the fluffy green wool provided in the kit and cut a 38 cm (15 inches) length. Put it away safely for the trees in the far background which I will show you how to do towards the end of Chapter 5. Refer to the picture below and use 1 strand of 4045 green thread. Place the remaining piece of wool on your design as shown and twirl it a bit then couch in place with the green thread along the edge provided on the wool.  Cut off the excess (no need to take the wool to the back of your work, simply stitch the ends onto your design). Fluff and shape with your fingers. Trim the fibres here and there, if you like. Hint: it looks quite good overlapping section J.
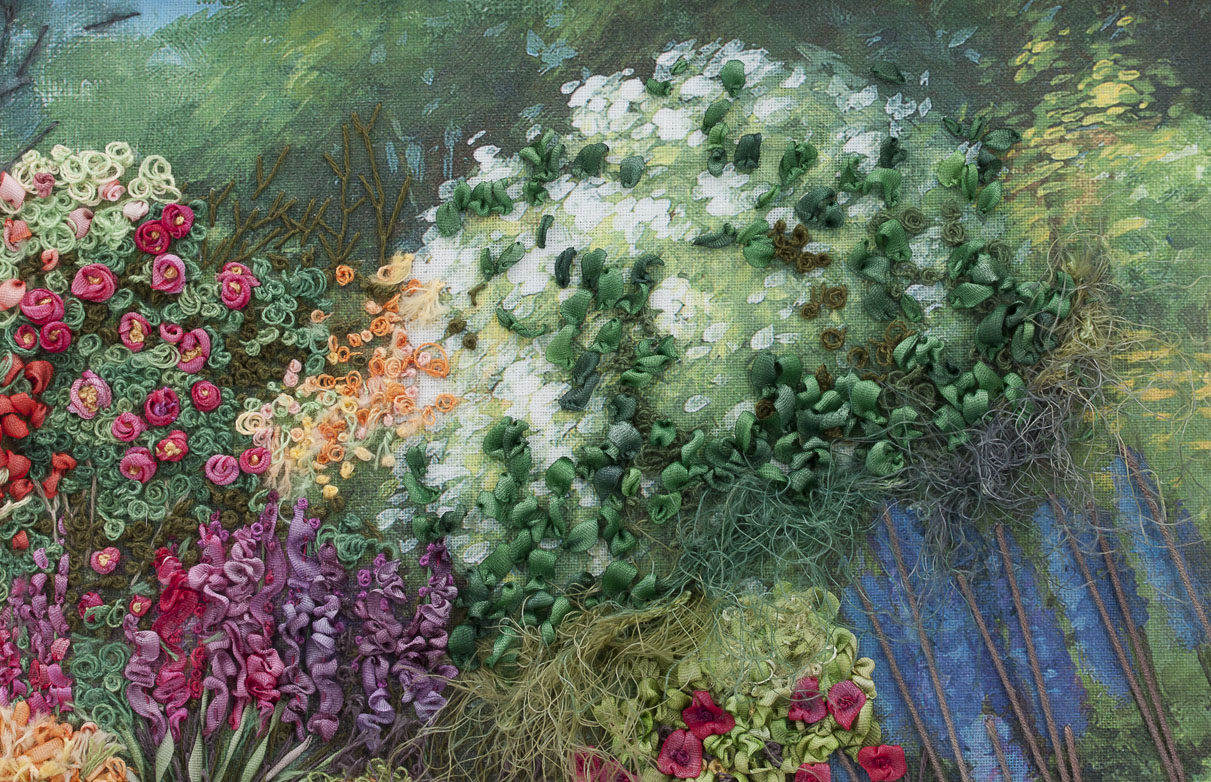
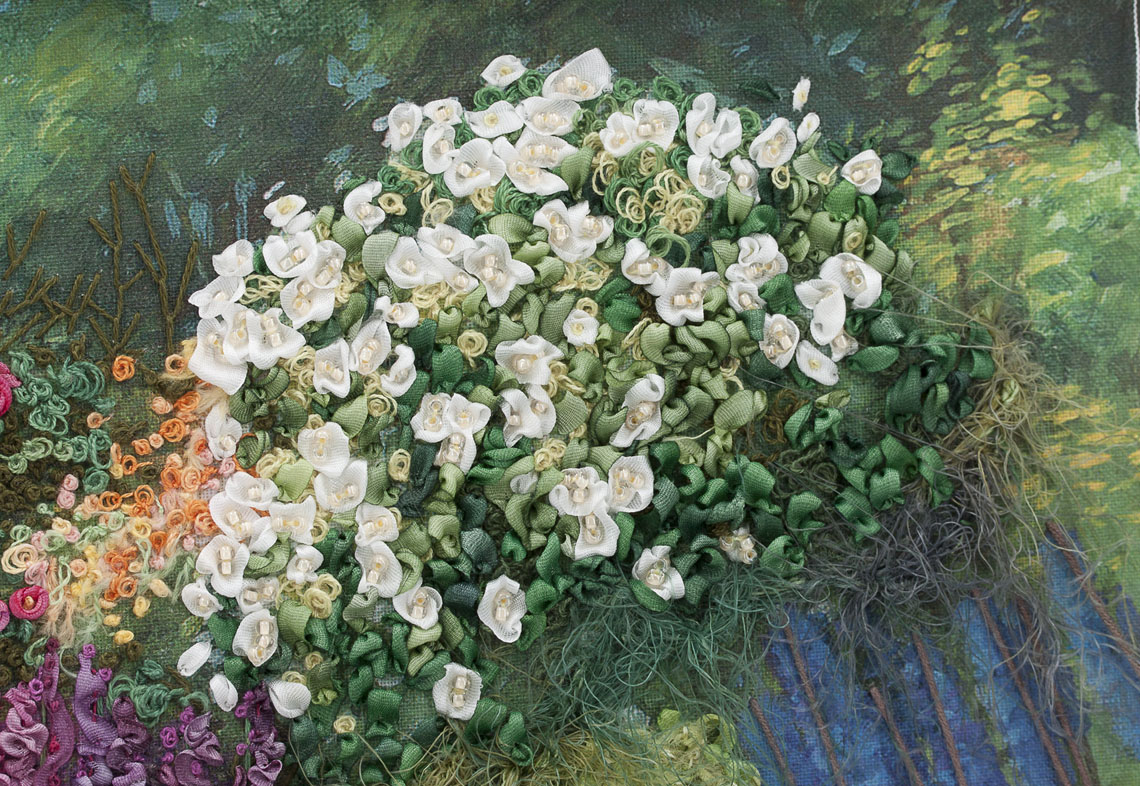
Section L. Complete the green and white bush.
1. Fill in the shadows firstComplete the dark shadows with 2 strands of 747 green thread and make French knot (2 strands, 3 wraps). Brush wool fibres out of the way as you stitch, holding the thread up towards the top part of your design as you take it to the back of your work. This helps prevent the thread from snagging on the wool.  With 4mm no. 83 make loose, puffed ribbon stitches on all the dark parts of this section.Question. Why use so many ribbon stitches in the design? Remember that if you are looking at trees and flowers in the distance, it’s not possible to distinguish the shapes clearly. That’s why it’s important, for a realistic effect, to use vague stitches such as ribbon stitch at this stage. As you reach the front part of the design (in the near distance) then you will start to make more ornate stitches to portray each flower.
  2. Add golden green highlightsUse thread 830. Make French knots — 2 strands, 2 wraps, wrapped loosely around your needle to form loop-like stitches.
  3. Make more green leavesChange to 4mm no. 143, add the lighter green leaves in ribbon stitch as you did before. Leave the white flowers open for the next step.With 4045 green, 2 strands, 3 wraps, make more of the medium green leaves with French knots, as you did before, working up towards the top of the bush.
  4. Make the white flowersWith 7mm no. 103, make the white flowers with loop stitch, working over a tapestry needle or similar object (like a kebab stick). Make more than one loop over the needle before moving it.Only move the tapestry needle when necessary.
  Insert tapestry needle into other stitches to support the needle and also into the last of the white loops to hold the loop in place for the next step. You don’t want it to pull out of shape as you stitch. Using the finest embroidery needle or a beading needle, thread up with 1 strand of 830 make a knot at the long end and come up in the centre of the loop. Pick up 2 or 3 of the small beige/yellow beads and take the needle to the back of your work. Come up to couch/catch thread between the beads once or twice, (but usually once is enough).
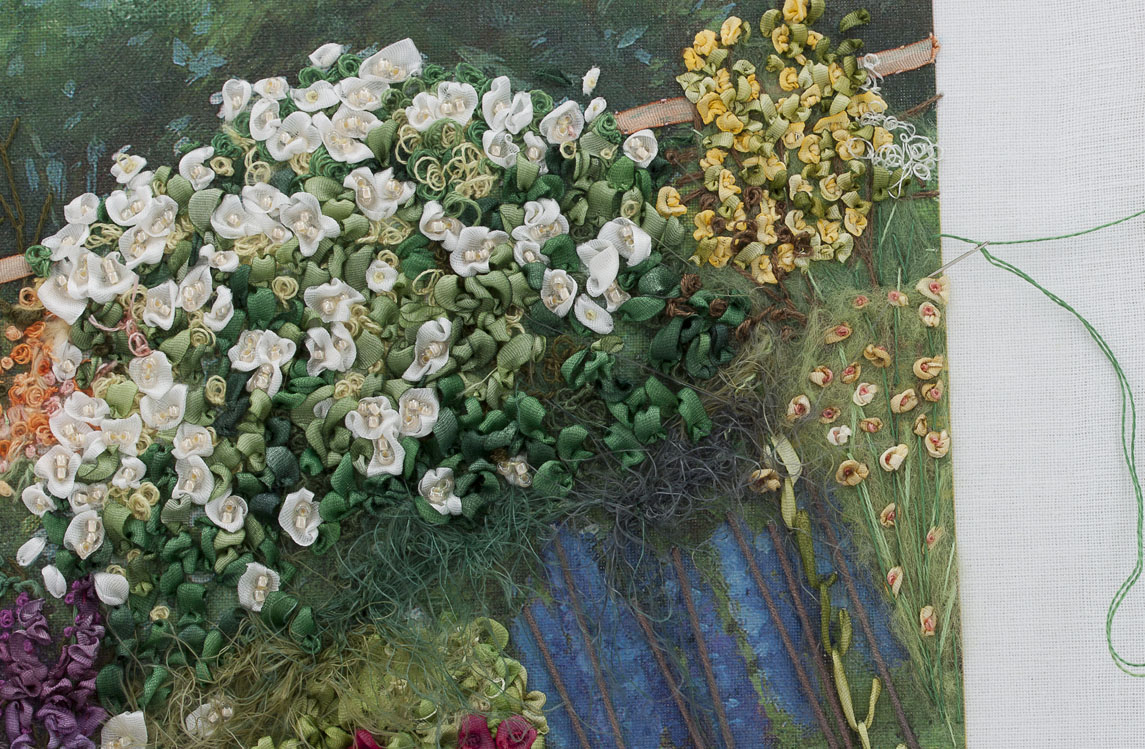
  If you like, add more green leaves with 4mm no. 143 green and no. 83 (use loose, puffed ribbon stitch). Add more golden green stitches with loose French knots (colour 830, 1 strand, 2 or 3 wraps). Add more white flowers with the 7mm no. 03 and make the yellow stamens on top with the beige/yellow beads.
  Hint: Allow a gap below G (orange/yellow bush) and above H (the fuchsia pink flowers) for depth.
 The wall. Make the top part of the wall.
Use the 4mm no. 86 ribbon and form the top edge of the wall. Refer to the pictures below and come up on the left-hand edge. Make a ribbon stitch and come up to the right of the red bush (F) and go back just before the white bush (L). Repeat for the section alongside and between the white and yellow (M) bush as shown in the picture. Use 1 strand of 4100 thread and make tiny stab stitches along the edge of the ribbon to shape and to secure. Space stitches about 5mm (just over 3/16”) apart.
 Go back to the beginning and end of the ribbon and using 4045 make French knots to cover the edges of the ribbon for a neat finish (2 strands, 2 wraps).
  Hint: use a blue water-soluble pen and a ruler to draw the line which serves as a good guide for a straight line. Use a cotton earbud (or similar) dipped in water and dab it on the ribbon (once secure) to remove the blue line.
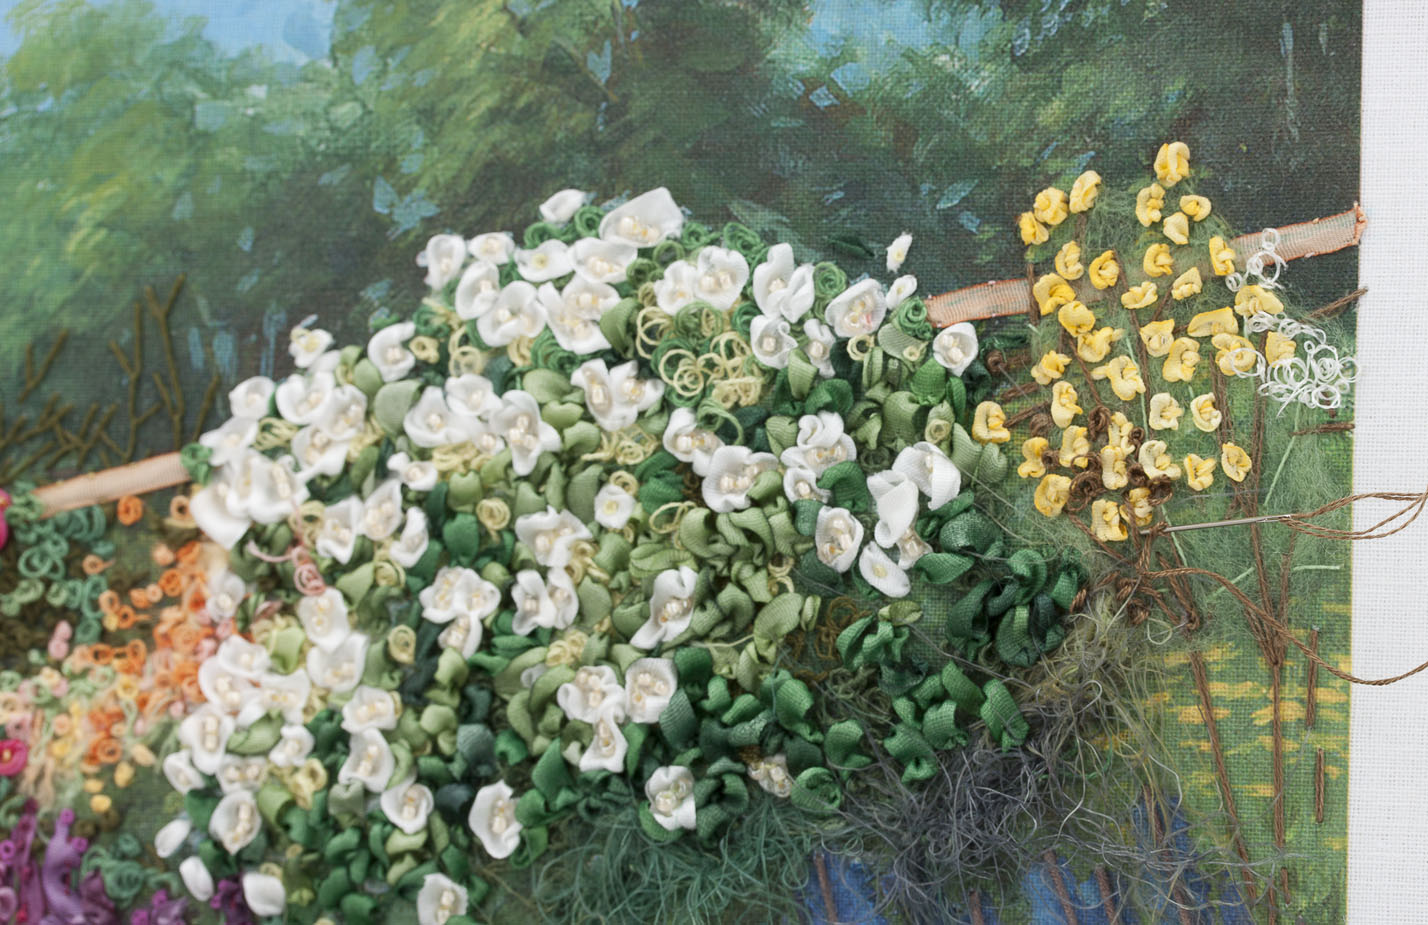
 Section M. Complete the Yellow Bushes
The Top yellow bush (M1)
A. Make the branches and add the textureUse 3 strands of 823 brown thread and make the branches and side branches first. Use fly stitches with long anchoring stitches (long tails) or form back or straight stitches. Make French knots (3 strands, 2 wraps) for the brown shadows as shown in the picture below.Add a tuft of green fibre, tease it out to form a thin layer that allows the branches to show through here and there.  With 1 strand of 729 green, make large fly stitches and straight stitches to softly hold the fibre in place as shown below. Change to 1 strand of 823 and make more brown branches in the same way.
  B. Make the yellow flowers and add brown shadows.With 4mm no. 95, make the flowers with loop stitch. Work over a size 13 tapestry needle, and make short, tight loops over it, making several loops before moving the tapestry needle to form more stitches — keeping the last loop on the needle before making the next one is always a good idea to prevent it from pulling out of shape while you stitch. Come up close to it and insert the needle in the centre of the loop to form an interesting knot-like stitch.
 Make some loop stitches horizontal, others vertical for an interesting effect. This is achieved by placing the tapestry needle vertically or horizontally as you form the loops over it. To remove creases in the ribbon, run the side of the ribbon needle up and down the length, working close to where it emerges from the fabric. Make all the yellow flowers in this section as you did above. Add the brown detail as shown below with the 823 brown thread (1 strand, 2 or 3 wraps)
  C. Make white flowers and green leaves.With 1 strand of Rajmahal number 96 (white), make the white patch with loose French knots wrapping thread three times around your needle. Again you can add more brown shadows as shown below with the 823 brown thread and French knots (1 strand, 2 or 3 wraps)
  Change to 2mm no. 80 and make green leaves between the yellow flowers. Make loose, puffed ribbon stitches or loop stitches.
  Hint: if you still have the no. 80 on your needle, work the foliage between the blue flowers in feather stitch or fly stitch. Make lazy daisy stitch at the end. See photograph below.
  The Bottom Yellow Bush (M2) A. Add the fibre and make the branches Refer to the above picture as a guide. Use a piece of fibre as you did before, teasing it out to form a thin film. Use 1 or 2 strands of 723 or 729, couch in place with long fly stitches or straight stitches as shown in the picture. Use no. 99 (4mm) ribbon and make French knots (one wrap) for yellow flowers. For smaller flowers, use the same ribbon and ribbon or straight stitch.Change to 1 strand of 253, Coral, and make French knots in the centre of the flowers, wrapping thread twice around your needle.
  Change to 1 strand of 4045 green and make fly stitches to form the fine stems holding up each flower. This will add the proper framework for an authentic effect.
  Section P. Make the Green Foliage 1. Make the dark green shadows.With1 or 2 strands of 812 fill in the dark shadows with French knot – 1 or 2 strands, 3 wraps. Use Fly stitch or straight stitch for the pointed shapes as shown below.
  2. Make the leaves With 7mm no. 25, make loose/puffed ribbon stitches working from the top downwards as shown in the picture. Work over a spare tapestry needle to form raised shapes. With 723 green, make 3-wrap French knots on the base of the leaves to secure the stitch and to re-shape at the same time.Hint: By stitching the base and/or the tip of each leaf, you will prevent the stitches from pulling out of shape as you form the adjacent shapes.
  Add more French knots between the plum-coloured stitches. See picture below.
Section P. Make the Blue Flowers
1. Make the blue flowers and brown stems Open packets of 7mm no. 64 and 88. Iron both colour ribbons with curling tong or iron to remove all the creases.  Thread up with the 7mm no. 64 ribbon on a large chenille needle. For the length of the ribbon to use, measure the length of the flower on the design, multiply by 5 then add on another 5 cm (“2”) for the starting and ending off. For example, a 5 cm long flower will use 5 cm x 5 plus 5 cm = 30 cm or (12”).Then thread up with 20 cm (8”) of brown yarn on a medium chenille needle. Come up with the ribbon at the base of the flower on the design. With 1 strand of blue 521 thread, secure the tails at the back of your work. End off and trim the thread at the back.
  With the yarn’s needle, come up at the base of the stem. Make a stitch to create the stem (no need to take it to the back of your work) and when you reach the starting point of the ribbon, make small running stitches (zig-zag style) in the ribbon about 4mm (1/8”) and push down to gently gather the ribbon. Repeat until there is enough gathered ribbon for the length of the flower.
  Keep up with the running stitch, gather gently until you are happy with the length and thickness of the flower or if there’s 4 or 5 cm (2”) of ribbon left.
  Take yarn and needle to the back and end off, take ribbon and needle to the back and use the blue thread to secure the tail. Trim the tail short so that it does not get in the way while you stitch.
 Gently shape the gathered flower until you are happy with the shape and use the 521 blue thread (1 strand) and couch the gathered flower here and there with hidden stitches so the flower is supported on your design. 2. Add the foliage
  Use the green fluffy yarn supplied in the kit and cut 10 cm pieces. Insert between the blue flowers. Use the pints of your small scissors or a tapestry needle to push it under some of the longer flowers. Not too much (the flowers should not look bent) and couch it in place (here and there) with 1 or 2 strands of 723 thread and tiny stab stitches.
  Couch the fibre to secure...
  3. Make the dark blue flowers in the background With 2 strands of 521 blue thread make the dark blue flowers in the background with French knot (3 wraps).
  Once you have run out of the no.64 (and also to add an interesting variation in colour), use the 7mm no. 88 ribbon. See the picture below. Then add more green woolly bits between the flowers and couch in place as you did before. Add more navy shadows in the background with the 521 thread (two strands) and make French knots. Use the brown yarn to add more stems if you like, then re-shape ribbon flowers to your liking.
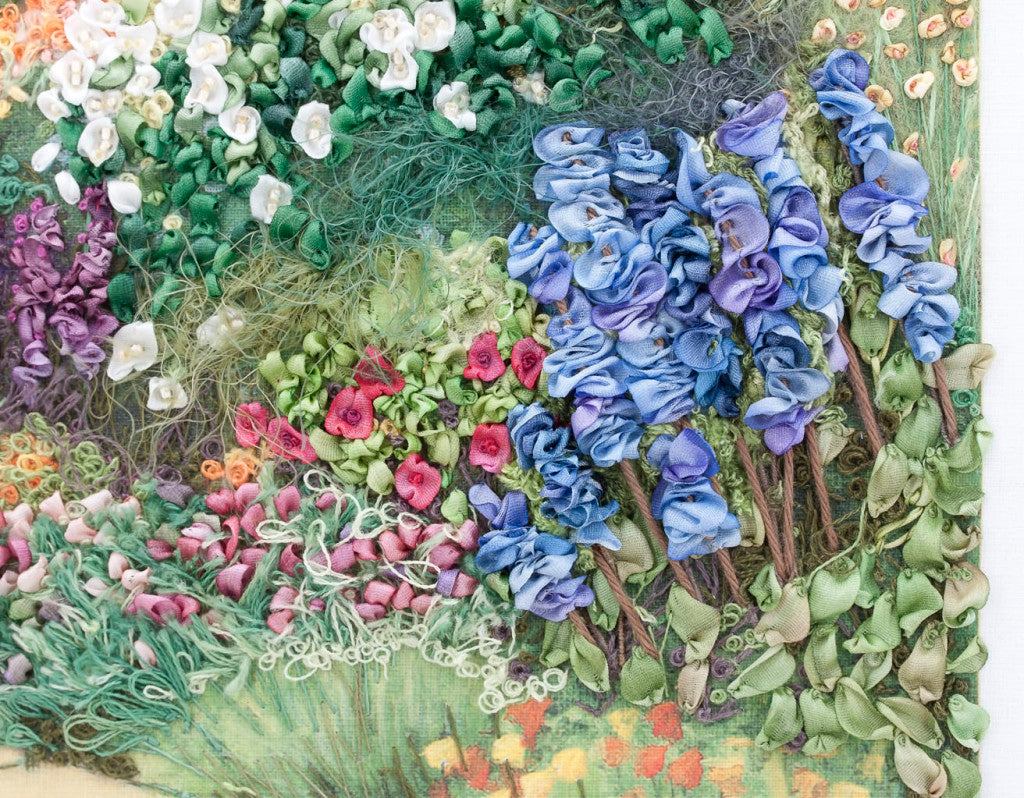
Section K. Make the green grass
Thread up with 2mm ribbon no. 79 and, using a kebab stick or similar object, make long loops as shown using the single-knotted stitch method. Start halfway up the section, as shown, make a loop. Come up at the base of the stitch and make a tiny stab stitch to secure the loop.  Make more loops between and behind the others, always holding them in the direction you want them to face before securing with tiny stab stitches. Remember that it’s best to hold the loop in the direction that you would like it to face as you make the tiny stab stitch at the base.
  Once you are happy with the number of loops, bring them forward and insert some of the green fibre behind the grass as shown and couch in place with two strands of 830 golden green.
  Hint: to encourage the loops to stand upright, use 2strands of the 830 thread and make tiny (vertical) stab stitches close to where the loop emerges from the fabric. While you have the thread on your needle, make a few more loops and loose French knots between the other loops.
  Change to 2 strands of 747 dark green thread and with the same single-knotted stitch make dark green grass to create the shadows. See the direction of the loops? Hold them that way as you make the anchoring stitches. Trim shorter as you see fit. Change to 806 green and repeat loops as shown. Cut some loops, leaving others as they are, brush them upright once you have cut the loops.
  Change to 2 strands of 905 dark plum thread and make the dark plum shadows by repeating the steps as shown below.
  Change to 2 strands of 723 make olive green grass and add a few loosely wrapped French knots (3 wraps).
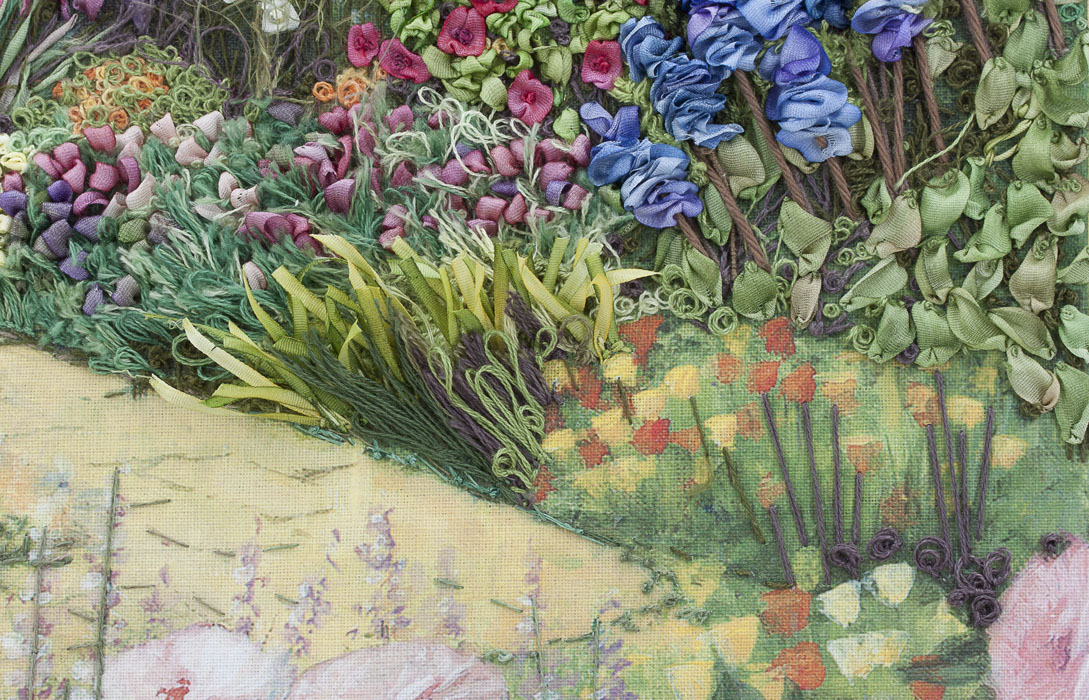
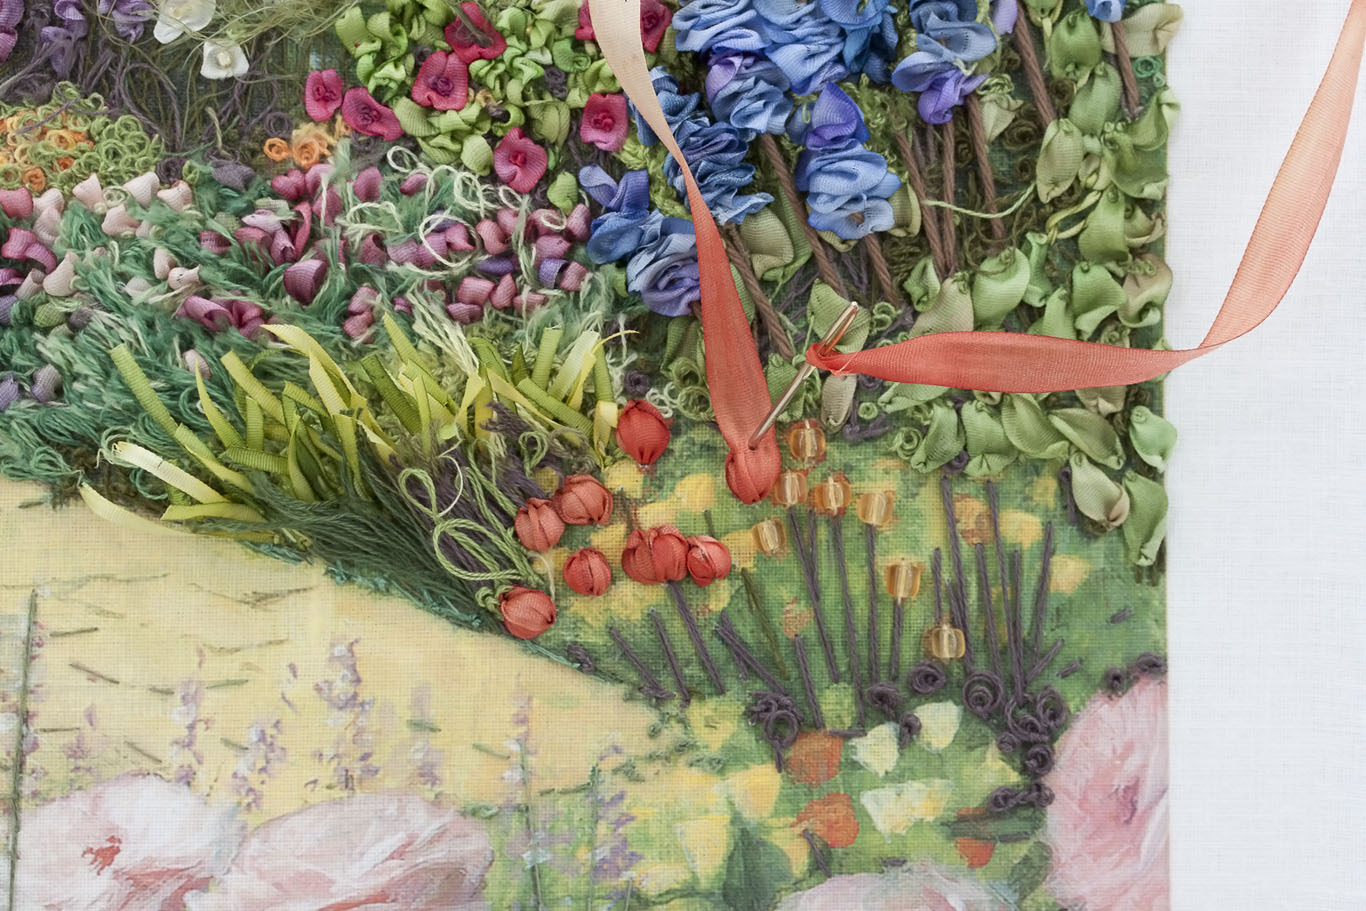
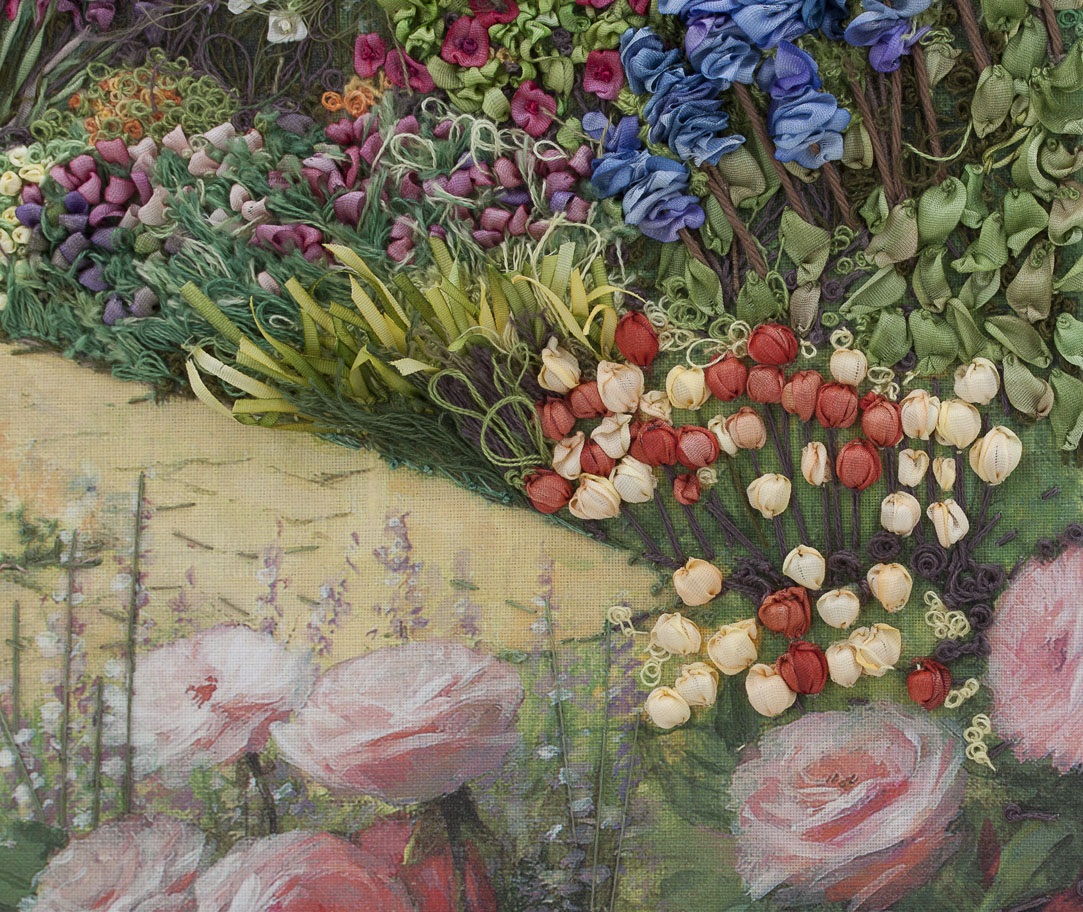
Section O. Make the Orange and Yellow Flowers
1. Make the stemsWith three strands of 905 make some flower stems in straight stitch and add a few French knots to create shadows — 2 wraps around your needle. See the photo above. 2. Make the Orange FlowersSee the yellow or green beads that we included in the kit, 3mm (1/8”) to 4mm in size? Add the beads first. These will give the flowers a softly raised look. Choose a fine embroidery needle, or any fine needle that will fit inside the bead, and with one strand of 830 (golden green) thread, secure a bead on top of the orange flowers, securing with two or three stitches. Repeat for all the orange flowers, leaving the very small flowers to be covered with a ribbon stitch or straight stitch.The yellow flowers will be done a little later.  Iron the 7mm no. 91 and thread up. Leaving a tail at the back, come up at the base of the flower. Make a ribbon stitch and insert needle close to the outer edge of the bead so that the ribbon fits snugly around it. Make 2 or 3 ribbon stitches to cover the bead. Secure the tails at the back and trim them so they don’t get in the way as you stitch.
  3. Make the Yellow FlowersThread up with two strands of 830 and make a few two-wrap French knots to add colour for the smaller yellow flowers. Use 7mm no. 54 (iron it to remove the creases, if necessary) and make the yellow flowers as you did the orange ones, work over a bead for a softly raised effect. Use 1 strand of 830 to make tiny stab stitches at the tip of each flower. This will shape the ribbon nicely and secure at the same time. Make ribbon stitches for the smaller flowers in-between.
  4. Make the long leaves
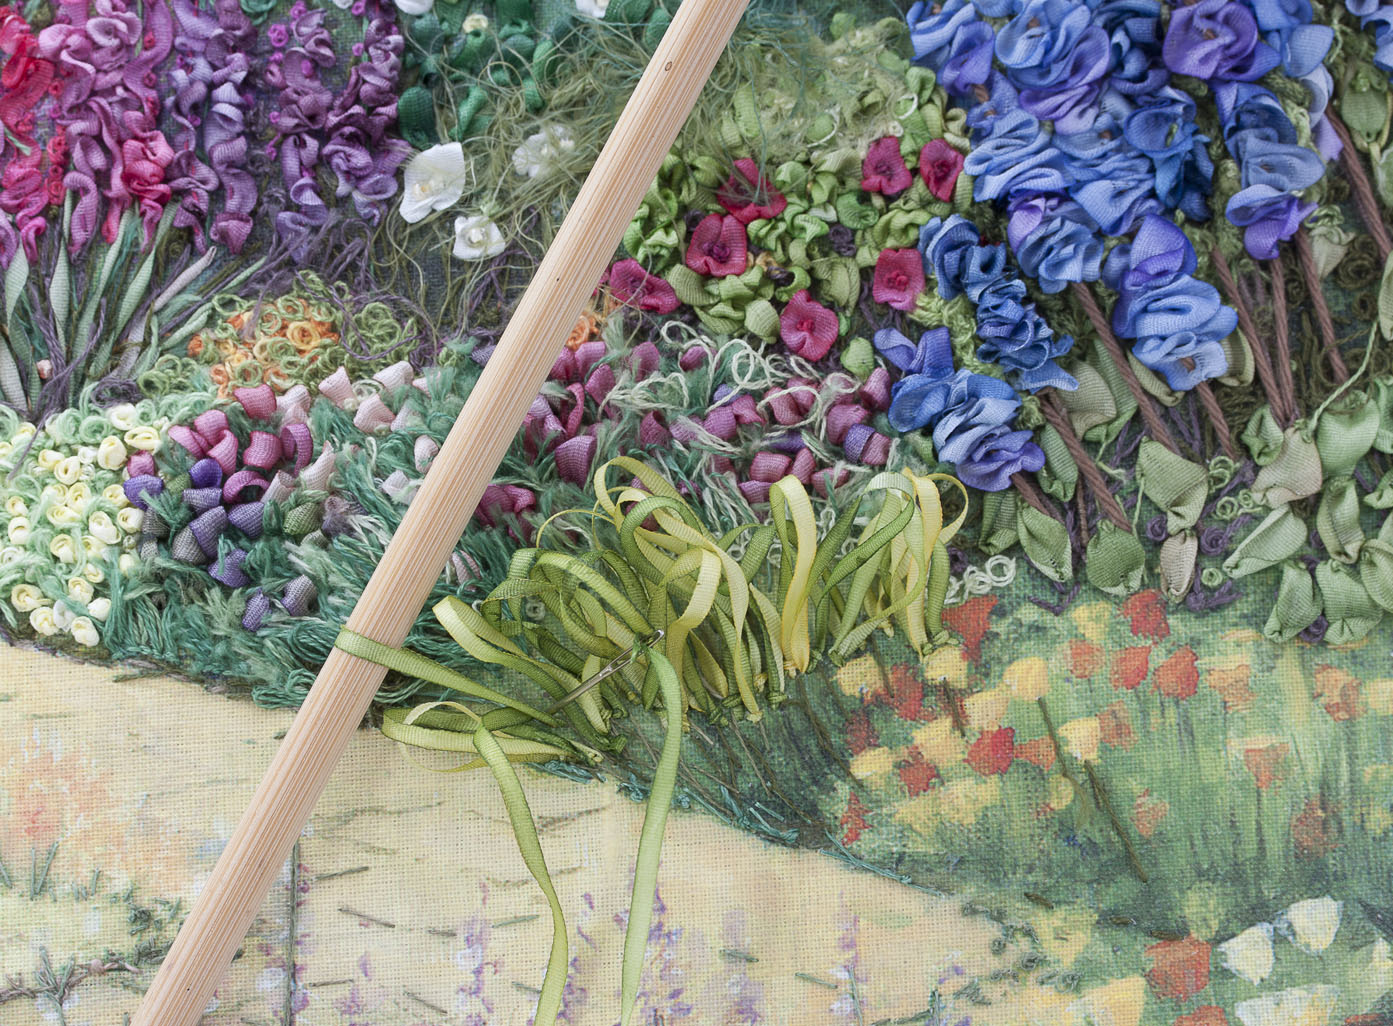
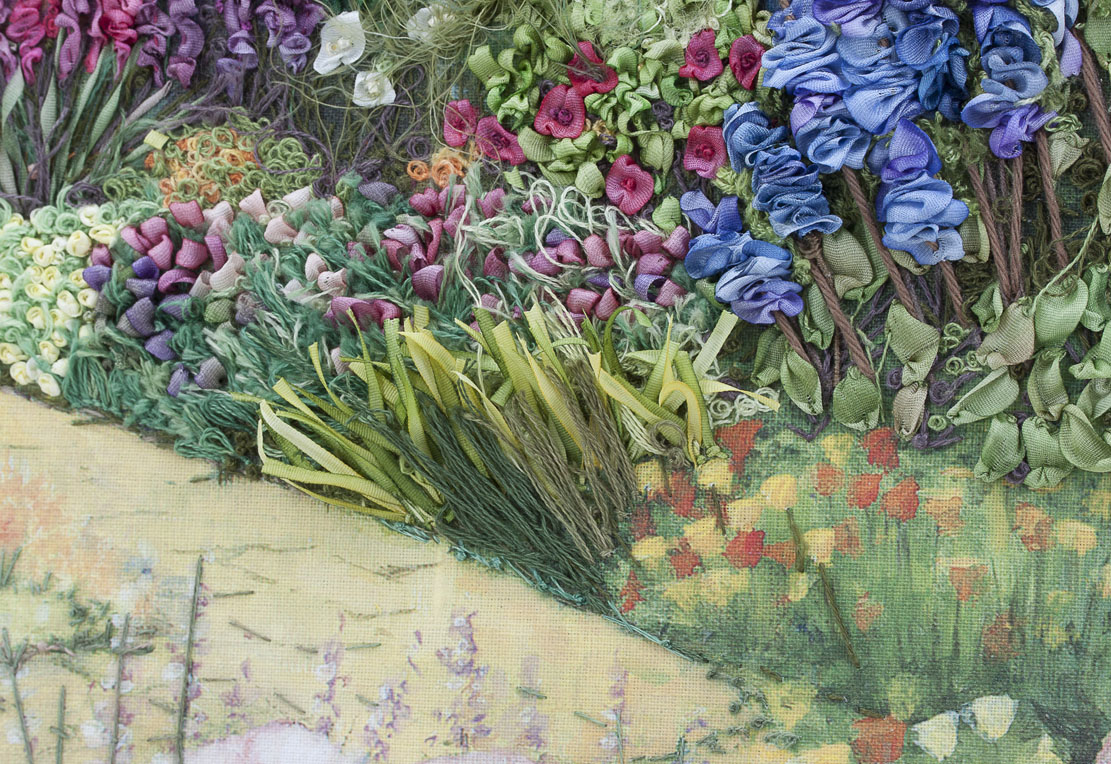
  Thread up with 2mm no. 24 and with the same stitch as for the long grass in section K, make long loops and secure with a tiny stab stitch. Work from the top down towards the bottom of this section.
  Trim the loops, as shown, creating long strap-like leaves. For an authentic finish allow some of the flowers to be behind the leaves. Remember, where necessary, you can use a matching green thread and make a tiny stab stitch along the base of each leaf to encourage them to stand up straighter.
  Change to 2mm no. 26 and make the brown/green leaves in-between to create depth in your design.
  5. Make the short leaves The flowers in front (near the large pink roses) have shorter leaves. Use the 2mm no. 26 and make loose French knots, wrapping ribbon two or three times around your needle.Add a few more dark plum knots with 905 thread and dark green knots with 812 thread. Use two strands, three wraps.
Complete Steps 8, 9 and 10
1. Make the leaves Use 2mm no. 126 and make the long pointed leaves of the white flowers in straight stitch, making vertical and horizontal stitch as shown in the picture. The white flowers will be added later.  Use 2mm no. 26 and make the round green leaves of the lavender flowers in loose French knots, wrapping ribbon (1 or 2 wraps). The longer leaves are pistil stitches or extended French knots. Some are vertical and others are horizontal to the flower bed. 2. Make the white, the purple and the orange flowers White flowers: With 2mm no. 103 ribbon, make the small white flowers in ribbon or straight stitch, pistil or French knots — one wrap.
  Purple: With 2mm no. 96, make each lavender flower with a straight or back stitch. Then come back and whip each stitch by inserting the needle under and over every stitch (3 or 4 times per flower) to form a fat, padded shape. Change to 2 strands of 4145 and make the lavender stems in straight stitch. See picture above. Orange: Use 2 strands of 4100 and make the orange/peach flowers with French knots, wrapping thread loosely twice around your needle for smaller shapes and three times for larger shapes. Keep the stitches loose and looped. Repeat for the orange flowers to the left of the white flowers, near the pink rose bush. See picture below.
Complete the tree trunks and flowers in the far distance
With 4145 thread, 2 strands, complete the tree trunks (the one showing between the two hedges and the trunk and branches on the left-hand side of the picture as well) and use rows of stem stitch, making the rows close together for a neat finish.  Use 253 thread (two strands) and make the coral flowers under the tree in French knots, wrapping thread once around your needle.
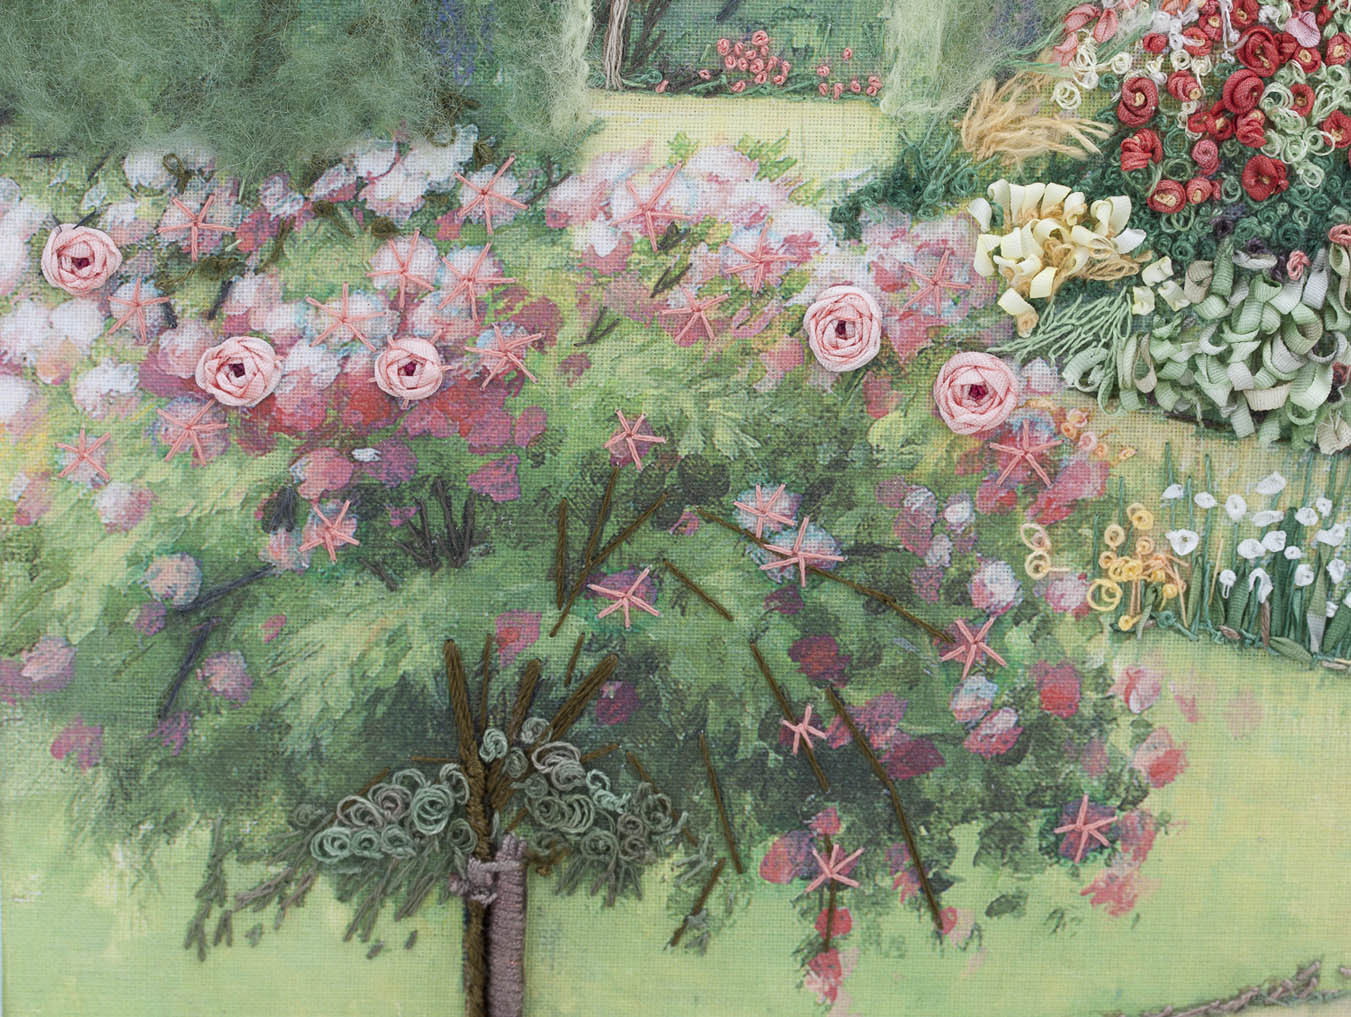
Make the big rose bush on the left
1. Make the roses The roses are made first in this case as we will use spider-web rose method and you don’t want any leaves in the way as you make the roses.Optional: with a blue water-soluble pen, draw circles about 6 or 7mm no. in diameter. For roses that are any smaller than that, then we will use the twirled ribbon roses that you learned in Section B, Chapter 2.Use 2 strands of 253 thread and make the 5 foundation spokes for the roses. Refer to the pictures as a guide.  With 4mm no. 46, make the light pink roses first. Come up in the centre and twist the needle a few times so the ribbon is twirled. Weave the ribbon under and over the spokes to form a pretty rose. Don’t pull too tight, the ribbon should form soft, somewhat open petals.
 Any spokes showing around the rose will be covered with leaves a little later. Alternate with no. 46 ribbon and then change to 4mm no. 114 to form the light pink roses in the design. Optional: Use 4210 thread and with one strand, make a two or three-wrap French knot in the centre of the rose. Otherwise, use the 253 coral thread if you want less contrast.Use the 4210 (fuchsia pink) thread or the 253 (coral) thread to make more roses with the 5 foundation spokes as shown below.
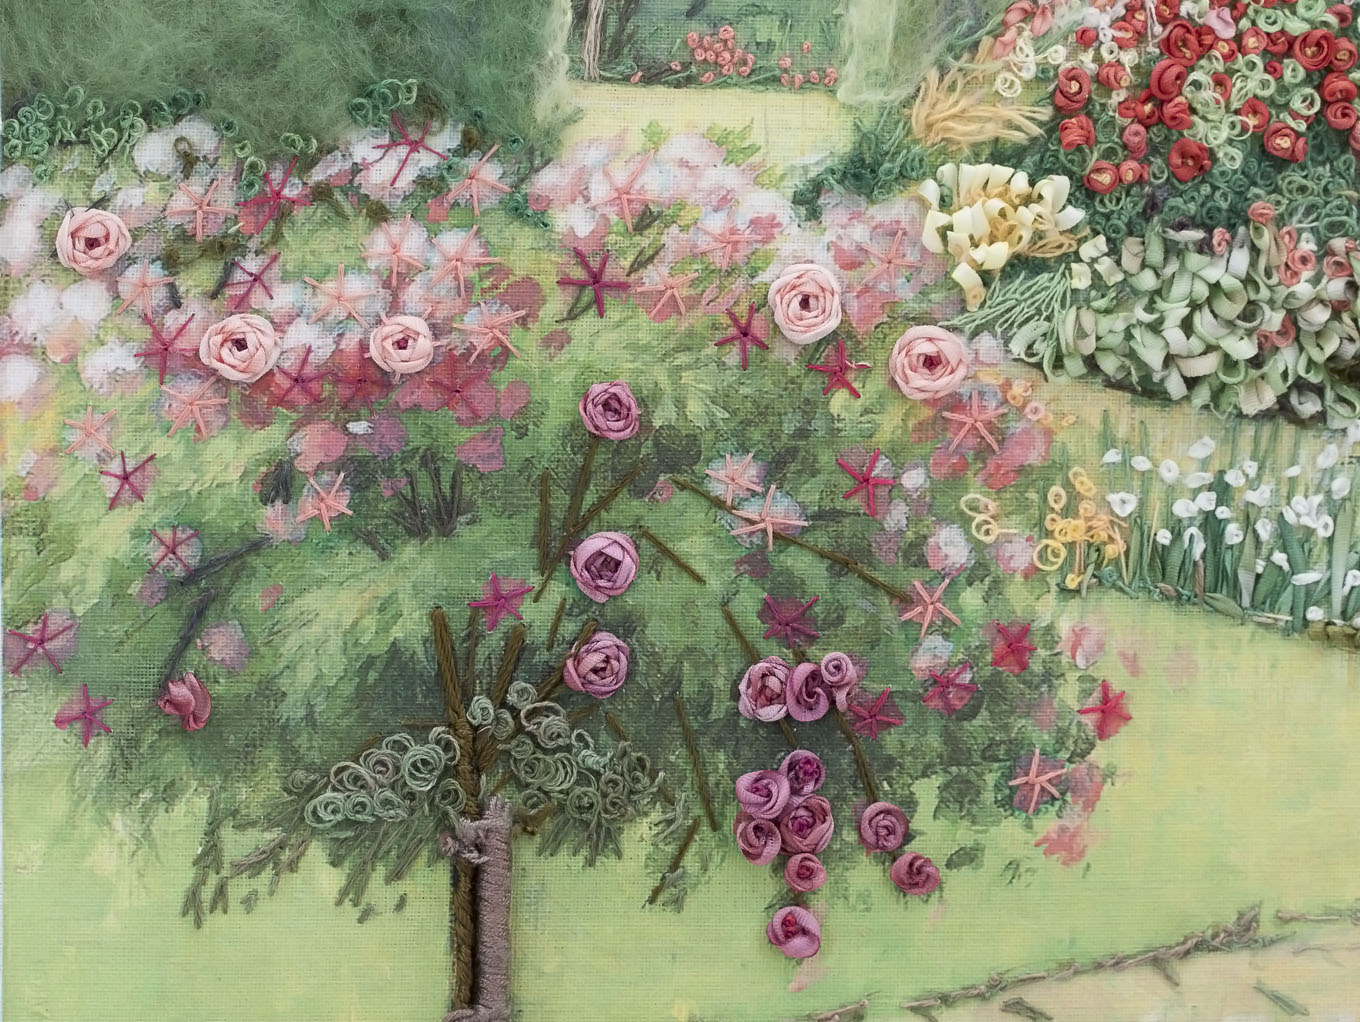
  Change to the 4mm no. 42 ribbon and then to no. 41 and make the darker pink roses in the same way. Later after all the spider-web roses are completed, for the smaller shapes, use the Twirled Ribbon Rose method that you used in Chapter 2 (section B). It’s best to make them after the spider-web roses as they tend to pull out of shape otherwise.Hint: for the spider-web rose and the Twirled Ribbon Roses, it’s a good idea to allow the ribbon and needle to hang off from the back of your work so that the ribbon can unwind completely. Then twist it a little bit again before making the next rose. Hold the previous Twirled Ribbon Rose with your fingertip as you make the next one. This will help to control and to prevent it from pulling out of shape. Add a few French knots in the centres of the Twirled Ribbon Roses, as you did before, with 1 or 2 strands of 4210.
  Make more medium pink roses with 4mm no. 39. See picture above. Use the Twirled Ribbon Rose method for some, and spider web roses for others. For the small buds and hard-to-reach areas between the roses, use ribbon stitches in 4mm no. 39 or 42. Use the 4210 (fuchsia pink) thread or the 253 (coral) thread to make tiny stab stitches on the tip of the ribbon stitches to secure them. Remember to turn your work over to the back as often as possible to check for loose threads and ribbons and use one strand of pink thread to secure the tails or any loose pieces on the design. Trim the tails short so they won’t get in the way as you stitch.
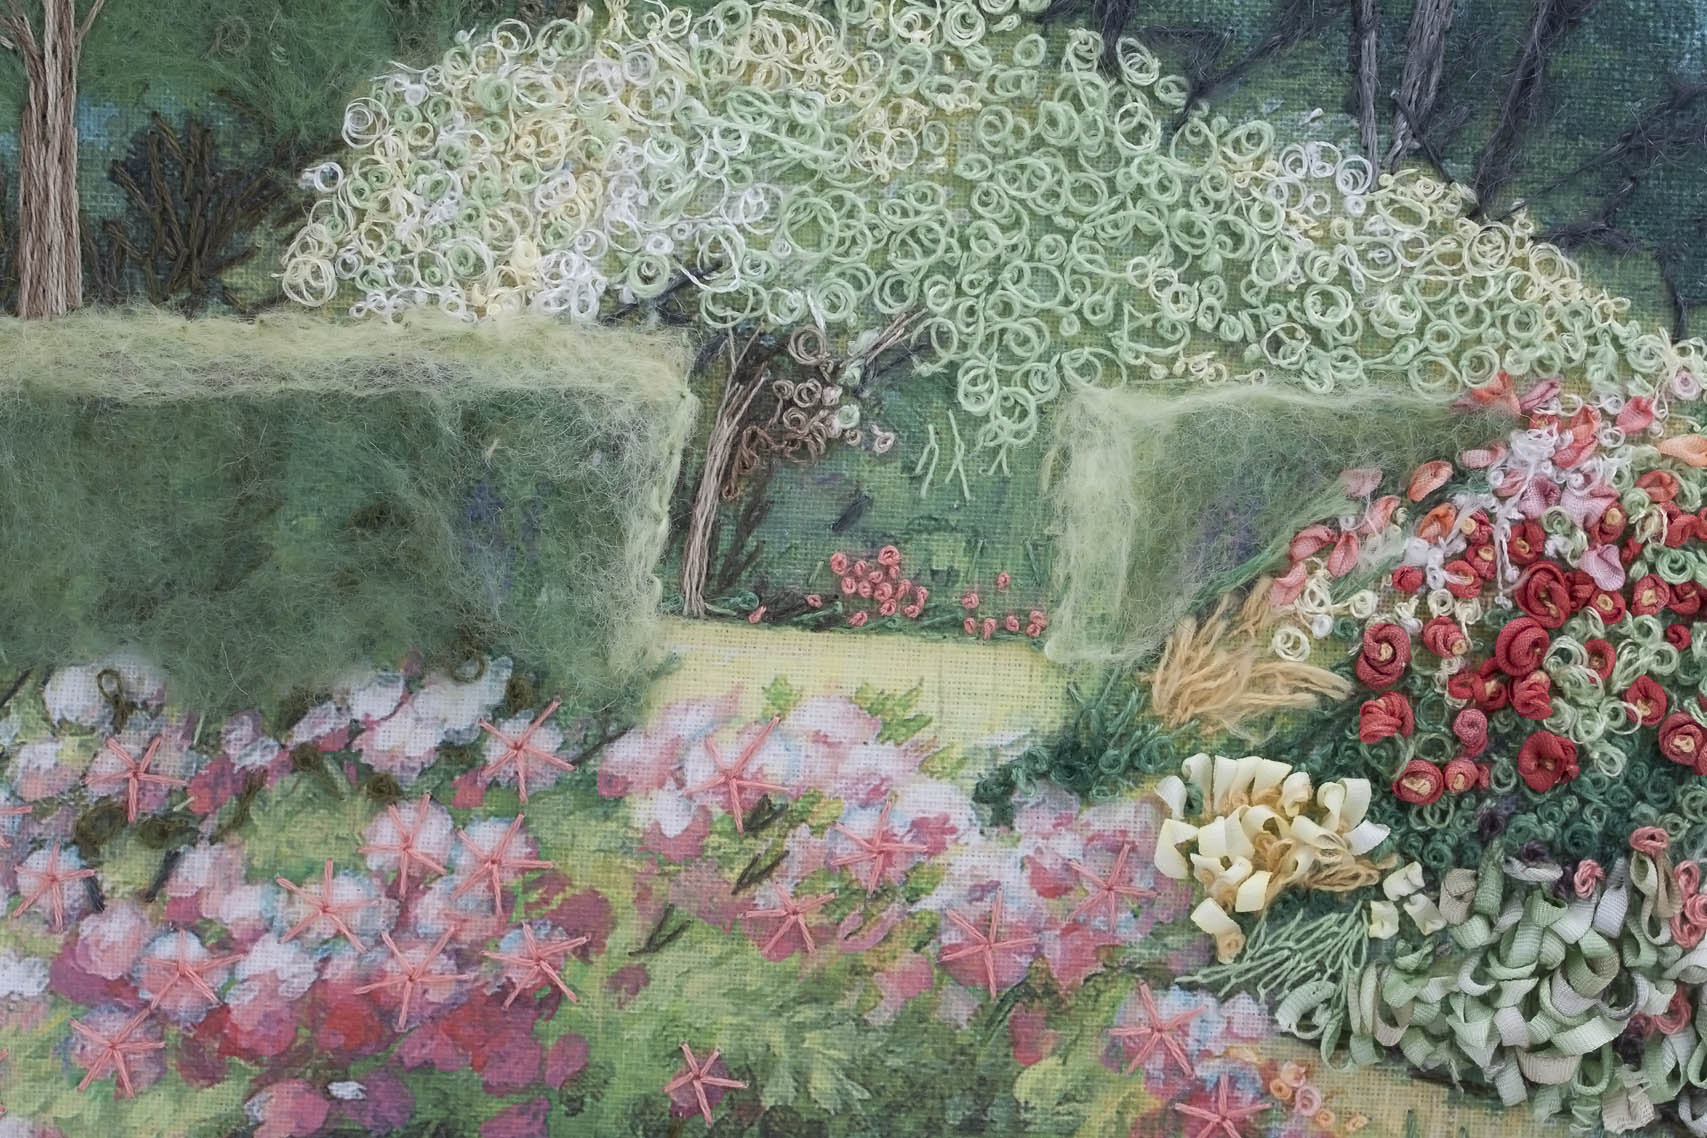
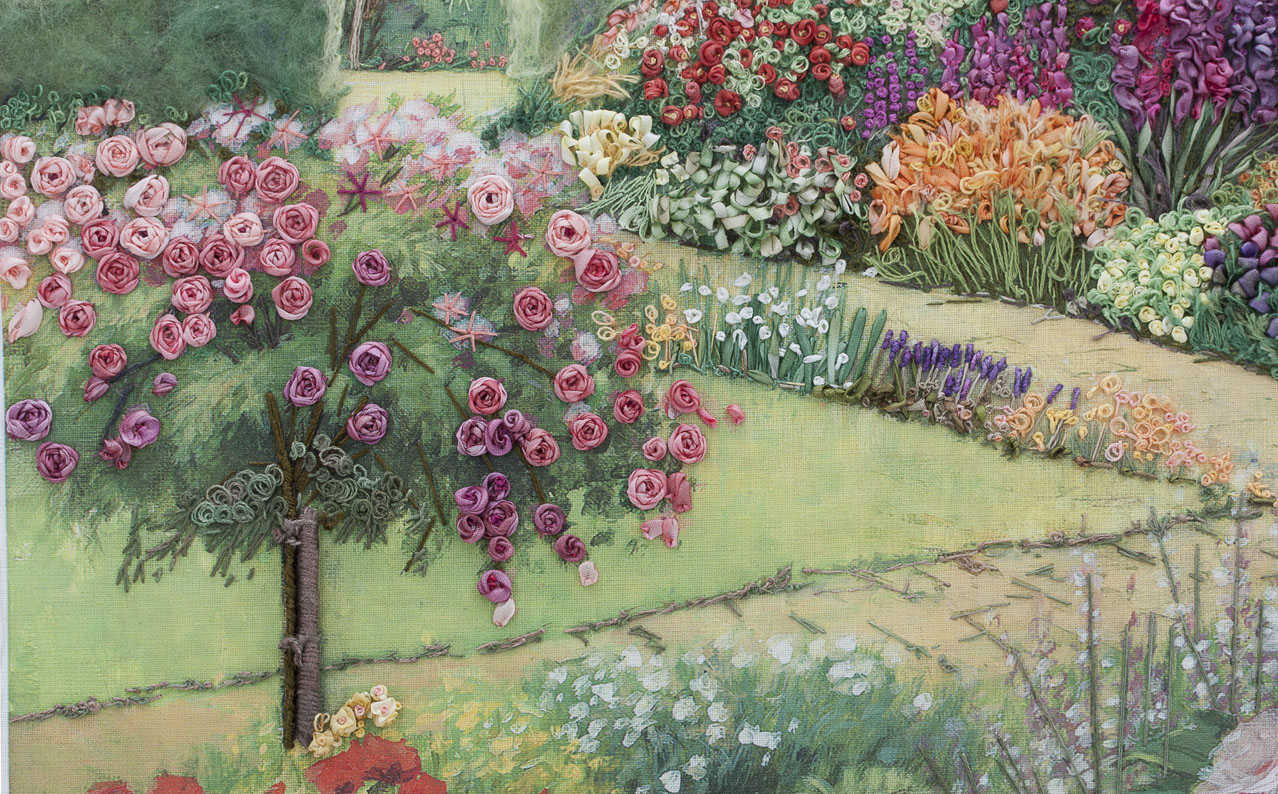
 Complete the trees in the background
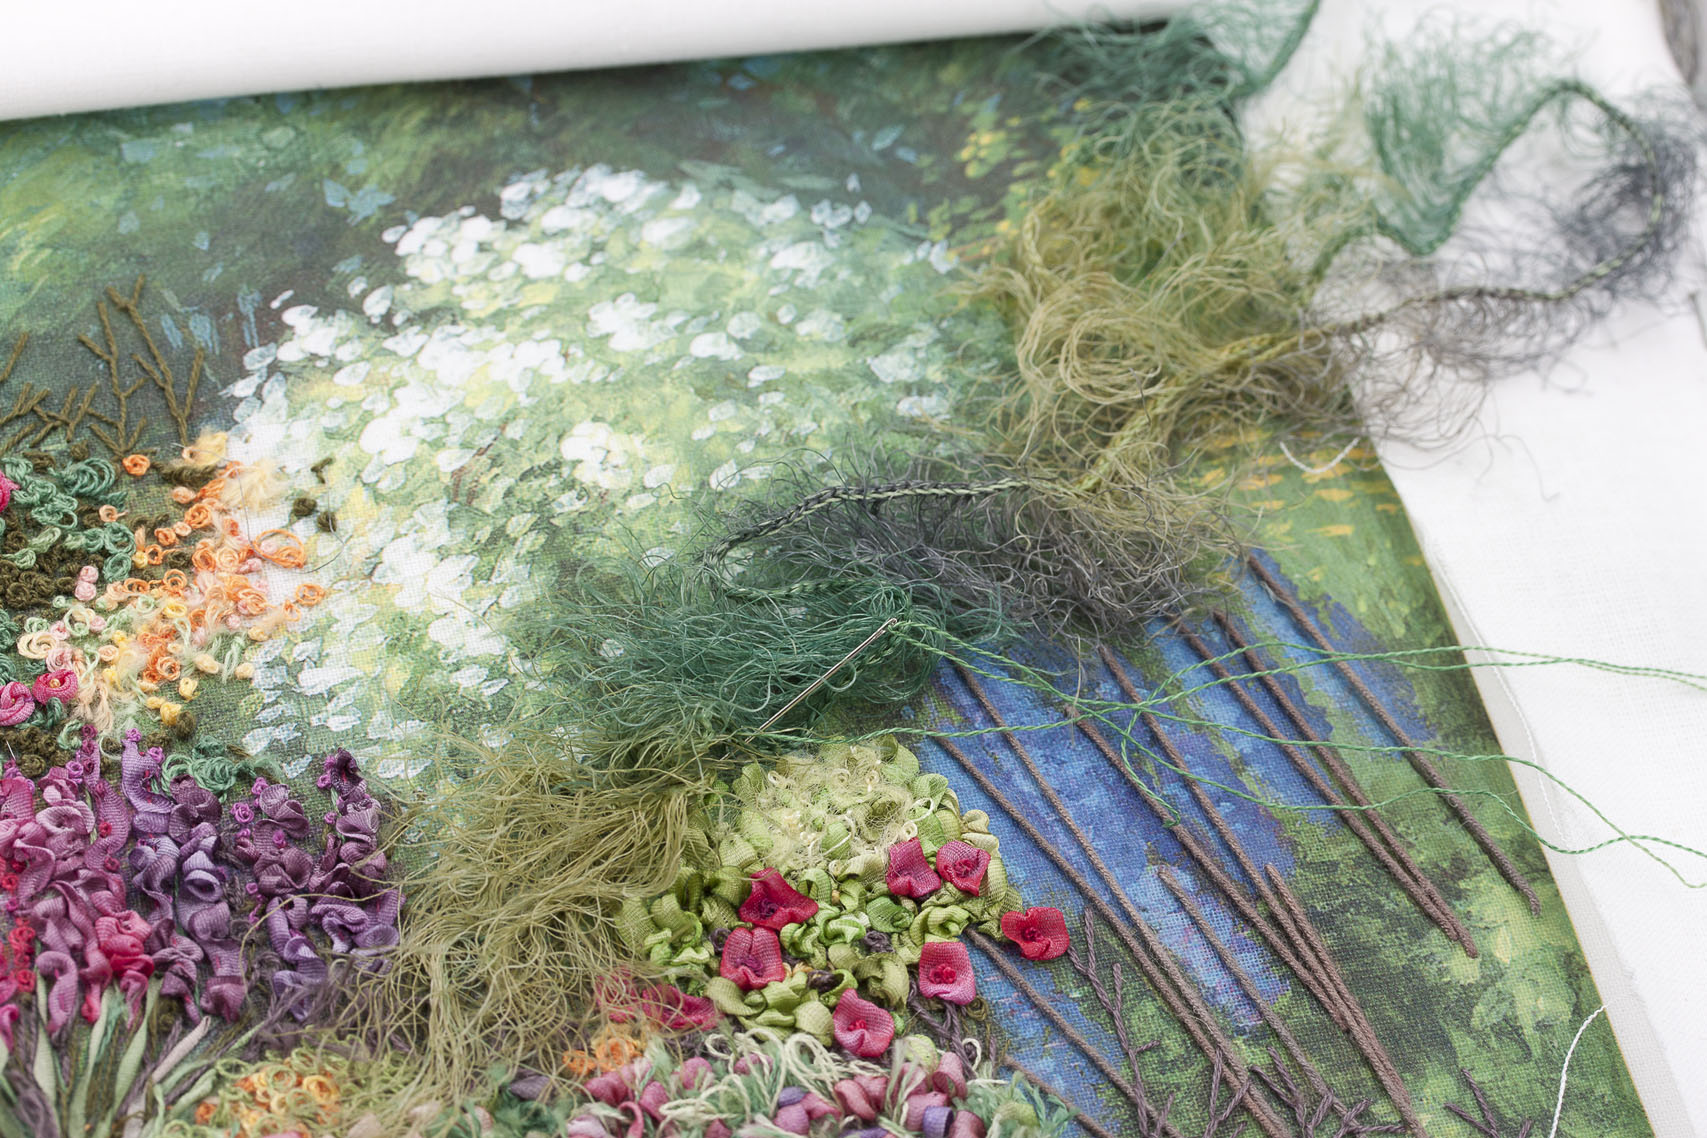
It is at this stage that you will have a good idea of what texture you require in the far distance. Before this, it would have been difficult to be absolutely sure that you were choosing the correct texture/fibre or stitch for the far distance. So I stopped making the rose tree and added the texture for the trees. Use the green fluffy wool supplied in the kit and take the piece that you cut at the beginning of this Chapter which is 38 cm (15”) long. 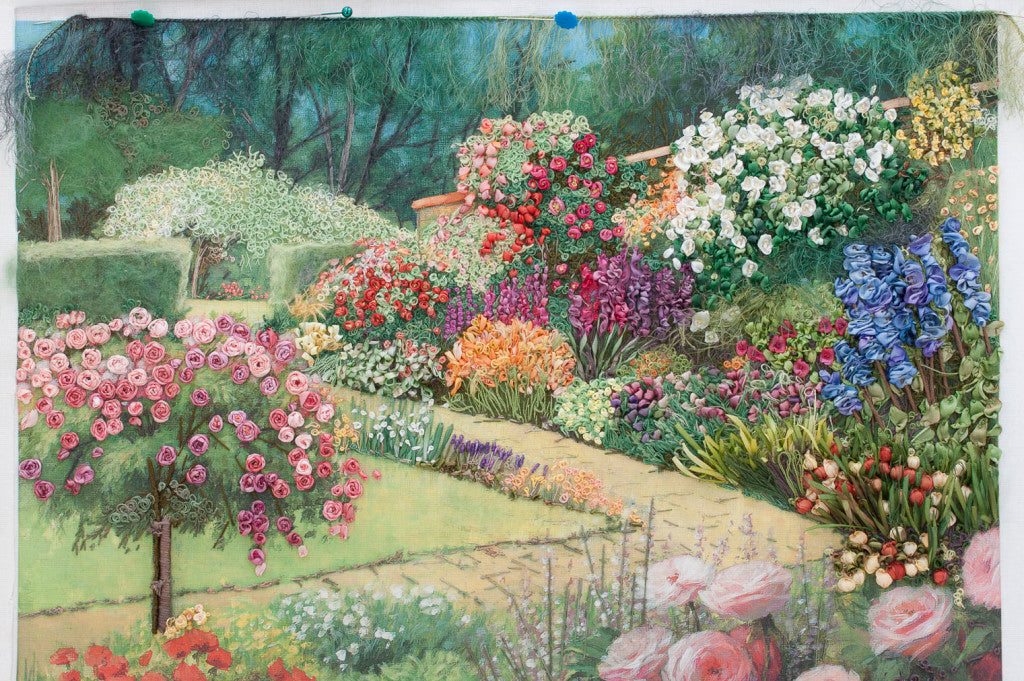 Place the edge along the edge of your picture and pin it in place. No need to take the raw ends to the back of your work, trim and leave on top of the fabric. See the picture above. With 2 strands of 747, couch the edge onto the fabric or use back stitches. Make a stitch every 4 or 5mm (just over 3/16”).
  Optional: Use the fibre left over from the hedges and make the trees below the woolly canopy. Tear out a thin film and secure with 747 green thread. Use long straight or fly stitches to create the fine branches that will secure it onto the design.Hint: if necessary, neaten and add more green fibre on the two hedges that you made in Chapter 2. Use 4045 green (1 strand) and small stab stitches to secure here and there.
 Make the leaves on the rose bush
1. The dark green leaves.Use 2mm no. 126 and make the small darker green leaves close to the stem of the tree. Make them loose and puffed, working downwards as shown. With 1 strand of 806 or 747 make a loose French knot, detached chain /lazy daisy or fly stitches for the finer detail, stitching onto the ribbon leaves to secure the stitches.  2. The light green leavesWith 7mm no. 25 ribbon make the larger, light green leaves at the top of the bush. Use ribbon stitches making them loose and puffed. Cover any of the pink areas that are showing. With 1 strand of 723 thread, make tiny stab stitches on the tips of the leaves to shape and secure. Remember to secure and to trim the tails at the back.Change to 4mm no. 132 and make more light green leaves working on the sunny part of the rose tree. Use 2mm no. 79 to form the thin pointed (light green) leaves on the outer edge of the tree. Use fly stitch or detached chain /lazy daisy stitch. Change to 2mm no. 126 for darker green leaves on the outer edges. Then use 4mm no. 35 and complete the light green leaves in the same way.
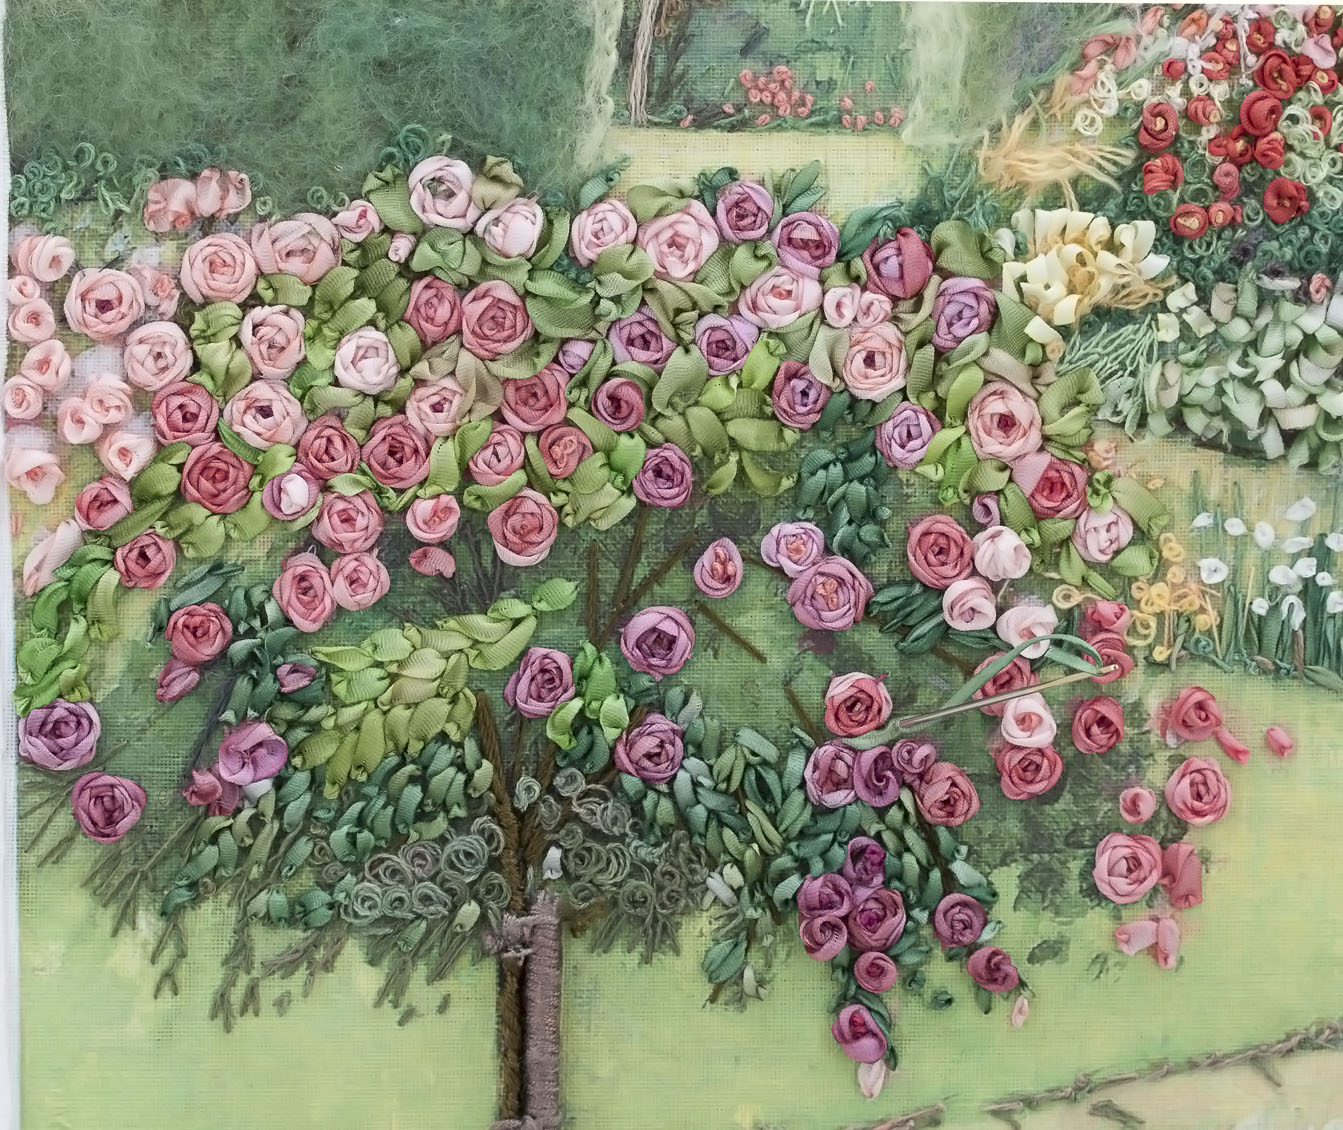
  And... here is the completed rosebush.
 Click on the images to enlarge.
 Method. Step 1. Add more leaves as follows: Use 4mm no. 35 or 36 (which we will include in the kit for the final Chapter 6) and as you did before, make the medium green leaves in ribbon stitch. Make some stitches loose and puffed and others flat or less rounded for an interesting texture. Refer to the pictures above and below as a guide.
  Step 2. Add the dark green shadows between the ribbon leavesUse 1 strand of 747 and 1 strand of 806, threaded onto the same needle. Make loose French knots, wrapping the thread three times around your needle. Step 3. Make small branches on top of some leaves Use 1 strand or two of 814 thread and make straight stitches or fly stitches for the branches. Step 4. Add yellow highlights on the left-hand side With 112 thread, one strand or two, make loose French knots, wrapping the thread two or three times around your needle. You can also use detached chain or lazy daisy stitches.
  In the next (and final chapter, Chapter 6) I will show you how to make the flowers and roses in the foreground (steps T, U, V, Q, R, S, W and the finer touches to use when finishing off. I hope that you will enjoy this lovely project as much as I did. It's a wonderful way to learn how to create beautiful landscapes with silk ribbon and threads. For those of you who would like to start the Pink Delight project and learn by following Chapters 1 to 5, please feel free to email us at info@dicraft.com and ask for the Pink Delight project. We will assist you with the kits (panel, threads, ribbons, fibres and yarns) for chapter 1 to 5. Or you can order the kits online:
If you do not have the panel, you can purchase it here
The multipurpose needle pack can be purchased here
The kit for Chapters 1, 2 and 3 can be purchased here
The kit for Chapter 4 can be purchased here
The kit for Chapter 5 can be purchased here ** Here is the final chapter (Chapter 6) for the flowers in the near distance.  Have fun!LoveDi


![IMG_6092[1]](https://gstatic.co.za/dicraft-legacy-cdn/2019/03/IMG_60921.jpg)
![IMG_6095[1]](https://gstatic.co.za/dicraft-legacy-cdn/2019/03/IMG_60951.jpg)
![IMG_6098[1]](https://gstatic.co.za/dicraft-legacy-cdn/2019/03/IMG_60981.jpg)
![IMG_6104[1]](https://gstatic.co.za/dicraft-legacy-cdn/2019/03/IMG_61041.jpg)
![IMG_6186[1]](https://gstatic.co.za/dicraft-legacy-cdn/2019/03/IMG_61861.jpg)


Leave a comment