
# Type at least 1 character to search # Hit enter to search or ESC to close
Cart


Would you like to make some strawberries for a design that you are working on? You could also use the ideas below to make single strawberries for your Christmas tree or to decorate a Christmas wreath and presents!

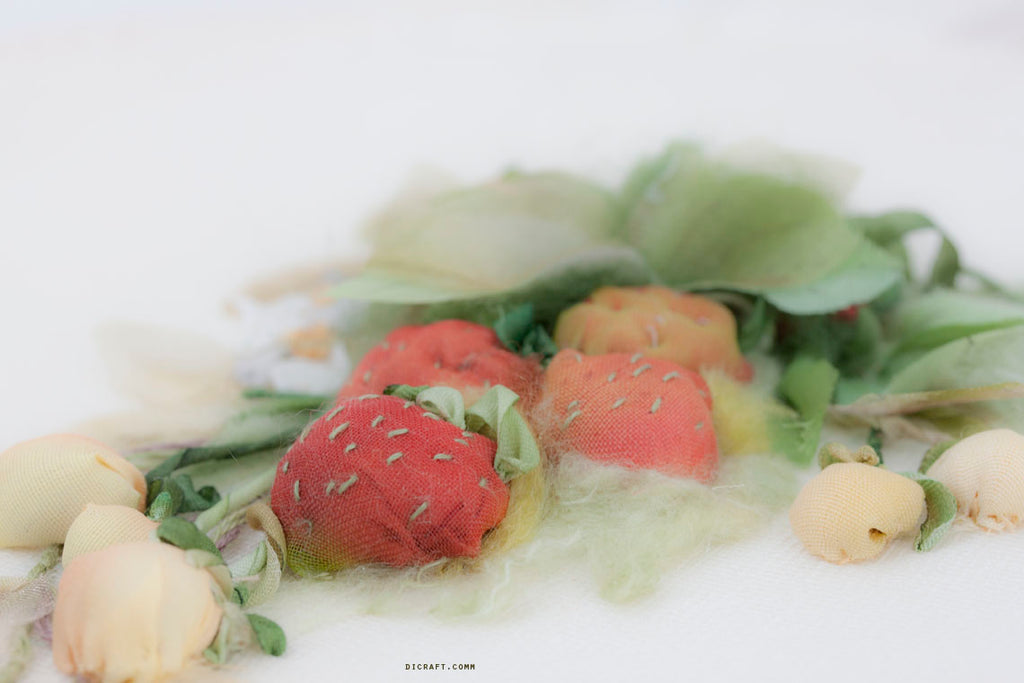
This is the strawberry design that I made using an interesting technique that I hope you will enjoy using in your own creations. The cute strawberries are made with circular shapes of ribbon that are filled with woolly fibre to create rounded shapes. The size of the circle will determine the size of the strawberry. For larger strawberries, use silk and organza fabric.


Here I made circles ranging from 32 mm and 38 mm in diameter. I used a 32mm silk ribbon no. 147 and a 38mm organza ribbon no. 147 (I used ribbons from my range - the Di van Niekerk's range) but you can use whatever size suits you.
With a sharp pencil or water-soluble pen, trace a circle onto 32mm silk ribbon and trace a circle onto 38mm organza ribbon no. 147 as well.
Note: Draw some circles onto yellow/green part of the ribbon, others onto the red part (which will be used for the ripe strawberries). Draw as many circles as you need for your strawberry design.

Draw some circles onto the yellow 32mm silk no. 146. These circles should have bits of pink showing alongside the yellow. Cut out the shapes as shown.
Hint: if creases on the ribbon are bothering you, press with a steam iron on a silk setting.
Take a ribbon circle and thread up with a matching thread (one strand out of the six). Make a knot at the long end. Form a circle of running stitches about 2mm (1/16 “) as shown.

Place a ball of pink woolly fibre into the centre and gather the thread to form a ball.

Work stitches across the opening to hold the fibre and end off.
Take an organza circle and repeat running stitch along the edge, as before. Gather slightly and place the silk ball inside organza shape as shown.

Gather thread and ...

work thread across the opening to close it.

With tiny stitches secure the strawberry onto the fabric, gathered part facing the fabric and work along the edge of the shape through all the layers. Hint: use the blunt end of a chenille needle to push the loose bits of organza under the shape to neaten the edge. Use tiny stitches along the edge to shape and to neaten.

Make the tiny specks (achene)
Use small straight stitches, working with a loose tension so as not to flatten the strawberry. Hint: if you angle the needle through the woolly fibre as shown, the shape will flatten even less. Once completed, take the needle to the back and end off.
Make the silk leaves
Use a green ribbon (here I chose the 32mm ribbon no. 33) and with a blue water-soluble pen, trace a few leaf shapes.

Use a waterproof black pigment ink pen to draw the veins onto the leaf and cut out the shapes.
Apply water-soluble anti-fray agent onto the entire shape and allow time to dry.

Dip an earbud into a glass of water and with the wet earbud, dampen the edge of the leaf to remove the blue marks. Allow time to dry.

Use a matching green thread (one strand) and make tiny stitches to secure a silk leaf onto the design as shown. Allow the edges of the shape to stand free. Apply a few other leaves as you like. Working from the stem outwards and using tiny straight/stab stitches through all the layers, make two or three stitches, one top of the other to secure each shape. Note: The edges and tip of the leaves are lifted off the surface of the design.

Make another strawberry and secure onto the design. Add more leaves and strawberries as you like.
Add shadows
Use a small piece of dark green woolly fibre (about the size of a pea) teasing it out to form a flatter surface. Use the blunt end of a large needle: insert fibre between the leaves and under the strawberry. Add a piece of medium green to create more shadow and to help lift leaves up and off your design.

Use more of the pale green fibre; place it between the strawberries to build more texture. Secure with matching thread and tiny stab stitches. Place stitches only where necessary — the woolly texture shouldn’t be too flat. Pull the fibre gently to add colour along the edge of the design. Use one or two stitches to secure as you did before.

Make the green calyx and stem and add more specks.
Thread up with green 7mm ribbon no. 33 and make the calyx of the strawberry with ribbon stitch. Use a gentle tension so as not to flatten the stitch. Make three or four stitches close together. Make the stem with the same ribbon and twisted straight stitch, twisting the ribbon before inserting the needle under the leaf and taking it to the back of your work. Hold the stem as you take the ribbon to the back to form a softly curved shape. Use one strand of a matching green thread and tiny stab stitches to secure the stem — place stitches only where necessary; work with a gentle tension so as not to flatten the stem. With a shiny white metallic thread, add some more specks (achene) on the strawberries with tiny straight stitches.
Make the yellow strawberries
Make a few half-ripe strawberries. Note: these strawberries do not need any organza circle to cover them. Make running stitch along the edge with a matching thread and us pale yellow fibre to fill the shape. Secure onto your design.

The final detail
Use 7mm silk ribbon no. 104 (palest grey and white) and make the strawberry blossoms in ribbon stitch, working from the centre outwards. With yellow thread, make small French knots in the centre, wrapping the thread three times around your needle.
Use 4mm ribbon no. 24 (green) and make the stems in twisted straight stitch and calyxes in ribbon stitch, as you did before.

add more leaves if you like...

Trace the leaf shapes onto the 25mm organza ribbon no. 139. Cut out and prepare as you did before. Secure between the strawberries as you prefer, allowing the tips and edges to be lifted up off the surface. Add more organza leaves along the outer edge of design — these leaves help to create interesting shadows. Insert a bit of brown fibre between the strawberries for dark shadows.

Use a cotton earbud and dip in in water. Wet the areas where there are any blue lines to remove the marks.
The side view...

For detailed step-by-step instructions, refer to the book Little Flowers by Di van Niekerk and Marina Zherdeva
Get regular newsletters packed with tips, specials and new products!
Copyright © DI VAN NIEKERK. ALL RIGHTS RESERVED.
Added to cart successfully!

Leave a comment