
# Type at least 1 character to search # Hit enter to search or ESC to close
Cart


.
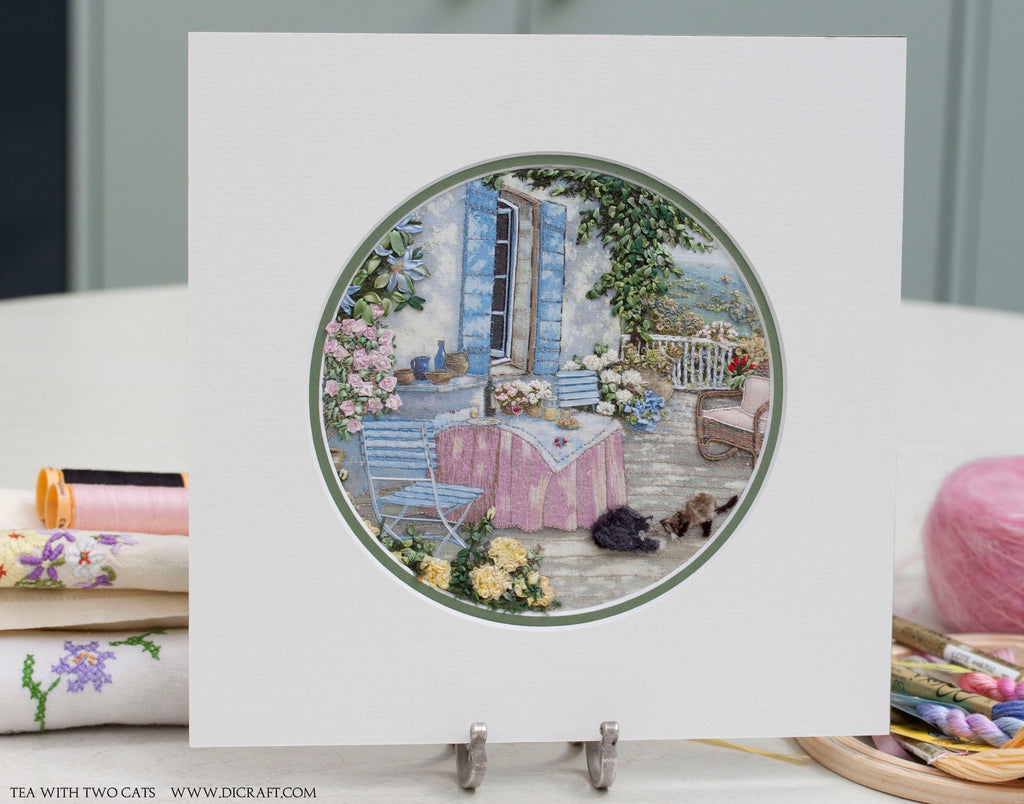
See the yellow roses in this lovely design?
Creating large, fluffy roses with silk ribbon is an exquisite and enjoyable craft that can add a touch of elegance to any project. Whether you are embellishing clothing, creating home decor, or designing accessories, these roses are sure to impress.
This is one of our beautiful kits embroidered for us by Karen Nell from Sedgefield on the Garden Route in South Africa. Here is a short tutorial to help you make your own stunning silk ribbon roses.
.

.
FLUFFY YELLOW ROSES
.
With a matching yellow thread, gather a length of yellow ribbon along one long edge. Here we used 2mm ribbon no. 55 but you can use 4mm, 7mm or 13mm ribbon depending on the size of the rose you are creating.
Starting in the centre of the rose, with the same yellow thread, stitch the gathered ribbon in place to create a fluffy rose. Work in a circular pattern. The stitches are almost invisible.
Secure the raw edge or edges between the folds. Keep adding more gathered ribbon until you are happy with the shape.
.I'll show you how to make the buds and the leaves...
BUDS
Make a stem for each bud in two strands of thread and stem stitch. Create little yellow buds by placing two ribbon stitches side by side in yellow ribbon. With green thread, make a fly stitch around the bud and a central straight stitch in for the sepals.
LEAVES
With ribbon stitches, add leaves with green ribbon. Here we used 2mm ribbon no. 33 and no. 126 but you could use a wider ribbon for larger roses. Stitch between the roses and add leaves along the stem of the bud, working from the stem outwards.
ADD MORE TEXTURE
Add more texture between the leaves. Use 1 or two strands of green thread and make two-wrap French Knots and for a fluffy texture, make Single Knotted Stitches
Finally, with the green ribbon, add five sepals to the rose on the lower right with ribbon stitches, working from the centre out or from the outside to the centre. Finish with a French knot on top.

.
I hope you enjoyed this little tutorial, and today we have put this gorgeous kit on special while stocks last.
We have also added Box 13 – Lisianthus and Lavender on special. I will show a section about this lovely piece next time.
Enjoy your weekend, we have a long weekend in South Africa. I was going to hike in the mountains today but there is a huge fire burning in Silvermine that is spreading at an alarming pace because of the wind and evacuations are already happening now as I write this post. It’s so sad when this happens as it’s always the creatures who live on our mountain that suffer the most.
.

.

.

.

.
Get regular newsletters packed with tips, specials and new products!
Copyright © DI VAN NIEKERK. ALL RIGHTS RESERVED.
Added to cart successfully!

Leave a comment