
# Type at least 1 character to search # Hit enter to search or ESC to close
Cart


 For this project, I purchased a journal-like book with a hard cover which is 15 cm x 18 cm (6 x 7.2 inches) in size. To make a smaller or larger journal, adjust the pattern and ribbons accordingly.
This beautiful journal cover is not difficult to make, and is the ideal handmade gift for a special occasion: make it for a special child’s 21st birthday; for a wedding gift for a good friend; for a mum that is moving into a retirement home, or for a daughter who will be graduating and starting a new chapter in her life. Maybe a friend is going through a difficult stage in her life, this journal is ideal for her too.
Whatever the occasion, this journal is sure to become a treasured gift. Depending on how much time you have, embroider just the flowers and words for a faster project, or embellish it as shown in the photograph. Enjoy!
For this project, I purchased a journal-like book with a hard cover which is 15 cm x 18 cm (6 x 7.2 inches) in size. To make a smaller or larger journal, adjust the pattern and ribbons accordingly.
This beautiful journal cover is not difficult to make, and is the ideal handmade gift for a special occasion: make it for a special child’s 21st birthday; for a wedding gift for a good friend; for a mum that is moving into a retirement home, or for a daughter who will be graduating and starting a new chapter in her life. Maybe a friend is going through a difficult stage in her life, this journal is ideal for her too.
Whatever the occasion, this journal is sure to become a treasured gift. Depending on how much time you have, embroider just the flowers and words for a faster project, or embellish it as shown in the photograph. Enjoy!
 Note: the pre-printed “Love Life” panel, is available for order here from my website...
OR you can download, print and trace the pattern onto the fabric from here.
Note: Please be patient while the page loads.
It is a large file so you will be able to make a good print.
[download id="197"]
1. Start on the pre-printed Love Life panel
OR use a white, pure cotton fabric, 41cm (16.5”) square and trace the black and white pattern which you have downloaded and printed from this page [download id="197"]. Use a blue water-erasable pen and neatly trace the flower shapes (Hollyhocks), the words and the outline of the journal cover (including the centre lines)
Hint: Use a ruler to draw these lines as neatly as possible to ensure a perfect finish.
2. Place the design, right side up, on top of the backing fabric. Insert both layers in a 12" (30.48 cm) hoop so that the front part of the cover is centred in the hoop. Tighten the hoop halfway. Pull both layers as taut as a drum, ensuring the outlines are not distorted. Tighten the hoop; roll up the four corners and pin or tack in place—this prevents the corners from getting in the way as you work. The back part of the cover (which is rolled up) will be ironed later.
Make the Letters
Note: the pre-printed “Love Life” panel, is available for order here from my website...
OR you can download, print and trace the pattern onto the fabric from here.
Note: Please be patient while the page loads.
It is a large file so you will be able to make a good print.
[download id="197"]
1. Start on the pre-printed Love Life panel
OR use a white, pure cotton fabric, 41cm (16.5”) square and trace the black and white pattern which you have downloaded and printed from this page [download id="197"]. Use a blue water-erasable pen and neatly trace the flower shapes (Hollyhocks), the words and the outline of the journal cover (including the centre lines)
Hint: Use a ruler to draw these lines as neatly as possible to ensure a perfect finish.
2. Place the design, right side up, on top of the backing fabric. Insert both layers in a 12" (30.48 cm) hoop so that the front part of the cover is centred in the hoop. Tighten the hoop halfway. Pull both layers as taut as a drum, ensuring the outlines are not distorted. Tighten the hoop; roll up the four corners and pin or tack in place—this prevents the corners from getting in the way as you work. The back part of the cover (which is rolled up) will be ironed later.
Make the Letters

 Complete the words

 Hints:
If you are not happy with the wrapped letter, repeat the process, working in the same direction, to create an even texture.
Where there is a gap, be sure to end off before starting the next letter. The ribbon does tend to show through if you “jump” to the next section across a white patch. Secure the tails underneath the embroidered letter with the green thread and tiny stitches.
Hints:
If you are not happy with the wrapped letter, repeat the process, working in the same direction, to create an even texture.
Where there is a gap, be sure to end off before starting the next letter. The ribbon does tend to show through if you “jump” to the next section across a white patch. Secure the tails underneath the embroidered letter with the green thread and tiny stitches.
 b) Start at the base and work upwards, making long stitches, twirling (twisting) the ribbon for a finer, raised stem. Take the needle to the back at the tip of the flower.
c) Pull the ribbon quite taut and untwist the ribbon before bringing it to the front of the work—this prevents loops from forming at the back.
d) Gently pull the ribbon (once it is at the front of the work) so that the stem is not too slack on the design.
b) Start at the base and work upwards, making long stitches, twirling (twisting) the ribbon for a finer, raised stem. Take the needle to the back at the tip of the flower.
c) Pull the ribbon quite taut and untwist the ribbon before bringing it to the front of the work—this prevents loops from forming at the back.
d) Gently pull the ribbon (once it is at the front of the work) so that the stem is not too slack on the design.

 a) Form the small green buds on the tip of the stems. Use the same colour green ribbon and make French Knots (2 or 3 wraps) to form the buds.
b) Make the small leaves: Use Ribbon stitch or Detached Chain Stitch.
c) Make the large leaves: Change to the wider ribbon, 7mm silk no. 119. and make the larger leaves with Ribbon Stitch.
Hints: Work over a spare large needle to raise the stitches off the design. A large tapestry needle (size 13) works well or use the blunt end of a size 18 chenille needle or a kebab stick.
Overlap some leaves as shown above to form the broad, lobed leaves.
Use 1 strand of the soft green thread and make tiny Stab Stitches at the tip and the base of the large leaves to secure them in place. This will prevent the ribbon from pulling out of shape with wear and tear of the journal.
d) Use 2 strands of the green thread and Couch the stem in place every 2 cm (3/4”) to anchor the stems in place. Use a gentle tension so as not to flatten the ribbon.
e) If any lines are still visible on the design, use the same green thread (two strands) to add extra stems alongside the ribbon stems. Make long Straight Stitches to form the stems and Couch in place with the same colour thread, if necessary.
f) Use slanted couching stitches at the base of the stems for an interesting texture.
Embroider the cross on the top right-hand side of the design
Click on the images to enlarge
a) Form the small green buds on the tip of the stems. Use the same colour green ribbon and make French Knots (2 or 3 wraps) to form the buds.
b) Make the small leaves: Use Ribbon stitch or Detached Chain Stitch.
c) Make the large leaves: Change to the wider ribbon, 7mm silk no. 119. and make the larger leaves with Ribbon Stitch.
Hints: Work over a spare large needle to raise the stitches off the design. A large tapestry needle (size 13) works well or use the blunt end of a size 18 chenille needle or a kebab stick.
Overlap some leaves as shown above to form the broad, lobed leaves.
Use 1 strand of the soft green thread and make tiny Stab Stitches at the tip and the base of the large leaves to secure them in place. This will prevent the ribbon from pulling out of shape with wear and tear of the journal.
d) Use 2 strands of the green thread and Couch the stem in place every 2 cm (3/4”) to anchor the stems in place. Use a gentle tension so as not to flatten the ribbon.
e) If any lines are still visible on the design, use the same green thread (two strands) to add extra stems alongside the ribbon stems. Make long Straight Stitches to form the stems and Couch in place with the same colour thread, if necessary.
f) Use slanted couching stitches at the base of the stems for an interesting texture.
Embroider the cross on the top right-hand side of the design
Click on the images to enlarge
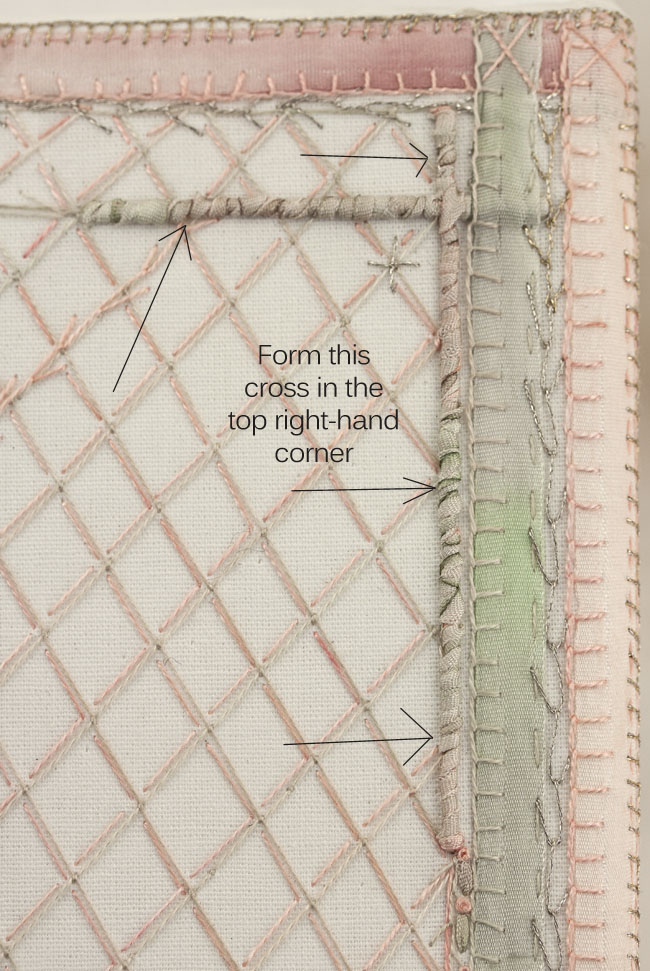
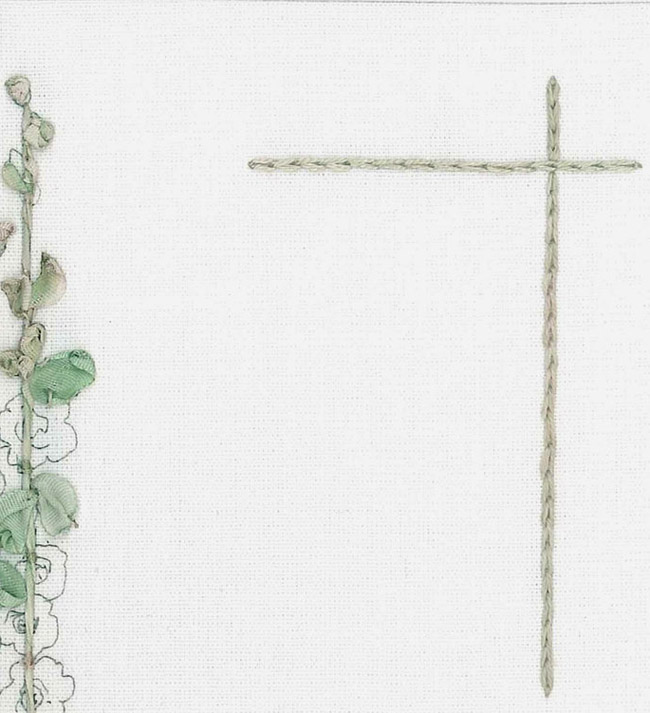 a) Use 2 strands of the green thread and Chain Stitch to cover the lines of this cross on the fabric.
b) Use Whipped Chain Stitch and wrap the chain with the same colour no. 120 ribbon, as you did before.
Repeat the process, wrapping them again, if you prefer a higher relief.
Click on the image to enlarge
a) Use 2 strands of the green thread and Chain Stitch to cover the lines of this cross on the fabric.
b) Use Whipped Chain Stitch and wrap the chain with the same colour no. 120 ribbon, as you did before.
Repeat the process, wrapping them again, if you prefer a higher relief.
Click on the image to enlarge
 The larger Hollyhock flowers are made separately and then attached onto the design.
Use the 7mm no. 115 for the darker peach flowers and the no. 102 for the pale pink ones.
Cut a length of ribbon 5 to 8 cm (2 to 3.2”) long.
Hint: Vary the lengths of the flowers for a more interesting effect—the smaller, more open flowers are 5 cm (2”) long, the medium size flowers are between 6 or 7 cm (2.4”) and the large, frilly flowers are 8 cm (3.2”) in length.
Use the gathered flower technique to make the flowers as shown below.
Click on the image to enlarge
The larger Hollyhock flowers are made separately and then attached onto the design.
Use the 7mm no. 115 for the darker peach flowers and the no. 102 for the pale pink ones.
Cut a length of ribbon 5 to 8 cm (2 to 3.2”) long.
Hint: Vary the lengths of the flowers for a more interesting effect—the smaller, more open flowers are 5 cm (2”) long, the medium size flowers are between 6 or 7 cm (2.4”) and the large, frilly flowers are 8 cm (3.2”) in length.
Use the gathered flower technique to make the flowers as shown below.
Click on the image to enlarge


 Hint: for a quicker gift, there is no need to add all the details below. Skip them and follow steps towards the end of this tutorial to cover the journal. To add the blocks and other detail as shown, follow the steps below.
Form the straight lines first with long Straight Stitches
Use a 1 metre length of the Soft Green cotton thread (one strand) and make a knot at the long end. Come up at the bottom right hand corner; Measure a long Straight Stitch to find the line up to the second last flower of the Hollyhock on the right – refer to the completed design above.
Holding the thread in place as a guide, make a small dot with a sharp pencil at the e and v and the Hollyhock. Insert the needle to the back at the e, come up again beneath the v; do the same for the v; make a long straight stitch again inserting the needle to the back at the Hollyhock.
Take needle to the back and come up 1 centimetre (3/8”) above the first line and make a second line as before, pulling the thread taut as you work to form a straight line. Do the same for the third and remaining lines and remember to pull the thread taut each time.
End off at the back, pulling the thread taut as you work. Re-thread with a metre long thread and continue as before. Work the thread in the opposite direction and form the criss-cross pattern.
Hint: Use the green thread on the right-hand side of the Hollyhocks. On the left-hand side of the Hollyhocks, use the green thread criss-crossed with the Gold Metallic thread in the opposite direction, Pull the threads taut each time to form straight lines—all of them about 1 cm (3/8”) apart.
Hint: for a quicker gift, there is no need to add all the details below. Skip them and follow steps towards the end of this tutorial to cover the journal. To add the blocks and other detail as shown, follow the steps below.
Form the straight lines first with long Straight Stitches
Use a 1 metre length of the Soft Green cotton thread (one strand) and make a knot at the long end. Come up at the bottom right hand corner; Measure a long Straight Stitch to find the line up to the second last flower of the Hollyhock on the right – refer to the completed design above.
Holding the thread in place as a guide, make a small dot with a sharp pencil at the e and v and the Hollyhock. Insert the needle to the back at the e, come up again beneath the v; do the same for the v; make a long straight stitch again inserting the needle to the back at the Hollyhock.
Take needle to the back and come up 1 centimetre (3/8”) above the first line and make a second line as before, pulling the thread taut as you work to form a straight line. Do the same for the third and remaining lines and remember to pull the thread taut each time.
End off at the back, pulling the thread taut as you work. Re-thread with a metre long thread and continue as before. Work the thread in the opposite direction and form the criss-cross pattern.
Hint: Use the green thread on the right-hand side of the Hollyhocks. On the left-hand side of the Hollyhocks, use the green thread criss-crossed with the Gold Metallic thread in the opposite direction, Pull the threads taut each time to form straight lines—all of them about 1 cm (3/8”) apart.
 Thread up with 1 strand of Salmon Pink thread and refer to picture above.
Make short Straight Stitches at each block to add the pink detail.
Note: the pink stitches are only added on the right-hand side of the Hollyhocks. See picture below.
Thread up with 1 strand of Salmon Pink thread and refer to picture above.
Make short Straight Stitches at each block to add the pink detail.
Note: the pink stitches are only added on the right-hand side of the Hollyhocks. See picture below.

 Use the Salmon Pink thread and Feather Stitches to add the feather-like detail along some of the straight lines.
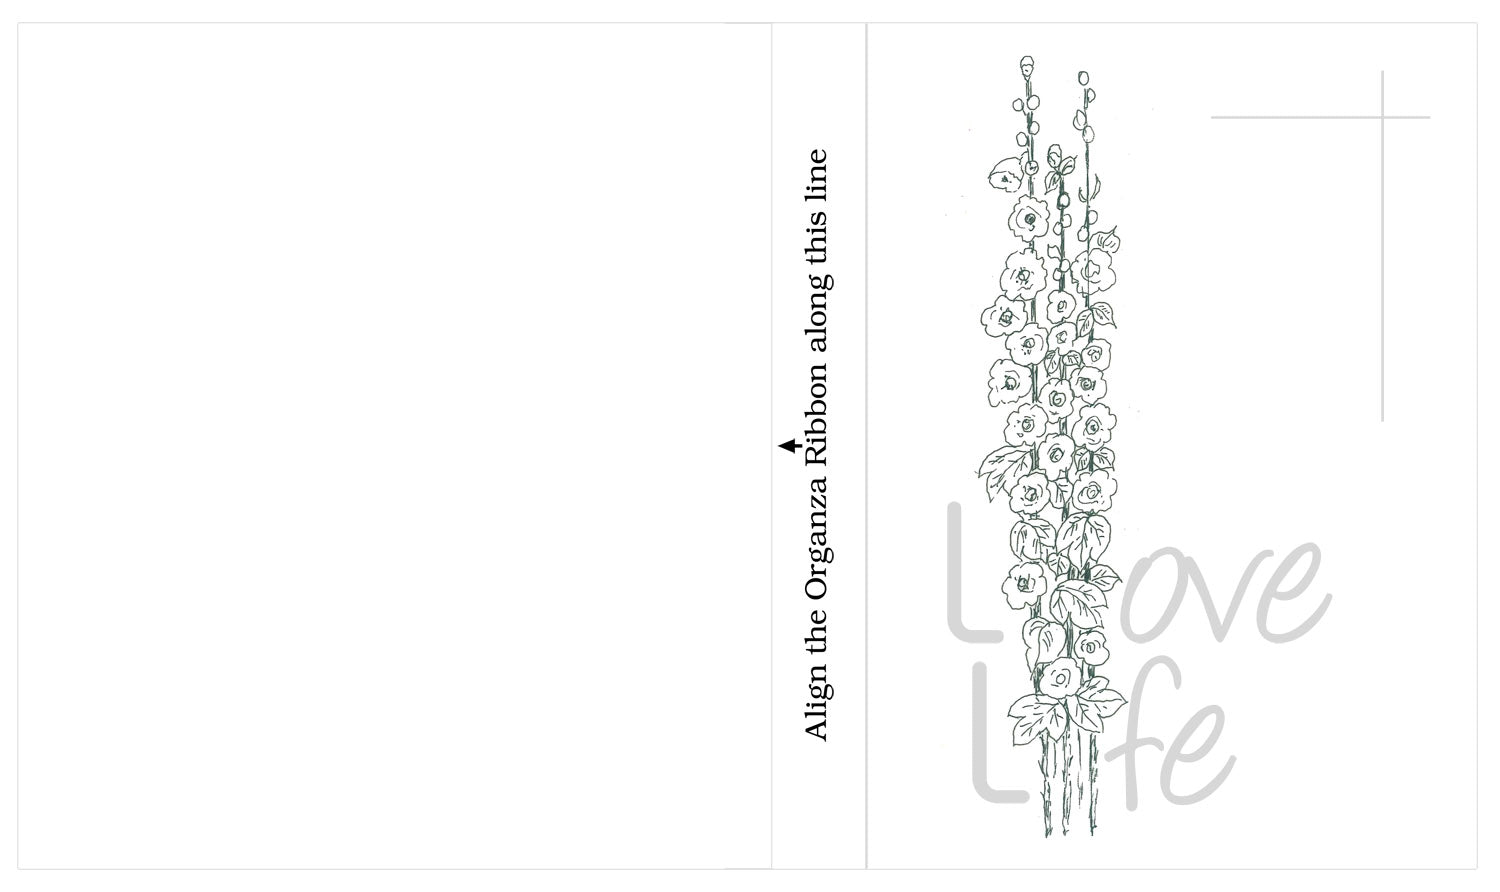 Use a 20 cm (8”) length of wide 15mm organza ribbon no. 115.
The ribbon should be flat and lined up on the left-hand edge (first line) of the design.
Allow the excess ribbon and the raw edges to overlap the design.
Note: These tails will be cut a little later.
Use the Salmon Pink thread (one strand) and Back Stitch along the edges to secure the ribbon in place.
Use a 20 cm (8”) length of wide 15mm organza ribbon no. 115.
The ribbon should be flat and lined up on the left-hand edge (first line) of the design.
Allow the excess ribbon and the raw edges to overlap the design.
Note: These tails will be cut a little later.
Use the Salmon Pink thread (one strand) and Back Stitch along the edges to secure the ribbon in place.
 Click on the image to enlarge
 Use 1 strand of Soft Green thread and Blanket Stitch along the outer edge of the organza ribbon.
See picture above.
Use the Silver Metallic Thread and Fly Stitch on the inside edge of the organza ribbon.
See picture on the left.
Left-hand border of the journal
Use the same Silver Metallic thread and make a row of Chain Stitches (a short distance away from the Feather Stitches) and add diagonal Straight Stitches between the Feather and Chain stitches for an interesting texture.
Stitch along the printed grey or blue line in Stem or Back Stitch in one strand of the Salmon Pink thread.
Use 1 strand of Soft Green thread and Blanket Stitch along the outer edge of the organza ribbon.
See picture above.
Use the Silver Metallic Thread and Fly Stitch on the inside edge of the organza ribbon.
See picture on the left.
Left-hand border of the journal
Use the same Silver Metallic thread and make a row of Chain Stitches (a short distance away from the Feather Stitches) and add diagonal Straight Stitches between the Feather and Chain stitches for an interesting texture.
Stitch along the printed grey or blue line in Stem or Back Stitch in one strand of the Salmon Pink thread.
 Cut two x 18 cm (7.2”) lengths of the 7mm no. 102.
Place the ribbon just below the outer line at the bottom and the top of the design, lining them up with the straight lines.
Pin in place along the two tails and use the Salmon Pink thread (one strand) and Back Stitch or Running Stitch to secure the ribbon onto the design along both edges.
Cut two x 18 cm (7.2”) lengths of the 7mm no. 102.
Place the ribbon just below the outer line at the bottom and the top of the design, lining them up with the straight lines.
Pin in place along the two tails and use the Salmon Pink thread (one strand) and Back Stitch or Running Stitch to secure the ribbon onto the design along both edges.
 f) Change to Silver Metallic thread and make a row of Blanket Stitches on top of the green couched threads.
g) Change to the Gold Metallic thread and use a Blanket Stitch to work along the outer edges of both the top and bottom ribbons.
h) Refer to fig above and use the Silver Metallic thread and Feather Stitch along the inner edge of the top ribbon
i) Use one strand of green thread and work a row of Feather Stitch from the wrapped cross on the top right of the design towards the Hollyhocks and to the edge of the organza ribbon.
f) Change to Silver Metallic thread and make a row of Blanket Stitches on top of the green couched threads.
g) Change to the Gold Metallic thread and use a Blanket Stitch to work along the outer edges of both the top and bottom ribbons.
h) Refer to fig above and use the Silver Metallic thread and Feather Stitch along the inner edge of the top ribbon
i) Use one strand of green thread and work a row of Feather Stitch from the wrapped cross on the top right of the design towards the Hollyhocks and to the edge of the organza ribbon.
 a) Use 20 cm (8”) lengths of 7mm ribbons: no. 119 green and no. 115 pink. Secure as you did before. Use Running Stitch in matching thread along the edges to secure the ribbon.
b) The green ribbon is edged in Blanket Stitch on the left-hand side with green thread. Use Feather Stitch with Silver Metallic thread on the right-hand side.
c) The pink ribbon is edged in Blanket Stitch on the left-hand side with Salmon Pink thread and on the right-hand edge use Blanket Stitch with the Gold Metallic thread. Make the stitches a little longer so they will cover the edge of the ribbon at the same time.
f) Make a row of Feather Stitch in one strand of Salmon Pink thread; work from the wrapped cross downwards to the bottom of the design.
g) Make a row of Running Stitches alongside: use the 4mm (no. 120) silk ribbon.
h) Add French Knots (two-wraps) between the stitches in one strand of the Salmon Pink thread.
a) Use 20 cm (8”) lengths of 7mm ribbons: no. 119 green and no. 115 pink. Secure as you did before. Use Running Stitch in matching thread along the edges to secure the ribbon.
b) The green ribbon is edged in Blanket Stitch on the left-hand side with green thread. Use Feather Stitch with Silver Metallic thread on the right-hand side.
c) The pink ribbon is edged in Blanket Stitch on the left-hand side with Salmon Pink thread and on the right-hand edge use Blanket Stitch with the Gold Metallic thread. Make the stitches a little longer so they will cover the edge of the ribbon at the same time.
f) Make a row of Feather Stitch in one strand of Salmon Pink thread; work from the wrapped cross downwards to the bottom of the design.
g) Make a row of Running Stitches alongside: use the 4mm (no. 120) silk ribbon.
h) Add French Knots (two-wraps) between the stitches in one strand of the Salmon Pink thread.
 Hint: align the edge of the design with the journal and glue the front short seam first. Use masking tape to hold the glued seam in place. Close the book and press flat. Allow to dry for a few minutes.
e) Do the same for the back of the journal, stretching the fabric layers slightly for a neat finish. Tape the glued seam in place. Close the book and press flat, allow a few minutes for the seam to dry.
Hint: do not worry about the glue messing on the first and last pages -these pages will be glued down in the next step to hide the seams.
Hint: align the edge of the design with the journal and glue the front short seam first. Use masking tape to hold the glued seam in place. Close the book and press flat. Allow to dry for a few minutes.
e) Do the same for the back of the journal, stretching the fabric layers slightly for a neat finish. Tape the glued seam in place. Close the book and press flat, allow a few minutes for the seam to dry.
Hint: do not worry about the glue messing on the first and last pages -these pages will be glued down in the next step to hide the seams.

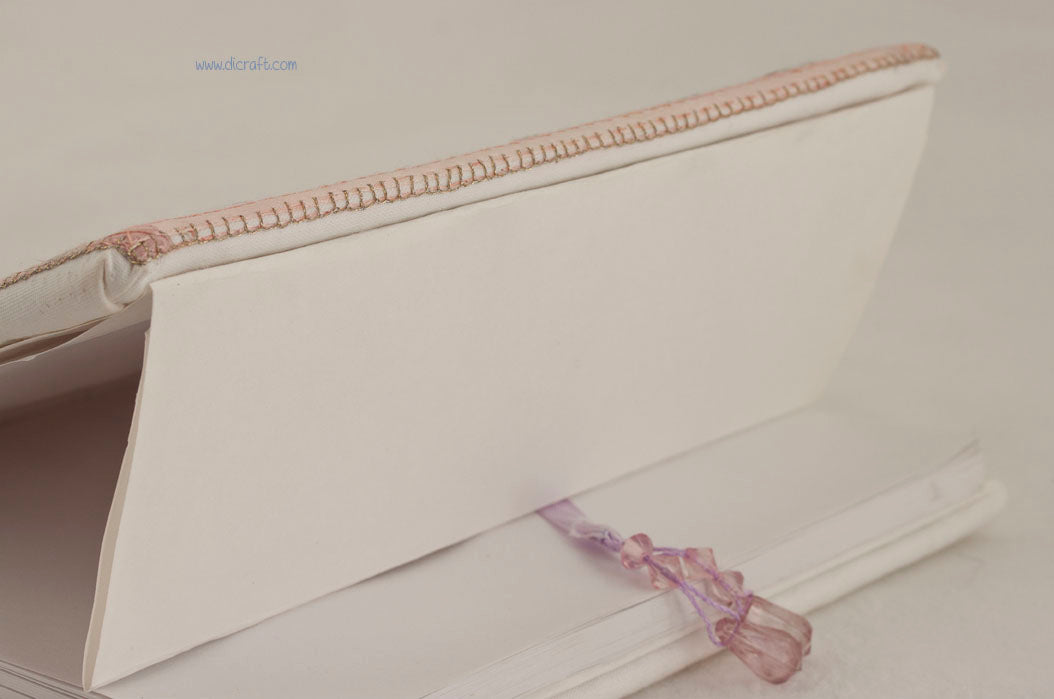
 f) Glue the top and the bottom seams in place, folding neat corners, as you would do for a school book. Glue the front and back pages over the seams, ensuring that the book opens flat as you glue. Cut two pages a little smaller from sketch paper or a nice scrapbook paper. Glue in place.
Hint: cut the paper wider than the front and back page, fold the paper along outer edge of the journal to form a flap that will serve as a bookmark. Or use leftover ribbon and add two or three beads on the one end. Glue other end in place inside the spine to form a ribbon bookmark.
f) Glue the top and the bottom seams in place, folding neat corners, as you would do for a school book. Glue the front and back pages over the seams, ensuring that the book opens flat as you glue. Cut two pages a little smaller from sketch paper or a nice scrapbook paper. Glue in place.
Hint: cut the paper wider than the front and back page, fold the paper along outer edge of the journal to form a flap that will serve as a bookmark. Or use leftover ribbon and add two or three beads on the one end. Glue other end in place inside the spine to form a ribbon bookmark.
 I hope that you enjoyed this project as much as I did.
You are welcome to subscribe for free to keep up to date with new tutorials and news releases.
'Till next time
Happy Stitching!
Love
Di
I hope that you enjoyed this project as much as I did.
You are welcome to subscribe for free to keep up to date with new tutorials and news releases.
'Till next time
Happy Stitching!
Love
Di


Leave a comment